Okay, I did it again. I got another game in today. It was fun, but not as fun as the first two, but it was my fault. I shall explain...
Situation: The battalion has been engaged heavily in street fighting in the town of Francaisville. Tomorrow's attack will kick off at sunrise, which is 0615. Your company is in the lead, and your understrength platoon is charged with eliminating a German heavy machine gun position at grid reference XY 123456. Your platoon will infiltrate to its jump off positions under the cover of darkness, and your attack will be preceded by a 10-minute brigade stonk.
BOOM, BOOM, BOOM! "Sir, the artillery looks to be falling a bit long, Sir." "Yes, well, we'll just have to make the best of it Charlie."
I gave the Brits a command group with a Lieutenant, a Platoon Sergeant (both +2 to command rolls), a 2" mortar, a Vickers machine gun team, and a PIAT team; two rifle groups (NCO, Sten, and three rifles each), a Bren Group (NCO, Bren gunner, A-gunner, and two rifles), and an assault group (NCO, flamethrower, combat engineer, and two rifles). (28 men total)
I gave the Germans a Heavy Machine Gun (HMG) team of gunner (w/MG-42 on a tripod), A-gunner, and two rifles, two small rifle groups (NCO and two rifles, SMG and two rifles), and a LMG team (NCO, MG-42 (bipod) gunner, and A-gunner. (13 men total)
Since the HMG position was known (or at least suspected), I started it on the table, on Overwatch. The other three teams I put on blinds, with three dummy blinds. For every turn the HMG was not going to move, I put it on automatic Overwatch (instead of activating on a card).


Let me preface by stating there were a lot of forces on the table, so I will be summarizing a bit, where appropriate.
Turn 1: 1st team (far left) sprinted up to the first bldg, uncovered a dummy blind. 2nd team held fast, and there wasn't anything for the mortar or MG to do, so I skipped to the far right where 4th team sprinted up to some ruins, uncovering one of the German rifle teams (MP-40 and two rifles) in the second story of the big bldg next to them. Some fire was exchanged but, due to some extraordinarily atrocious die-rolling, nothing came of it. 3rd team moved up to the outside of the bldg the Germans were occupying. This uncovered the other German rifle team in the center (NCO and two rifles). Thus ended the turn. Kind of anti-climactic, but no sweat. I decided the Germans needed to know where all their guys were and so I put them all on the table and put all their cards in the deck. I don't have any pics because I had to do something for the wife and when I came back I forgot about it and moved on to the next turn...
Turn 2: 4th team (far right) exchanged fire with the Germans on the second floor adjacent to them, with no real effect (the German SMG was pinned but quickly overcame it). 3rd team moved into the first floor of the German-occupied building, again exchanging some ineffective fire. I should say 3rd team minus the flamethrower, who failed his command roll. The 3rd team NCO stayed with him while the Lt went inside. When I put all the Germans on the table it ended up placing the German LMG directly ahead of 4th team on the far right; the German LMG opened up on 4th team, pinning a couple guys. The German NCO left his two rifleman, sprinting to his left (towards the building with the other German rifle team, on the second floor), and it was just in time to, because the Vickers opened up and mowed down the two rifles in the house he just left. The German HMG responded by lighting up the Vickers, pinning the gunner and killing the A-gunner.
Via some great command rolls, all of 1st team (far left) ends up sprinting up into another building. 2nd team tries this too, but the Bren team fails and so the NCO stays with them (while the two rifles moved up). About this time the 2" mortar drops smoke in front of the German HMG, perfectly (I use a D12 for clock-face deviation with a D6 to determine how many cm it's off target. Then I roll a D6 and place it next to the smoke; that's how many turns the screen will last). Seeing this, the German HMG team decides it needs to displace next turn, and one of its rifleman sprints to the building to its left to scout the place out. That's the end of the turn; I put a card in the deck for the HMG because it needs to move next turn.


Turn 3: On the ground floor of the contested building, 3rd section's Engineer lobs a grenade into the next room, killing the German rifleman and pinning the MP-40. I was going to charge into close combat but everyone in 3rd section kept failing their command rolls... Finally, 3rd section's Private Broccoley decides he's man enough for the job and he rushes in and sticks his bayonet in the German submachine gunner. The PIAT gunner runs upstairs and pins the remaining German rifleman.
The German LMG team cuts loose on 4th section, killing the Sten gunner and pinning a rifleman. The German HMG team hauls butt over to its new position. The other HMG team rifleman is still in the original position and, having nothing better to do, takes a shot at the Vickers gunner and.... kills him. That shouldn't have happened and was completely my fault...
The mortar tries to drop smoke on the German LMG, and gets it close, but not great. 1st section again sprinted up the left side, minus one malingerer, and 2nd section couldn't really get anything done as the Bren team was having a brew.


Turn 4: German HMG goes back on automatic Overawatch (no card). The mortar drops some more smoke to cover 1st sections advance on the German HMG team, but it's off the mark. Now I have a dilemma; do I wait, or do I go for the cover of the building, or do I go for the cover of the smoke? Well, 2nd section finally get their butts in gear and move up; of course, that's when the German HMG went to work and laid two of the riflemen down. 1st section saw that and refused to move an inch. Dilemma solved...
In the contested house, the Lt heads upstairs to get things moving into close combat, but PIAT assistant tells him to shove it. Quite surprisingly, the PIAT gunner charges in and sticks the German. The house is no longer contested. The flamethrower FINALLY gets off his a$$ and moves up into the house (now that it's nice and safe), and the German NCO pins him. Then the German LMG killed one and pinned one in 4th section, and the LMG NCO kills another one. Owwiieee... 3rd section's Engineer, the one that so valiantly moved up and tossed the grenade on the two Krauts on the first floor, decides he can't take watching his mates in 4th section get eaten up by the German LMG anymore, and so he takes off and charges up to the smoke just in front of the LMG! Then a fellow 3rd section rifleman followed him. Seeing all this, the 4th section NCO and a rifleman ran up there too. What the hell's gotten into these lads? (Don't ask me what I was thinking when I charged that engineer up there; but when he made it, I started trying with other guys, and they all made it to. I'm thinking this is fantastic, I'm gonna pop a grenade right in the laps of that LMG team. You could think that, but you'd be wrong).


Turn 5: There's a card in the deck for the German HMG team as it's decided to displace again (to the left to face 3rd and 4th section. Perhaps not the best thing to do, but what my Course of Action Decision Maker Thingy/Matrix told me to do. I stuck with it because it's not a terrible idea). I found myself actually hoping for a German card to come out so I could give the German LMG team the chance to make a decision as to whether they wanted to run or shoot it out. Alas, of course, it was a Brit card, so here comes my engineer with a grenade. But he's nervous looking down the barrel of an MG42 and can't seem to find the handle (fail). The Tommy next to him does, but he slept funny last night and got a crick in his neck, so when he throws he feels a sharp stab of pain and almost drops it, but manages to get it to roll a few feet and not hurt anybody... Next guy fails, and then the NCO fails. That's right, 4 Brit cards in a row, fail, screwed up the toss, fail, fail! Inconceivable!!! Another Brit card comes, so the Lt takes a shot at the German NCO in the ruins, but misses. The German NCO chucks a grenade at a second story window and hauls butt back towards the building the HMG team is in. The grenade hits the wall and falls to the earth, exploding harmlessly. The PIAT gunner takes a crack at the fleeing NCO, misses. The flamethrower sprints up into the house just vacated by the retreating German NCO, and Broccoley decides he should check with the Lt before doing anything rash.
The German HMG team displaces (stays in the same bldg but gets into position for a field of fire encompassing 3rd and 4th sections).
And now it's time to pay the piper, right? The LMG A-gunner loads a fresh belt while the gunner licks his thumb and rubs it on the front sight post, Davey Crockett-style. He's got four Brits standing in the open only yards away. Probably fired a whole belt, and all he did was pin the 4th section NCO! Turnabout with bad dice-rolling is fairplay, I suppose... It's really been ridiculous. Having said that, when he got his turn the LMG NCO gunned down the 4th section NCO.
On the left, the Bren team (who has failed more command rolls than I can count) finally gets in the game, engaging the two HMG rifleman (they're in the same house as the HMG team, but in a different room), killing one. 1st section moves most of its guys into the house the HMG team used to be in, and the remaining HMG team rifleman pins the 1st section Sten gunner.


Turn 6: HMG is back on automatic Overwatch. Of course, big on my mind is the LMG situation. My card comes up, the engineer tosses a grenade, and it's short. Two more cards come out, and both his partners fail... Another card for me. The German HMG decides to fire, pinning the flamethrower, PIAT, and Lt. Then I realize, this is the moment I've been waiting for. There can be no other reason the flamethrower has failed so many command rolls, other than the fact I've wanted to use it so much! Now's my big chance. He passes his command roll (unpinning himself) and lets out a stream of flaming napalm that... pins the gunner and kills the A-gunner. I don't mean to sound mad, but it didn't do anything to the NCO, and only pinned the gunner!? Did I mention it's a flamethrower? Anyway, the LMG gunner can't rally, but the LMG NCO guns down another rifleman in front of him while the fleeing NCO sprays MP-40 rounds over his shoulder (re-pinning the flamethrower) while he dashes into the HMG team's bldg. The Lt manages to unpin himself.
On the left there's a lot of ineffectual firing and blown command rolls before the 1st section NCO, Sten, and a rifleman manage to charge into the ground floor of the HMG team's bldg (downstairs from the HMG rifleman and right next door to the recently arrived German NCO).


Turn 7: HMG on Ovewatch, no card, decides to go first, killing PIAT gunner and pinning his assistant. The Lt rushes down to the flamethrower. The German LMG unpins and rolls 4 dice at the flamethrower, airball (two 2's and two 3's). The LMG now has the flamethrower's undivided attention; he rallies and roasts those two Krauts like it's cool. The 3rd section NCO finishes his novel and decides to get in the game, dashing to the recently destroyed LMG position, followed by one of his rifleman. The engineer joins the crowd, but his buddy needs a potty break.
On the left, the Bren can't remember where he put the spare ammo, while the three 1st section guys in the house are not doing well. The Sten gunner fails, then the rifle fails, but the NCO passes, shoots at the German NCO in the next room but rolls a 1, a 2, and 3. One of the 1st section stragglers sprints towards the house but gets pinned by the German HMG rifleman upstairs. To put a fitting ending to the turn, the German NCO on the ground floor (the object of 1st section's attention) tosses a grenade at 1st section, but it bounces back and kills HIM! You have not seen dice rolling like this, I promise.


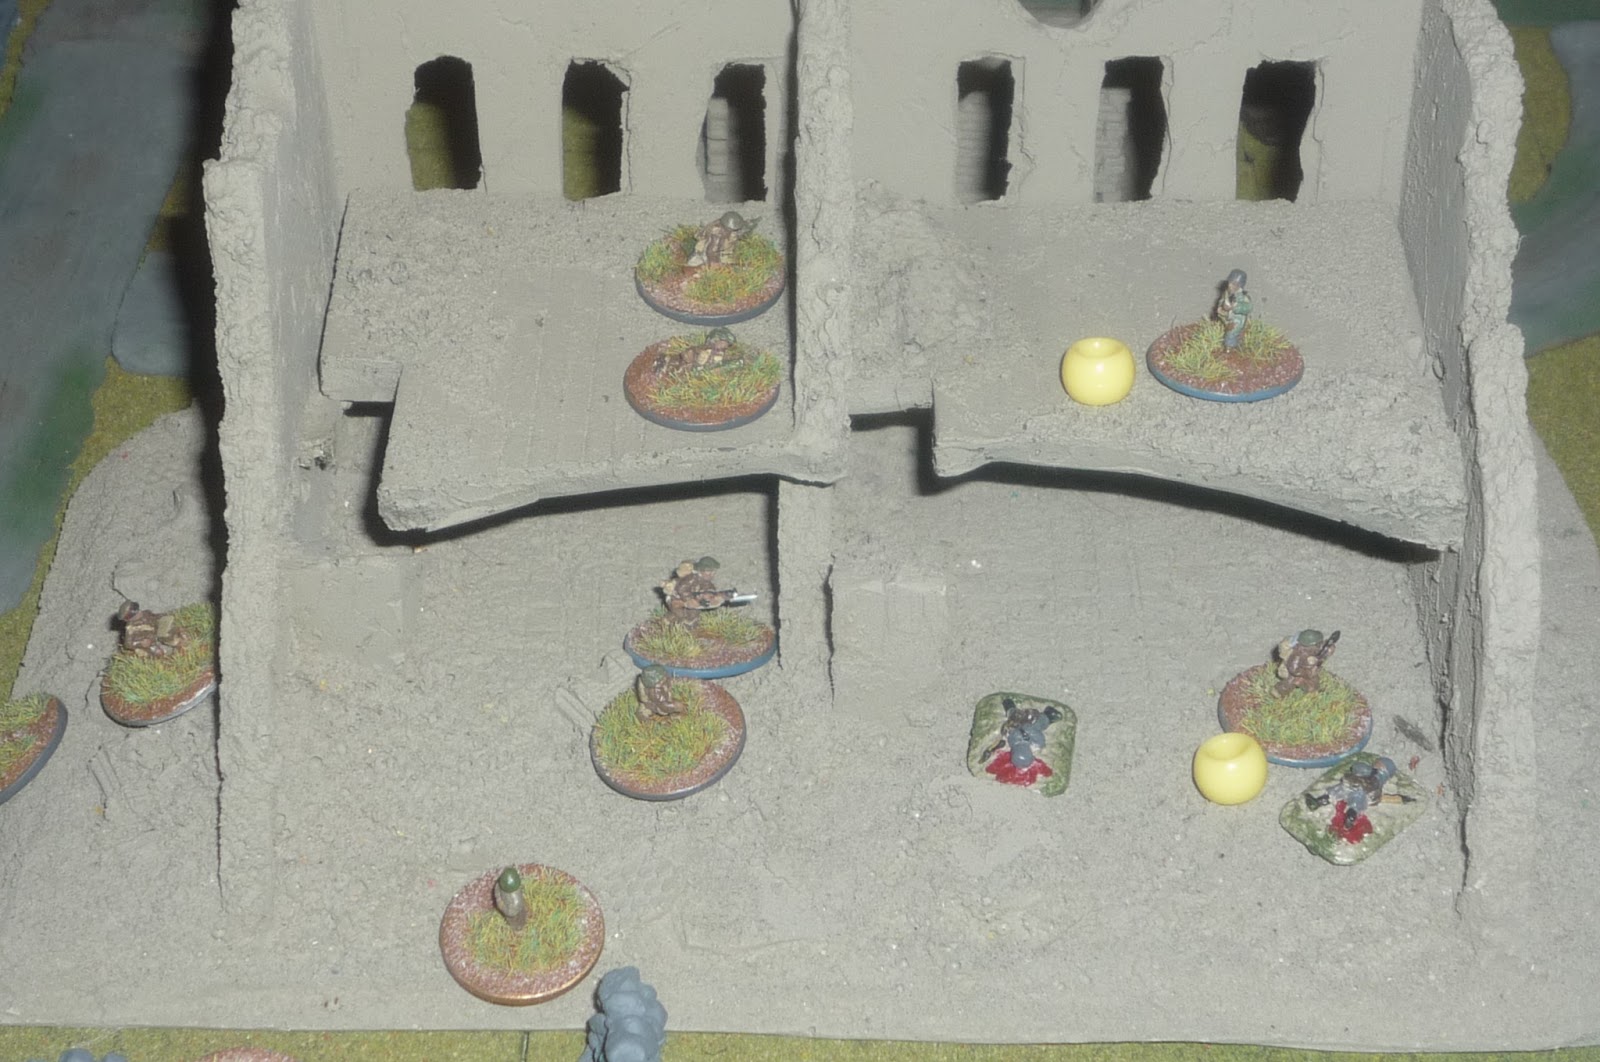
Turn 8: The HMG is on auto-Overwatch, decides to go first. They swing the gun over to put fire on the three knuckleheads on the left creeping next to the wall, and pin two of them (no kills!? Oh, I'm rolling the dice). The HMG rifleman, directly above 1st section in the house, drops a present down the steps for the Brits, but the grenade rolls clean out of the house and explodes harmlessly. The 1st section's NCO orders the Sten to go up there and "give Jerry the what-for," which he promptly does, but it ends badly for him as the German drops him in close combat (I get to try my new close combat rule!). The 1st section NCO looks at the rifleman and nods, and off he goes, whacking the German once he gets there. "You can come on up now, Corporal Sweetie-Pie, the coast is clear." The 1st section NCO dashes up the stairs and sprays the adjacent room with his Sten, not hitting a damned thing. However, several Brits from 3rd and 4th section are able to make their way into the ground floor directly below the HMG team, at which time it's "Kamerad" for the two machine gunners...

This is how it ended.
So let me tell you, this game was a slog. What I mean is, I overloaded it, I had way too many guys. I think this game's sweet spot is about 15 guys fighting about 8 guys. I just had too much stuff going on, and it caused tactical errors. The prime example was the death of the Vickers MG; because there were so many guys, I started compartmentalizing the fight, that is, instead of making the best tactical move when my card came up, I tended to want to 'finish things up' with this unit or location. The Germans had less men and cards, so they were done on the left side when I still had five more guys on the left side. When my cards came out I wanted to finish the left side, but when the German card came out, they didn't have anything left on the left side, so they'd go to the right or the center, and (several times) catch me with my pants down. If I'd have just activated that Vickers I'd have almost certainly have unpinned him (because the Plt Sgt was right there with him), making it impossible for the German rifleman to kill him.
My previous games were quick and crisp, moving pretty quickly. With this one I had to go back and count cards after every single turn to make sure they were right for the next turn (after taking casualties). I'm not dismayed by this as the 15 vs 8 is right where I want it to be for these rules. What I want to do is 'localize' the fight, i.e., take a larger battle (say company size) and reduce it to a series of reinforced squad-level fights. The good news is I've exercised everything in the infantry rules and got all the kinks out. One thing that continues to vex me is the lack of fatalities from MGs, but I think it's me making bad decisions with regards to how I'm splitting the firing dice as opposed to something wrong with the mechanics. For example, a LMG with A-gunner gets 6 firing dice that can be used against any number of enemies in a given area (I use a template). I keep picking three targets and giving them each two dice (which means both dice have to hit and the target has to fail both saves in order to kill him), as opposed to loading up more dice on fewer targets. The few times I do this (typically with submachine guns, who get three dice) I usually end up putting someone down. If there's anything wrong it's not the firing dice, it's the fact it may be too easy to unpin. But with my lousy command rolls and ratcheting up the difficulty level (i.e., it being relatively easy for the enemy to unpin) for solo gaming, I think it's fine where it is. I need to stop trying so hard to pin multiple enemies with my MGs and go for the kills.
I wish I hadn't have gone so big, but it's over and I'm glad I did it (and I won't do it again). Now that the infantry rules are tight, I need to check on how I'm handling vehicles.
V/R,
Jack
Jack


Very nice AAR!!
ReplyDelete