So tonight I had a solo game using my new skirmish rules. They're right up my alley, but there are a couple issues I'll discuss later. The rules are not for WW2, but I went to war with the army I had (I've got a simultaneous big orders in with Pendraken and more Pendraken from The Warstore). So, I dutifully lined up some Brits and Germans for a little Normandy '44 action.
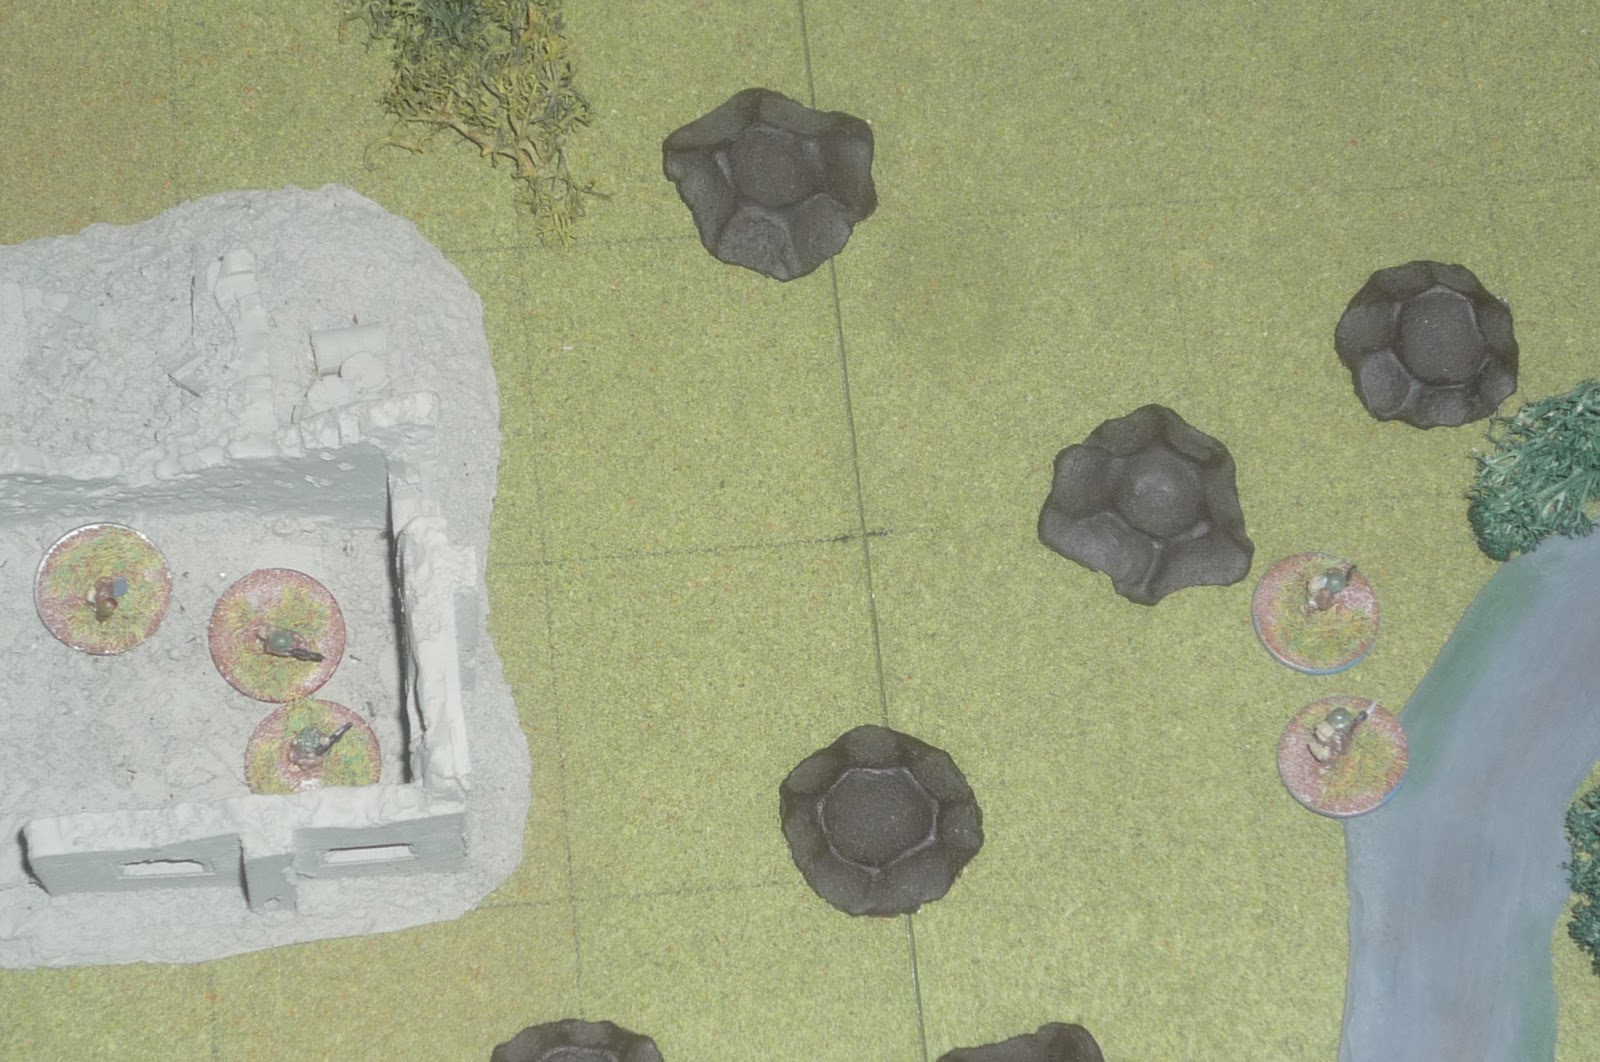
At first I lined up a couple platoons of Brits with a vehicle vs. a platoon of Germans with a vehicle. Mind you, these are 'real' skirmish rules, that is, a man is a man and activates as such. So I quickly scrapped that and went for a sub-battle. That is a British company is making an attack, this platoon is the assault element, and my particular squad is charged with reducing a German machine gun position. So I lined up 10 Brits subdivided into a Bren Group (with a Corporal) and Rifle Group (with a Sergeant). The Germans had a Corporal, a LMG team, and three riflemen serving as pickets. The Germans started off on blinds, with 6 white chips representing the three riflemen and three dummies, with two black chips representing the LMG w/NCO and a dummy position.


I didn't use any spotting rules for the blinds. The way I ran it was they were unspotted until and unless they decided to come off blinds or a Brit moved within about 6 inches of them. They way they decided to come off blinds was the way I decide everything for the bad guys; I come up with three options for them: 1) the most dangerous thing they could do; 2) the most likely thing they would do; or 3) the dumbest thing they could do. So, for example, most dangerous might be hold fire, most likely-fire, and dumbest-charge!, or most dangerous-fire and fall back, most likely-fire, and dumbest-do nothing. I roll 1D10, with 1-3=most dangerous, 4-9=most likely, and 10=dumbest. Also of note is the fact that my rules require my guys to test for orders once bad guys are in sight, while (in an attempt to make the game more balanced for the bad guys) I don't make the bad guys test for orders unless they are pinned. For my tests, there is a bonus if a leader is in close proximity, so, as with many rules, leader placement (my two NCOs) is very important.
The way activation is handled is by card; one per man except teams, which get one for the team (in this game it was only the two LMG teams). When blinds came on the table they got a free action (based on my Course of Action decision maker thingy described above), then for subsequent turns the men operated on cards like mine. The cards are not man specific, that is, the card is either Brit or German, and I decide which man/team to activate.
Turn 1: I started with the Bren Group; the Bren team and a rifleman moved up cautiously, a rifleman moved up a little and ascertained the chip in the house was a dummy, and then (of course) the NCO failed his roll... Then I moved to the RG, with the lead rifleman moving up the road and breaking cover, which uncovered a German rifleman to the right. The two exchanged fire without hitting anything but pinning the German. The Sten gunner (second in line on the road) tried to move into the treeline to the right to face the TWO German riflemen now present there, but froze. Another RG rifleman and the NCO made it into the trees, and guess who found the MG? Yep, it's up there in the house on the hill (I removed the other black chip, which was the dummy). The German LMG decided to light up the rifleman in the street as well as the NCO and rifleman in the trees (in my rules, MGs get more dice for their rate of fire, but when they have an A-gunner they get even more dice as well as they get to use a little homemade template and can split the dice as they wish to engage as many targets in the template as they like. In this case there were three targets and six firing dice, so I gave two dice to each guy. Sure, it's gamey, but it works for me. MMGs can also establish a fire lane and fire multiple times if on Overwatch, whereas everyone else can only fire once on Overwatch.). So, the guy in the open and the NCO are fine, but the other rifleman is pinned (pretty horrendous die rolling all night). Thus ended the first turn.


Turn 2: (All of the German cards were added but one as there is still one unspotted rifleman out there, as well as one dummy) The Brits started again, with the Bren team moving up cautiously while the far left rifleman sprinted up to the house. The other BG rifle and the NCO were having an argument about which brew is best and lost track of time, thus they did not move up (they BOTH failed). The sprinting rifleman, whom I call "The Lone Ranger," for reasons that will soon become apparent, figured out one of the blinds was a dummy, so I placed the last German rifle on the table. Then the German LMG opened up again on the same guys as last time, pinning the RG rifle near the crossroads (he should be dead, standing out in the open and all, but some pretty atrocious rolling) and missing the other two. The shaken German rifleman at the hedge pulls himself together, takes a potshot at the treeline (doesn't even hit that!), then runs for the road and takes up station next to his compadre. The German rifle on the far left, whom I'll call "The Lone Sentry," was looking at the whole Brit BG by himself and decided discretion was the better part of valor and so he begins hot-footing it towards his brothers to the right, making it behind the wall near the center ruins. The Lone Ranger then sprinted up to the house in the center, whilst the Bren Team and their NCO all decide to take a breather, while the other BG rifle takes a shot at the Lone Sentry (not even close).
The pinned RG rifleman in the trees gets his act together and takes a shot at the German LMG, to no effect, while the Sten gunner moves up and the shaken rifleman in the road wets himself. The two German rifles on the right take their shots but hit nothing, and the RG NCO decides to have a smoke and take stock of the situation (fail).


Turn 3: Brits up first again. The Bren team can't find the gunner's lucky rabbit foot and spends whole turn looking for it. The Lone Ranger moves into the building and takes a shot at the Lone Sentry, but misses. The rest of the BG decides to check their copies of the Stars and Stripes (or whatever newspaper Brits read).
The pinned rifleman in the middle of the road snaps out of it and moves up into cover, taking a shot, but having no effect. The German LMG goes on Overwatch to try to catch someone in the open, which occurs when the Sten gunner decide to sprint across the crossroad and into the house adjacent the one holding the German LMG team. He mentally steels himself then takes off like a bat out of hell. He must have really been flying, because he made it (one hit by the LMG, which was saved! He needed a '6' and got it). However, the LMG did pin the RG NCO and one of the rifleman in the treeline. The German NCO decided to make use of his MP-40 and pinned the other rifleman in the treeline. However, the rest of the turn was a bunch of ineffectual firing and the RG NCO and one of the rifleman actually becoming unpinned.


Turn 4: They drew first blood! The German LMG activates first and lays down the RG rifle at the crossroads. I don't mean to sound macabre, but I was starting to wonder if it would ever happen. The Lone Ranger takes another shot at the Lone Sentry, missing, while the Bren team runs up to the Lone Ranger's house. The BG NCO and the other BG rifle are still reading the funny pages...
The Lone Sentry decides to hell with the Lone Ranger, somebody better do something about the Brit Sten gunner in the house, so he sprints up and knocks at the door. The Sten gunner pins him for his troubles, though the German NCO moves out of the house into the nearby wood and pins him (I really wanted to try throwing a grenade but didn't want to risk accidentally blowing up the Lone Sentry). The RG NCO decides to run up to the roadside hedges and cut loose with his Sten; he did, but didn't hit a doggone thing. I think the sun got in his eyes. The two RG rifles in the treeline decided to take a nap...


Turn 5: Brits are up first, and the Bren Team finally gets into the fight! They decide to go after the German LMG and kill the gunner! Of course the A-gunner quickly shifts over (but will be penalized without an A-gunner of his own). Continuing with the BG, their NCO actually sprints up to the house, but just then the Lone Ranger decides it's time for a Union break.
In the center house, both the Lone Sentry and the Sten gunner suffer a Corporal Upham moment and cower on opposite sides of the wall. The RG NCO guns down one of the German riflemen in the road, while the other scurries up to the house and takes over A-gunner duties for the LMG. The German LMG gunner focuses all fire on the RG NCO and cuts him down in a hail of bullets. So, the moral of his story is, don't spread your team out all over creation and then leave yourself as the only target right in front of a machine gun (I could have played that one a little better...). The German NCO empties a magazine at the Sten gunner, who pulls some Matrix-like bullet-dodging. The two RG rifles in the treeline are having a hell of a nap...


Turn 6: Brits are up first, and the Bren experiences a jam (not really, just failed its command roll, with NCO right there with them!). The Sten gunner ventilates the Lone Sentry, putting him out of the fight, while in teh treeline the German LMG kills one RG rifle and pins the other. The German NCO empties another mag at the Sten gunner, once again pinning him.
Things are really looking pretty bleak for the Brits at this point. The Rifle Group is down to the Sten gunner, who's pinned in a house, and a rifleman, who is pinned in the treeline. Of course, the Krauts are having a rough time as well, with only the NCO and LMG team. I decide it's time for my guys in the BG (minus the Bren team, serving as a base of fire) to get some wheels and get over there and help clear this out. So, I roll, and I get the Lone Ranger to leave the cover of the house, and the other rifleman actually (finally?) moves, sprinting out from the cover of the woods, where he conducts a rendezvous out in the open with the Lone Ranger. Now I'll have the BG NCO meet them there, and next turn it's on, they are going to move up to the Sten gunner and clear out the German LMG once and for all. As it turns out, the BG NCO decided he would be much more comfortable in the house with the Bren team than out there in the open with those two idiot riflemen.
I don't know what I was thinking. I knew I needed to get some help into the line, and quick, before the Sten gunner and last RG rifle were finished off. I was focusing on the rules and not the tactical situation; I wanted to get the two BG rifles and the NCO together to have a better chance passing the command roll and saving the day. What I did was leave those two rifles out there like targets on a range...


Turn 7: As dictated by the wargaming gods, first up is the German LMG, who promptly cuts down the two BG riflemen. I swear I heard the BG NCO say, "alrighty then, what's plan C?" The Bren team gets the gun back in action, to no avail (6 dice, 1 hit, which was saved). The Sten gunner pivots towards the German NCO to let him have it, but accidentally ejects the magazine from his weapon (he failed his command roll). The German NCO laughs, calmly reloads, and empties another magazine at the Sten gunner, pinning him for the 947th time. The remaining RG rifleman decided he'd had enough. He popped to his feet, loosed off a round at the German LMG (pinning the gunner!), and bolted for the rear.
At that point a company runner arrived to inform the squad it was attacking the wrong hill, and had better pull back for the evening.

All in all I had a fun game and think it was a success. I think the bones of the rules are great, but need a couple tweaks. In terms of the game, I didn't lose because of the rules, I lost because I made some terrible tactical decisions. Some points:
-Please don't beat up on me regarding using my British section incorrectly in terms of doctrine regarding the proper use of fire and maneuver, etc... Not that I'm a genius, but I know, and that wasn't the point of this game or these rules. This game was an experiment, literally my first time playing these rules. In any case, and this might sound crazy/ridiculous, these rules are going to be "Hollywood" rules, whereas I'll look to others (such as the upcoming "Chain of Command") for realism. I intend on using these for my fictional Cuban Liberation campaign, where the battles will be fought with between 5 and 25 guys per side, organized in very independent 5-man fire teams, with the individuals acting very independently. I'll even throw in a vehicle or two every now and again, just to blow it up (if it's enemy) or to blow stuff up (if it's mine), Hollywood style. So, for example, that's why I had no problem leaving (or attempting to) the Bren team behind whilst the BF NCO and two riflemen went charging off.
-I think having my troops test for orders every time while only making the bad guys test when they were pinned (and not at a -1 like my guys when they're pinned) worked like a champ. Likewise my "Course of Action Decision Maker Thingy/Matrix."
-The rules don't have an overall force morale system. Both sides suffered at least 50% casualties, so would have broken a long time ago in real life. Having said that, I'm not sure I'm going to look at bolting some on. Again, these are going to be Hollywood rules, and so fighting to the last man might be the way to go. Or at least a withdrawal coming as a decision on my part to preserve forces for the campaign (as opposed to an arbitrary breakpoint).
-There were quite a few things I didn't get to: hand grenades, mortars, vehicles, close combat. I'll fix that soon.
-The blind system worked well. I had blinds for real forces and dummies, with the COA decision maker deciding when they would come off. I also gave them a 'free' activation right then, before anyone else, then added their card for the next turn. I did toy with the idea of putting the card in immediately, essentially giving enemy soldiers two activations in the turn they came off blinds, but I think that's probably too powerful.
-I'm thinking a lot about rifles... In these rules you can't be killed by one unsaved hit, it only pins you. Rifles only get one firing dice, so a rifle can't kill you unless you're already pinned. That of course makes no sense in real life (it only takes one bullet), and at first I was getting worried because I don't think it was until turn 4 that we had our first casualty. Having said that, I was rolling pretty bad on shooting dice and pretty good on saving dice, and, in the end, it got pretty bloody pretty quick, so I'm not sure. Right now I'm on the fence, and I think for my next game I'll stick with one firing dice for rifles, but I'm seriously countenancing giving them 2 so that it's possible to whack someone. Please understand that, philosophically, I'm of the belief that firepower pins and close combat eliminated, and I like my rules to reflect that. Having said that, that (in my humble opinion) is a tough thing to pull of in a skirmish, one man is one man, game.
-Oh, and the game took awhile. Part of it was new rules, part of it was taking photos and writing everything down, and part of it was, for about half the game I had my kids rolling dice (it wasn't me with the cold hand, it was my children. I can hear it now: "You're a real hero, Jack, blaming it on your kids."). I will say that by about turn 4 I had it rolling, so I expect things to move a bit quicker in the future.
-Oh#2: I messed up using my own rules! For the command roll, different values are used based on what you're trying to do (for example, it's easier to pass when you want to sit and fire, and harder to pass if you want to charge into close combat). Well, some of those failing command rolls might have been my fault as I didn't always pay attention to the correct value for that particular order. On a side note, another reason for some many failures was that I treated both sides as regulars (no modifier, where veterans would receive a +1). I'm trying to decide if that's a good or a bad thing. Right now I'm thinking it wasn't so bad; I mean, I didn't get beaten that badly, and if a couple bad decisions were corrected that LMG would have been a smoking hole in the ground.
-Again, I think the rules were simple and straightforward enough, with enough difficulty factor built in to give a good solo game. I hope you enjoyed reading it.
V/R,
Jack


No comments:
Post a Comment