All,
1430 Local Time
10 November 1942
Near Port Lyautey, French Morocco
Normally this would have been a job for his XO, or even one of the better platoon leaders, but his XO was dead and he was still trying to establish himself as a good leader in the eyes of his men, so Captain Henry, commander of TF Reisman's Armored Reconnaissance Company, was leading a mechanized thrust wide around the left flank of the French defenses in and around Port Lyautey. Despite a couple days' relatively hard fighting, morale was high as the sense the French, who no one believed were truly the enemy to begin with, were preparing to capitulate and everyone believed the fighting in Morocco was about to come to a joyous end. Major Reisman was quick to stamp out any such thoughts and complacency, admonishing his soldiers that "there was still a war to be fought," and so he kept the Task Force men busy, to include this scouting party.
Captain Henry had led the column out at first light, and so far, so good. They American column had covered many miles without any real sign of French defenders, just a few stragglers attempting to surrender, not a single shot fired. But the now-seasoned dogfaces were growing a bit uncomfortable, that edgy feeling that something was about to happen creeping in. Captain Henry felt it, too, and as the column approached an oasis and crossroads with a couple stone buildings present, he halted the column to and moved to get his field glasses on it.

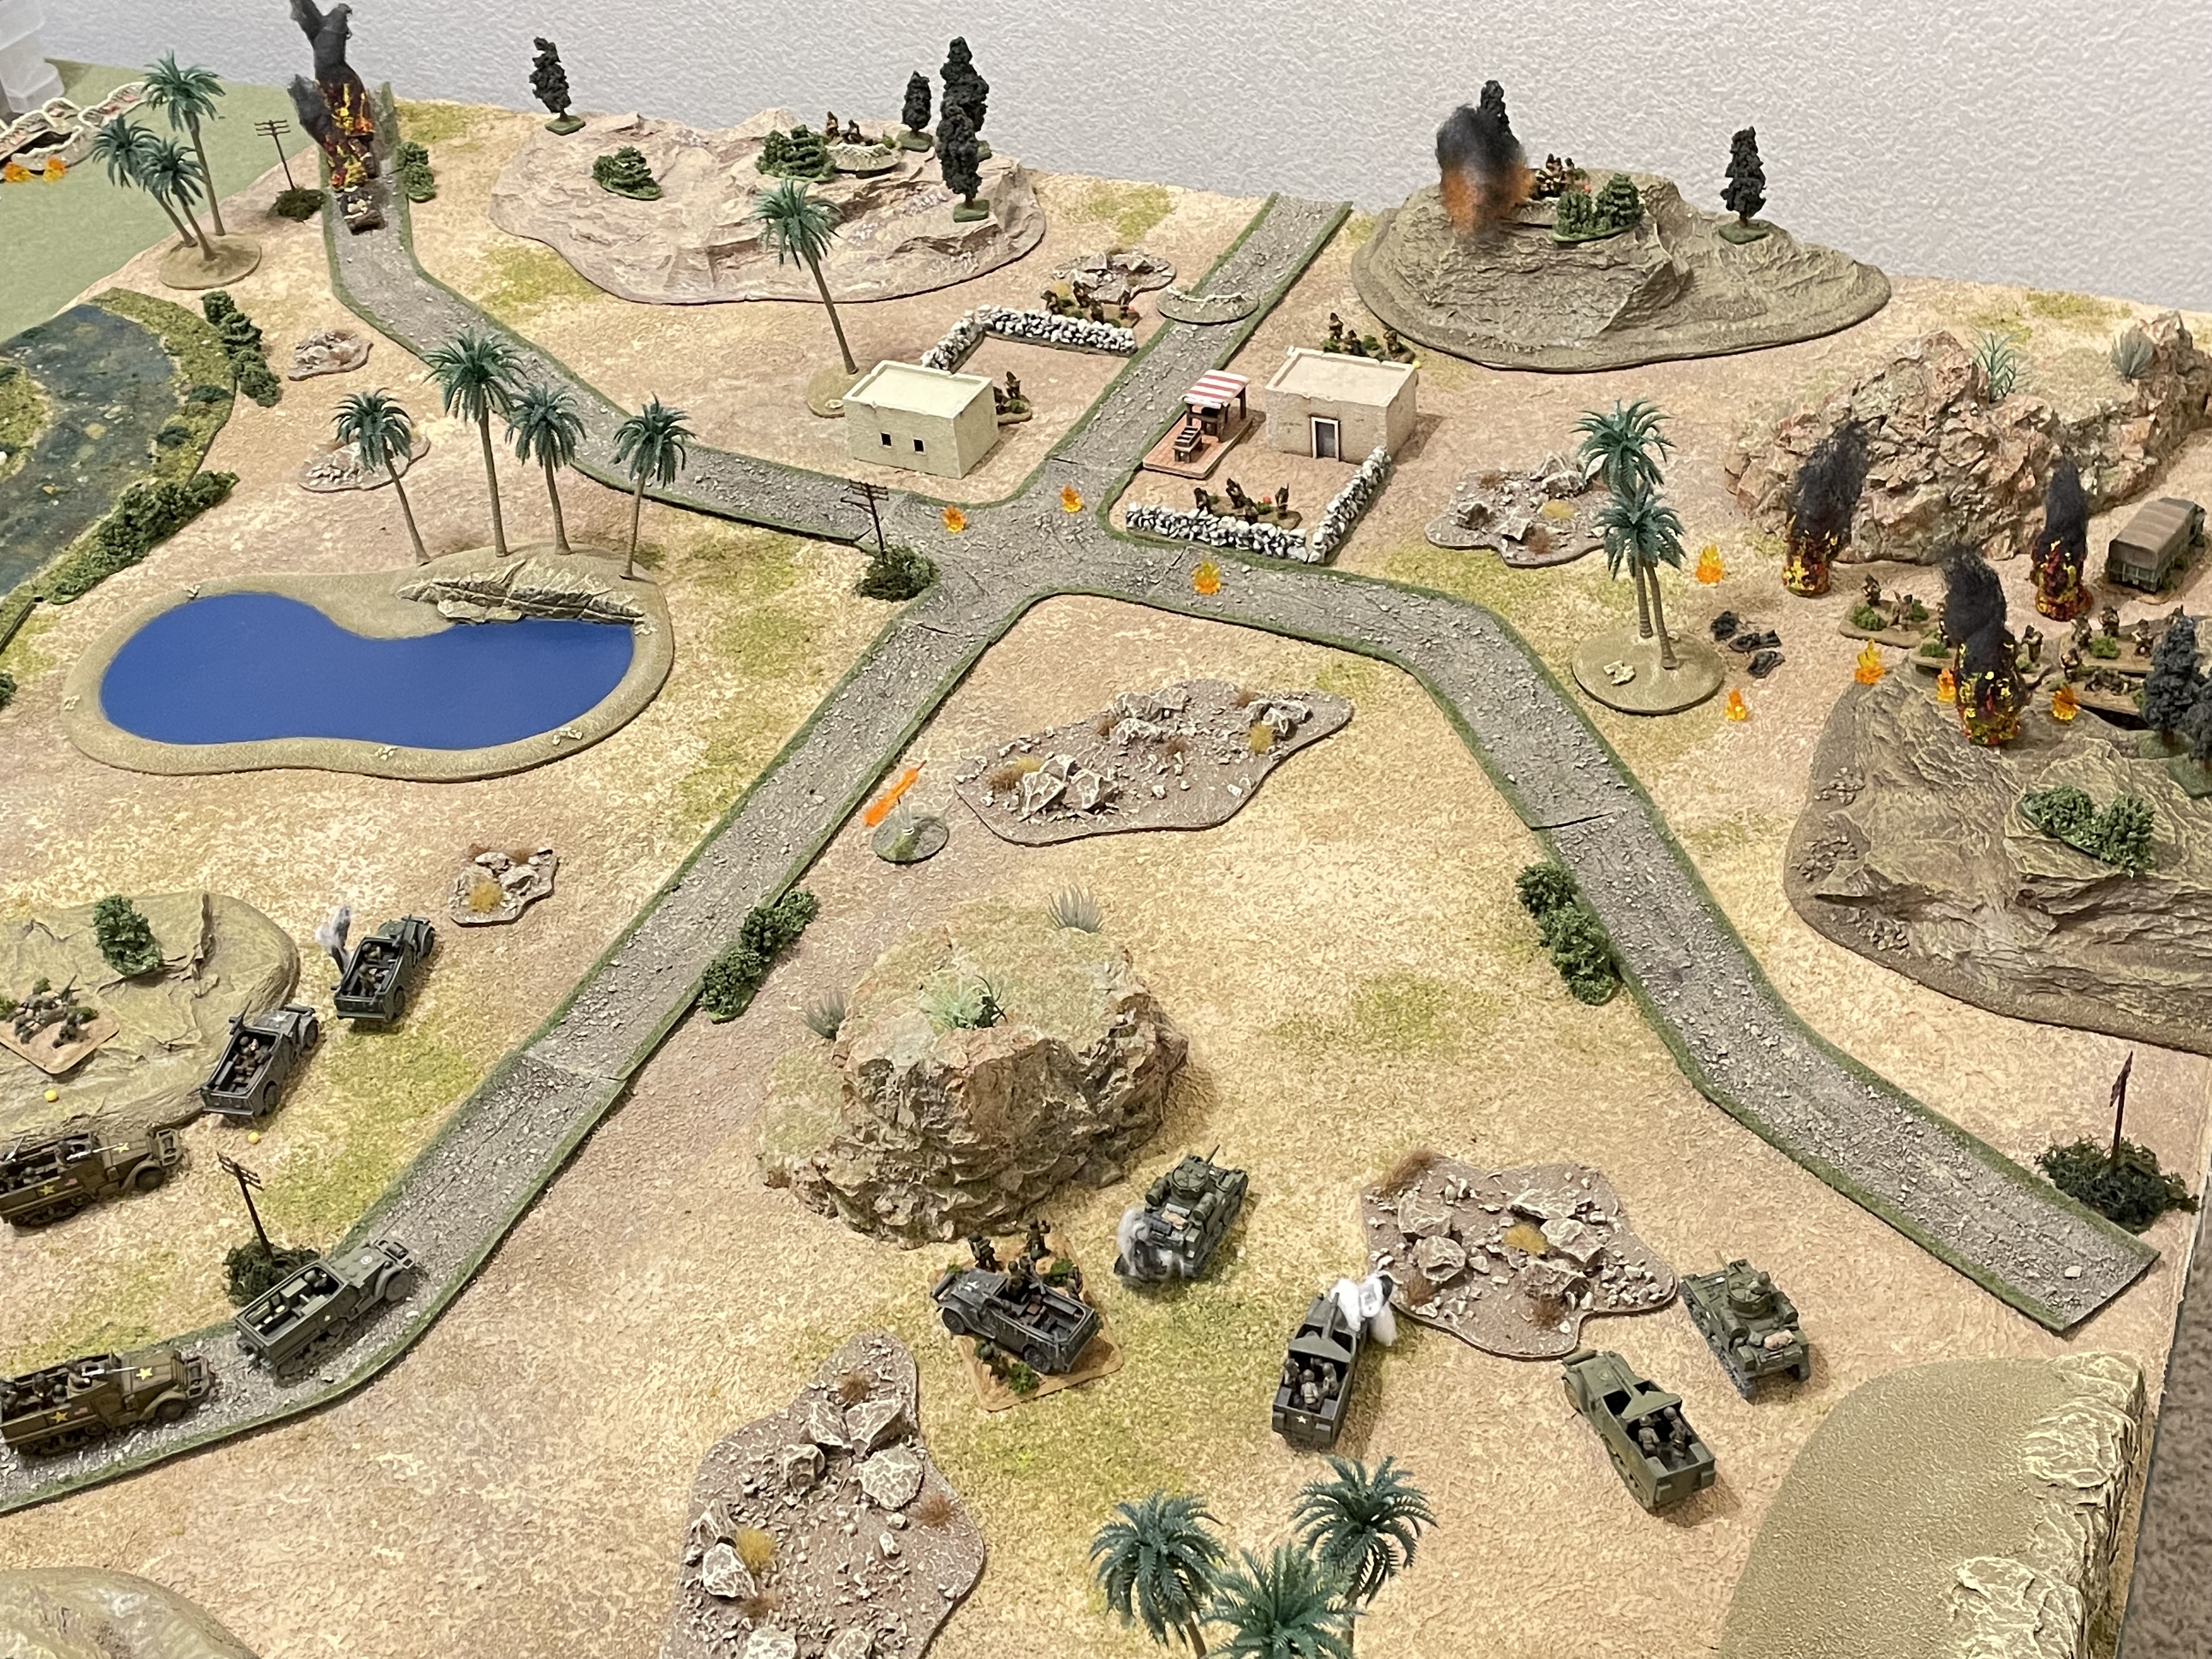
Overview, north is up. The hardball roads running north-south and east-west intersect at a crossroads hosting a couple stone buildings on the right side of the table, with a small, natural pond nearby, likely owing to a tributary of the Wadi Sebou flowing to the north. There are plenty of rocky outcroppings and rocky ground, split by the occasional palm tree, but overall it's pretty sparse. I tried to cut way back on my use of the hedges as scrub brush, I think my first six tables probably had way too much green for Morocco, but I'll deflect that accusation by stating these fights all occurred near the coast ;)
The only terrain features relevant to this fight are the crossroads/village, 'The Knoll' at left top (just left of the pond), and the twin hills just right of them, which will call Hills 36 (just below the road at far right) and 37 (just above the road at far right).
The opposing forces, with US on the left and French on the right. A little bit smaller of a fight than the first six, but not much.
The US force, broken down as follows:
CO: Captain Henry, Armored Recon Company commander
Armored Car Platoon:
-2nd Lt Stone, platoon leader
-Sgt Binn
Armored Infantry Platoon:
-2nd Lt Royals (2nd Platoon leader)
-Sgt Castle, 1st Squad
-Sgt Hendrickson, 2nd Squad
-Sgt Ravotti, 3rd Squad
-Cpl Buckner, MG Team
-Cpl Mims, Mortar team
M3 Stuart Tank Platoon:
-Sgt Bell
-Sgt Tomczak
Tank Destroyer Platoon:
-2nd Lt Swayne (platoon leader)
-Sgt Cuthbert
The French, consisting of:
Garrison:
-Platoon leader
-2 x rifle squad
-1 x Hotchkiss MG team
-1 x 81mm mortar team
-1 x 25mm anti-tank gun (ATG)
Reserves:
-3 x R35 light tanks
-Commanding Officer
-4 x Trucks (not shown)
The reserves are actually two separate columns, coming from two different directions (northeast and southeast), though both received the request for help at the same time and both will arrive on the table at the same time. Here's how the arrival time will work: I will roll 1D6 at the end of each French turn, and if I equal or beat a target score the reinforcements will arrive. If I don't, the reinforcements will not come on an I will try again at the end of the following French turn, with a -1 to the target number each turn (so the first turn needs a 6, the second turn needs a 5+, the third turns needs a 4+, etc...).

Overview, now with troops. The US baseline is at left; they have their CO and armored car platoon just off road at far left top, while their Stuart tank platoon and tank destroyer platoon is located at bottom left. The French are all grouped just east (right) of the crossroads, with rifle squads, their mortar team, and their platoon leader in the village, their 25mm ATG atop Hill 36 (far right, below the road), and their MG team atop Hill 37 (far right, above the road).
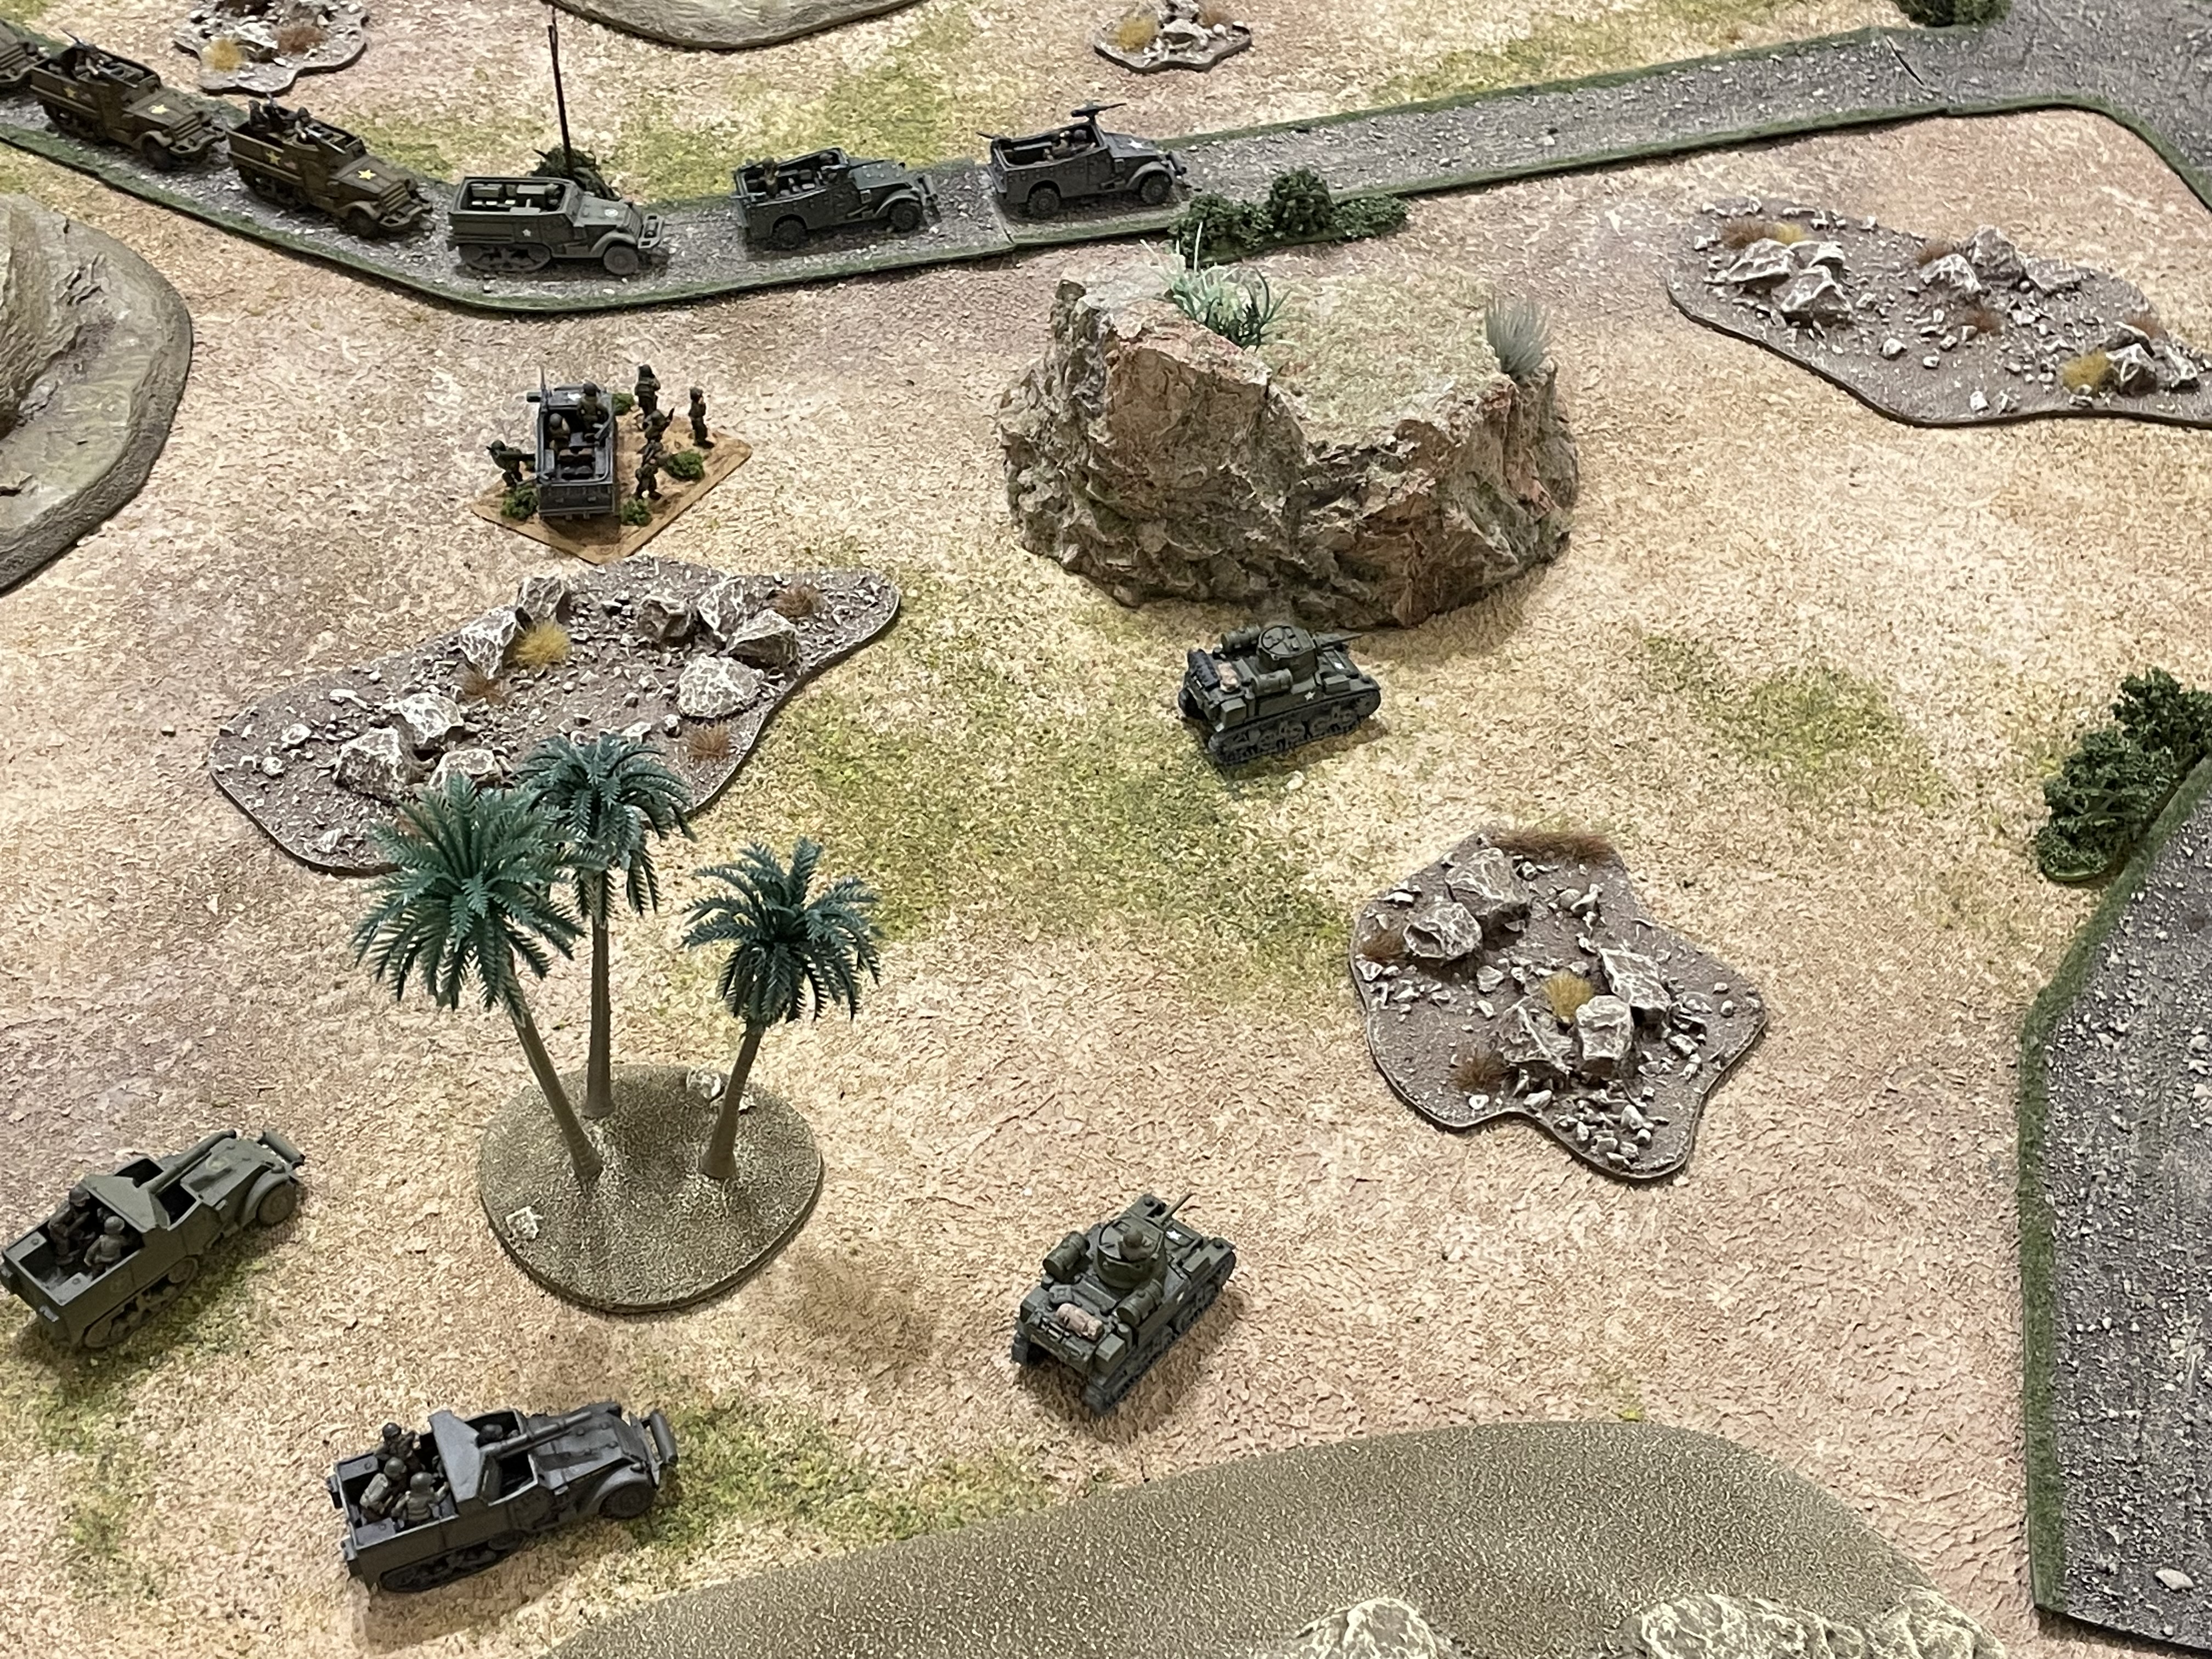
A closer look at the M3 Stuarts and M3 GMCs (tank destroyers) in the southwest corner, with the CO and armored car platoon at top left.
And the CO (right) and armored car platoon (left) in the northwest.
The US armored fist, ready to strike a blow! Or be struck...
The French defenders, all backed up in the center, consisting of two rifle squads (center), the platoon leader and mortar team (just above them), and the MG team and ATG (atop the hills, left and right, respectively).
Another look.
Captain Henry, the commander of Task Force Reisman's Armored Reconnaissance Company, glasses the crossroads and its surrounding environs. "It's quiet," states Captain Henry.
"Yeah, too quiet," replies Lt Stone, his Armored Car Platoon leader.
"It stinks of quiet," murmurs Captain Henry.* Nevertheless, he orders Lt Stone to advance; Lt Stone, in turn, informs his drivers and Lt Royals' Armored Infantry Platoon to prepare to move.
*Sorry, I just remember that exact sequence popping up in so many of the WWII comic books I read as a kid ;)
Captain Henry (left bottom) looks on as Lt Stone leads his armored cars and Lt Royals' armored infantry forward, passing The Knoll.
Looking from the opposite direction (north to south), you see the Stuarts and tank destroyers push ahead, picking their way through the rocky terrain (top center, with CO at right bottom).
As the Americans push forward, Sgt Bell is feeling increasingly uncomfortable, so he orders his tank to halt (bottom left, with Lt Stone's scout car visible at left top), and he fires, launching a 37mm HE round into the village (top right)...
Unknowingly suppressing one of the French rifle squads (red bead)!
But as the report and explosion echo through the valley, the French ATG atop Hill 36 (bottom left) sights in on Sgt Bell's Stuart (top center) and fires...
The French 25mm armor-piercing round misses, kicking up a shower of rocks and soil, as Sgt Tomczak orders his gunner (top left) to return fire, though they miss, too.
As the French ATG (far left) trades shots with the American armor (just off camera to top center right), the French MG team (bottom center, atop Hill 37) cuts loose with a long burst at the head of the American road column (top right)...
Machine gun rounds ricochet to and fro as Captain Henry dashes forward (center, from bottom left) to assist the road column.
The French get screwed when they roll a 'Scurry,' which allows them to move but not fire, but they don't need to move, they need to fire. All they can do is have their suppressed rifle team (just visible behind the wall at top right) rally. The good news from the French is that since they don't move, the Americans don't see anything and thus don't get a 'free' move.
Wary of the French anti-tank gun, Sgt Tomczak knows he can't sit still, but he's also not sure of the location of the French gun, so he pushes his tank slowly forward (center, from left), trying to present himself as a moving target without rushing blindly into a kill zone or crossfire.
But the French gunners (bottom right) are locked in on him (top left) and fire...
A loud CLANG! reverberates through the valley as Sgt Tomczak's Stuart is hit and immobilized (red bead and smoke at right)!!! Lt Swayne pushes his tank destroyer up in support (right, between the two Stuarts, with Sgt Cuthbert's tank destroyer at bottom left), searching for that damned gun!
But as he (top left) searches, the French MG team (bottom right) shifts fire and engages the tank destroyer...
A hail of French .30-cal bullets clatter off the armored halftrack, immobilizing Lt Swayne's vehicle right next to Sgt Tomczak's immobilized tank! To add insult to injury, the machine gun fire pins Sgt Bell's crew (yellow bead at bottom left, Captain Henry just visible at top left)!
Captain Henry rushes in to rally the troops: Lt Swayne's tank destroyer crew is good, but Sgt Bell's crew panics, dropping from pinned to suppressed (bottom left)!
While back on the road, Sgt Binn pushes his M3 Scout Car (yeah, everything is M3 something or other: M3 Scout Car, M3 Halftrack, M3 Gun Motor Carriage, M3 Stuart, and M3 Grant; makes absolutely no sense to me, had to make logistics management a nightmare) off road, near The Knoll (left top, next to Lt Stone's Scout Car), looking to engage th village (bottom right), but as he does a French rifle squad opens fire...
And the French FM 24/29 LMG knocks all kinds of holes in the Scout Car, immobilizing it!
*What the hell is going on here? Three shots in a row, three vehicles immobilized??? That's some pretty fancy shooting, particularly for the MG team and rifle squad!
Seeing the head of the road column taking fire, Lt Royals orders his heavy weapons to move up, off road, and get their weapons into the fight (the two halftracks at left, just below Sgt Binn's immobilized Scout Car, from bottom center). They roll up to The Knoll...
And dismount, with Cpl Buckner getting his M-1919 machine gun into action (center) while Cpl Mims gets his 60mm mortar set up (left).
But as Cpl Buckner and his team are still setting up the machine gun (top left) it is engaged by a French rifle squad in the village (bottom right), causing casualties and sending the American MG team 'men down!'
And then the French 81mm mortar team (bottom right) goes to work, targeting the American road column...
81mm HE rounds rain down on both sides of the road, but no one is hit (or pinned/suppressed)!
But don't get too happy for the Yanks just yet...
The French tanks have arrived in the northeast...
And the French mechanized infantry has arrived in the southeast.
The US commander (bottom left) tries to rally Sgt Bell's M3 Stuart, and they get 'up' to pinned, as Lt Swayne's tank destroyer (between the two Stuarts) fires on Hill 36...
Lt Swayne's (top left) 75mm HE round pins the French ATG crew (yellow bead at bottom right) as a rifle squad (right) returns fire, to no effect.
Captain Henry breaks his foot off in Sgt Bell's ass, successfully rallying him and his crew (bottom center), then moves left, where he does the same thing to Sgt Tomczak and his crew, dodging rifle, machine gun, and 25mm ATG fire, and even some shrapnel from the mortar rounds hitting near the road (top center/left).
But the newly arrived French in the northeast decide to get into the fight: the lead French tank (bottom right) spots the American tanks (top left center, with the village at far left top and The Knoll at top center right) and opens fire with its 37mm gun...
Suppressing Sgt Bell's tank (red bead at bottom right) and causing Sgt Tomczak's crew to panic (red bead at top center)!!!
Seeing the situation rapidly deteriorating and knowing that he, as the only armored unit not yet engaged, needed to do something, Sgt Cuthbert orders his driver to sally forth, into the fire (the M3 GMC tank destroyer at center right, the bottom of the two), next to Sgt Bell's M3 Stuart, where he attempts to rally Sgt Bell and his crew...
*Please recall that Sgt Cuthbert had actually been reprimanded for a lack of combat leadership in a previous fight; you guys might not realize that I do actually track that stuff (both bravery and cowardice), and I have it affect the tabletop action. For those interested in how I typically handle it, here's how it goes: if a unit is pinned, suppressed, or 'men down,' they are required by the rules to roll 1D6 to rally, accepting the result. When someone is heroic or cowardly, I actually roll 2D6, and I allow the heroic characters to pick the better of the two dice, while I make the cowardly pick the worse of the two dice. Additionally, when someone has shown a bit of a yellow streak (which I don't create myself, it happens merely as a result of some horrible dice rolling, such as failing two or three successive rally rolls) and there is a decision point, a fork in the road, I roll 1D6 to determine if he'll do the heroic thing (charge in, try to rally some suppressed comrades and engage the enemy armor, in the case of above), or if he'll chicken out (just sit tight, or move around to a different location, avoiding contact with the enemy, for example). It really makes things interesting on the tabletop ;)

But the second French tank in line (bottom right) spots Sgt Cuthbert's bold move (top left) and fires!
The 37mm AP round skitters harmlessly amongst the rocks (bottom left) as Sgt Bell's crew is successfully rallied, and Sgt Cuthbert and his crew bravely stand their ground and return fire on the French tanks (top right), sending a 75mm armor piercing round northward...
And here is what the good Sgt Cuthbert's shooting roll looked like. Those two red sixes are kills (and the black one is a pin), and I just couldn't bring myself to rob him of this incredible opportunity, so...
Sgt Cuthbert's AP round easily penetrates the French light tank and rips it apart! Sgt Cuthbert and his crew are working like a well-oiled machine, and it's less than two seconds before they've reloaded, re-laid the gun, and sent another 75mm AP round down range...
Killing a second French tank and pinning the third!!!
Near the crossroads, Lt Stone racks his Ma Deuce and begins raining .50-cal rounds on the village...
Suppressing both rifle squads in the village (red beads at left and center) and pinning the mortar team (yellow bead at bottom center)!
Lt Stone then orders his driver to snake the vehicle left, off road, towards The Knoll, so he can help rally Sgt Binn's immobilized Scout Car and Cpl Buckner's 'men down' MG team (white bead atop The Knoll). The French MG team (off camera to far right) spots the movement and opens fire, but Lt Stone calmly rallies both units.
As the French anti-tank gun (bottom left)...
And Sgt Tomczak's immobilized M3 Stuart (left, with CO behind him, Lt Swayne's immobilized tank destroyer, Sgt Cuthbert's tank destroyer, and Sgt Bell's M3 Stuart below him) trade ineffectual fire...
As the French mortar team (right bottom, dug-in between Hill 36 an the lower building) makes corrections and fires another sheaf...
This time the rounds are more focused on The Knoll, pinning down Lt Stone's Scout Car and Cpl Buckner's MG team (yellow beads at center).
In the ville, the French platoon leader braves American fire to dash forward (center left top, from right) and attempts to rally one of the suppressed rifle squads...
But the French riflemen panic and fall back (bottom center, from building at bottom left)! The sole remaining French tank (top right) successfully self rallies.
And the French mechanized infantry finally get moving (bottom center, from bottom right).
*To be fair, there hasn't been much opportunity yet for the French reserve infantry to be of use; even now it's really being carried out as more an act of desperation than sound strategy (the American road column is just visible at top left, while the American tanks and tank destroyers are just off camera to far left bottom).
And hastily dismount their CO and infantry from one of the two transports (the other truck still has two rifle squads embarked).
But Sgt Tomczak's M3 Stuart (far left, with the CO just below him) spots the French advance (top right) and opens fire with his 37mm main gun and coax MG...
A French squad is suppressed (red beat at center top), which convinces the French CO (just below the suppressed squad) to dismount the other two rifle squads (rather than get caught out, still mounted in their softskin truck) and rapidly climb a nearby hill to get into position (far left).
But back on the US side, Sgt Cuthbert (bottom left, with French mechanized infantry just visible at bottom right) lines up another shot, targeting the last French tank (top right). "Fire!"
"On the way!" WHAM!!!
BOOM!!!
Sgt Cuthbert and his crew's third shot turns the third French tank into nothing but a distant memory!!! Wow, three shots, three kills, very impressive for the young Sergeant, who has shed his former bout with a lack of combat leadership and earned himself the nickname "Sergeant Cut-throat"!
Lt Swayne (bottom left, between Sgt Cuthbert on his right and Sgt Tomczak on his left) takes a gander at Sgt Cuthbert's handiwork and whistles, quite impressed, before getting back in the fight and ordering his gunner to engage the French anti-tank gun position (top right).
The 75mm HE round streaks in and scores a direct hit on the sandbagged position atop Hill 36 (top center), suppressing the French anti-tank gun crew, as basically the rest of the US force (Sgt Bell's Stuart at far right, and Lt Stone's Scout Car, Cpl Buckner's MG, and Cpl Mims' 60mm mortar team at bottom left) fire on the French mechanized infantry (top right)...
The fire is horrendous, knocking out one French rifle squad, sending another 'men down,' suppressing another, then pinning the last and the French commander!
This is followed by Sgt Tomczak's Stuart (center right bottom), Sgt Binn's Scout Car (left), and Lt Royals' halftrack (on the road at bottom left, firing its .50-cal HMG) laying into the village (center top)...
The French platoon leader is killed (far left bottom), the French MG team (top left) and mortar team (bottom center) are suppressed, and both rifle squads panic and fall back (center/center top), with the result that the furthest one actually runs off the table! (the French ATG, at far right, was already suppressed)
And now it the Americans have the opportunity to show a bit of grace and chivalry; Captain Henry, suddenly aware he no longer hears the sound of return fire, orders his men to cease fire.
He cautiously peers around cover (bottom left), then creeps out into the open (center bottom), holstering his pistol and waving his arms. As he advances, the French commander (just visible between the hills at far right) spots him, stands up, and dusts himself off.
Captain Henry waves to him, and shouts "par-lay!"
The French (left and far right) apprehensively man their positions and grip their weapons, but none fire. Captain Henry's confidence grows; "par-lay!"
The two commanders meet and shake hands. The two converse for a few moments, then embrace...
The war is over for these men! Well, at least THIS war, and the French happily lay down their weapons and flow southwest, ending the battle, which Task Force Reisman referred to as "The Battle of Cut-Throat's Knoll" forever after.
Never even got the infantry into the fight!
Thus ends the battle, and thus ends Task Force Reisman's war in French Morocco! Later that evening US forces from the 9th Infantry Division finally captured the Kasbah, and a cease-fire officially went into effect on the morning of 11 November 1942, signaling a cessation of hostilities between the Vichy French and Allied Forces, who quickly became allies in time for the upcoming fighting in Tunisia.
This was a neat little fight, remarkable by the fact the US infantry never even had to get out of their vehicles, due in equal parts to the low morale of the French and the great dice rolling for US firepower, to include Sgt Cuthbert's startling three tank kills on three shots, for which he was awarded the Silver Star!
Let's get to some stats:
-the US had 5 men killed, wounded, or missing
-the French had 15 men killed, wounded, or missing
-The French had three R35 light tanks destroyed
-The French had 60 men, 1 25mm ATG, 1 MG, and 1 81mm mortar captured
Characters:
-Sgt Cuthbert, Vehicle 4 commander, Tank Destroyer Platoon, was awarded the Silver Star for knocking out three enemy tanks during the engagement
-2nd Lt Swayne, Platoon Leader, Tank Destroyer Platoon, was awarded the Purple Heart but was able to immediately return to duty
Major Reisman was incredibly proud of the performance of his men in their inaugural campaign, though he knew they'd soon face experienced tank crews and panzer grenadiers of the German army, and that would be a totally new ball game.
A quick recap of the seven fights in French Morocco:
-US casualties: 120 men wounded or killed in action
US equipment: 1 x 37mm ATG, 2 x M3 Stuart, 2 x M3 Scout Car, 1 x M7 HMC, 1 x M3 Halftrack, and 3 trucks destroyed
French casualties: 145 men wounded or killed in action
French equipment: 1 x 25mm ATG, 3 x Laffly Armored Car, 6 x R35 light tank, and 2 x 75mm Field Gun destroyed
French captured: 200 men, 2 x 81mm mortar, 3 x Hotchkiss Machine Gun, 1 x 25mm ATG, and 1 x 75mm Field Gun captured
I'm very happy with how my Operation Torch campaign turned out, happy with my re-introduction to 5Core Company Command, happy I got to use my French troops, and happy to finally have gotten back to playing some games. I truly enjoyed these games and can't wait to get to more; my only trepidation is how long it takes to write these damn batreps. I actually enjoy documenting my tabletop games, and the way I document them, they just take so damn long; as with most folks, I've got a lot of demands on my time, and so it's not helping with the wife and kids when I have time with them but I'm sitting over here banging away on the laptop...
Task Force Reisman spent a few days resting and helping to police up the area and surrendering French forces, but then received orders attaching them to the United States' 1st Armored Regiment, 1st Armored Division. Upon arrival in Tunisia they were instantly placed under British command in a unit being called "Blade Force," headed for a place called "Chewey-Gooey," where they'd gain their first experience of war against the Germans and their Italian allies.
Coming soon!
V/R,
Jack


What a great ending for TF Reisman, and well done for getting this far with it. I really liked the look of all that US armour (or 'armor'). I've done a few games set in Tunisia, but never Morocco. As you have noted, both are quite arid... Looking forward to Bladeforces adventures, one of my favourite units. What size table are you using? I can't remember to 5Core standard, 3x3 maybe?
ReplyDeleteHello, Martin, thanks a bunch! Don't get your hopes up too much, I'm only loosely following Blade Force, basically the same as I did in Morocco (dates and location, representative forces). 5Core standard is 3' x 3', but that just looks too small to me so I've been using a 4' x 4'.
DeleteRegarding arid, yeah, I've cheated by having a whole lotta green. I can tell you it's not until fight #13 that I actually get to a more arid looking table. I also go to a 5' x 4' at that point, just wanting to try and stretch things out a bit, make it a bit harder for infantry to get to grips and close assault a bit less prevalent, give armor a bit more room to maneuver.
V/R,
Jack
Hello Jack,
ReplyDeleteA great run of 7 battles to get back into playing. Enjoying them all so far. I think I have done North Africa once in my life so I am really liking those battle reports. And you track so much in the game. I found it too hard to keep track of names and you also keep track of how they are doing!
I know what you mean about writing the games up taking much longer than playing. I like playing and writing the blog posts but the latter takes so long.I am not even playing very much so blog post writing has defintely gone to the wayside at the moment.
Hey Shaun, good to hear from you, buddy, hope all is well! Let me just get this out of the way: you need to quit screwing around with 'real life' and get your ass back to wargaming, immediately ;)
DeleteYeah man, I've really gone deep into this whole 'character' thing, and man, it's really added another layer to gaming for me, really made it even more fun. Even though it slows the game down a bit and takes more admin time to track ;) But overall, I'd say it's worth it.
V/R,
Jack
Really great stuff Jack, genuinely inspiring - great-looking, exciting, engrossing narrative. Perfect. I like the idea of the initial vanilla rolls establishing the character 'pattern' which nudges, but doesn't determine, the future path. And describing the adventures of a battalion-ish force through a series of company-ish actions has a lot of appeal.
ReplyDeleteHiya John, hope all is well, and hope you get back to playing and posting soon! Thank you, I appreciate the kind words, it certainly helps to keep me motivated. I'm quite happy with the way the characters have unfolded, and the mechanisms to get there/stay there, it's all been pretty simple and seamless.
DeleteIt has crossed my mind that I should have followed a single rifle company. I do worry that following a battalion-sized element may be biting off a bit more than I can chew, but we'll see.
V/R,
Jack