All,
0230 Local Time
9 November 1942
Near Port Lyautey, French Morocco
The French forces, feeling their oats after stonewalling Task Force Reisman at 'Murderville'/'The Meatgrinder' and defeating several attacks by the 60th Infantry Regiment of the US 9th Infantry Division on 'The Kasbah,' and have decided to sally forth with armored forces to counterattack the US invasion beaches!
Chaos reigns on the US beachhead, in equal parts due to the inherent confusion in conducting an amphibious assault, horrible weather at sea, and seeing their first actual combat. Dazed and confused young men are wandering to and fro while as other sit, listless, with units intermixed and scattered, with ammunition, supplies, and casualties haphazardly strewn about. Major Reisman and his XO, Captain Thigpen, work tirelessly to untangle the mass of men, machines, and gear, sorting it out and directing traffic, looking to get his force organized for optimal combat efficiency. The TF Reisman defensive line, such as it is, is not dug in, and consists of a smattering of inter-mixed infantry squads and weapons simply flung out in a line running roughly north-south on the eastern end of the town of Mehdia.

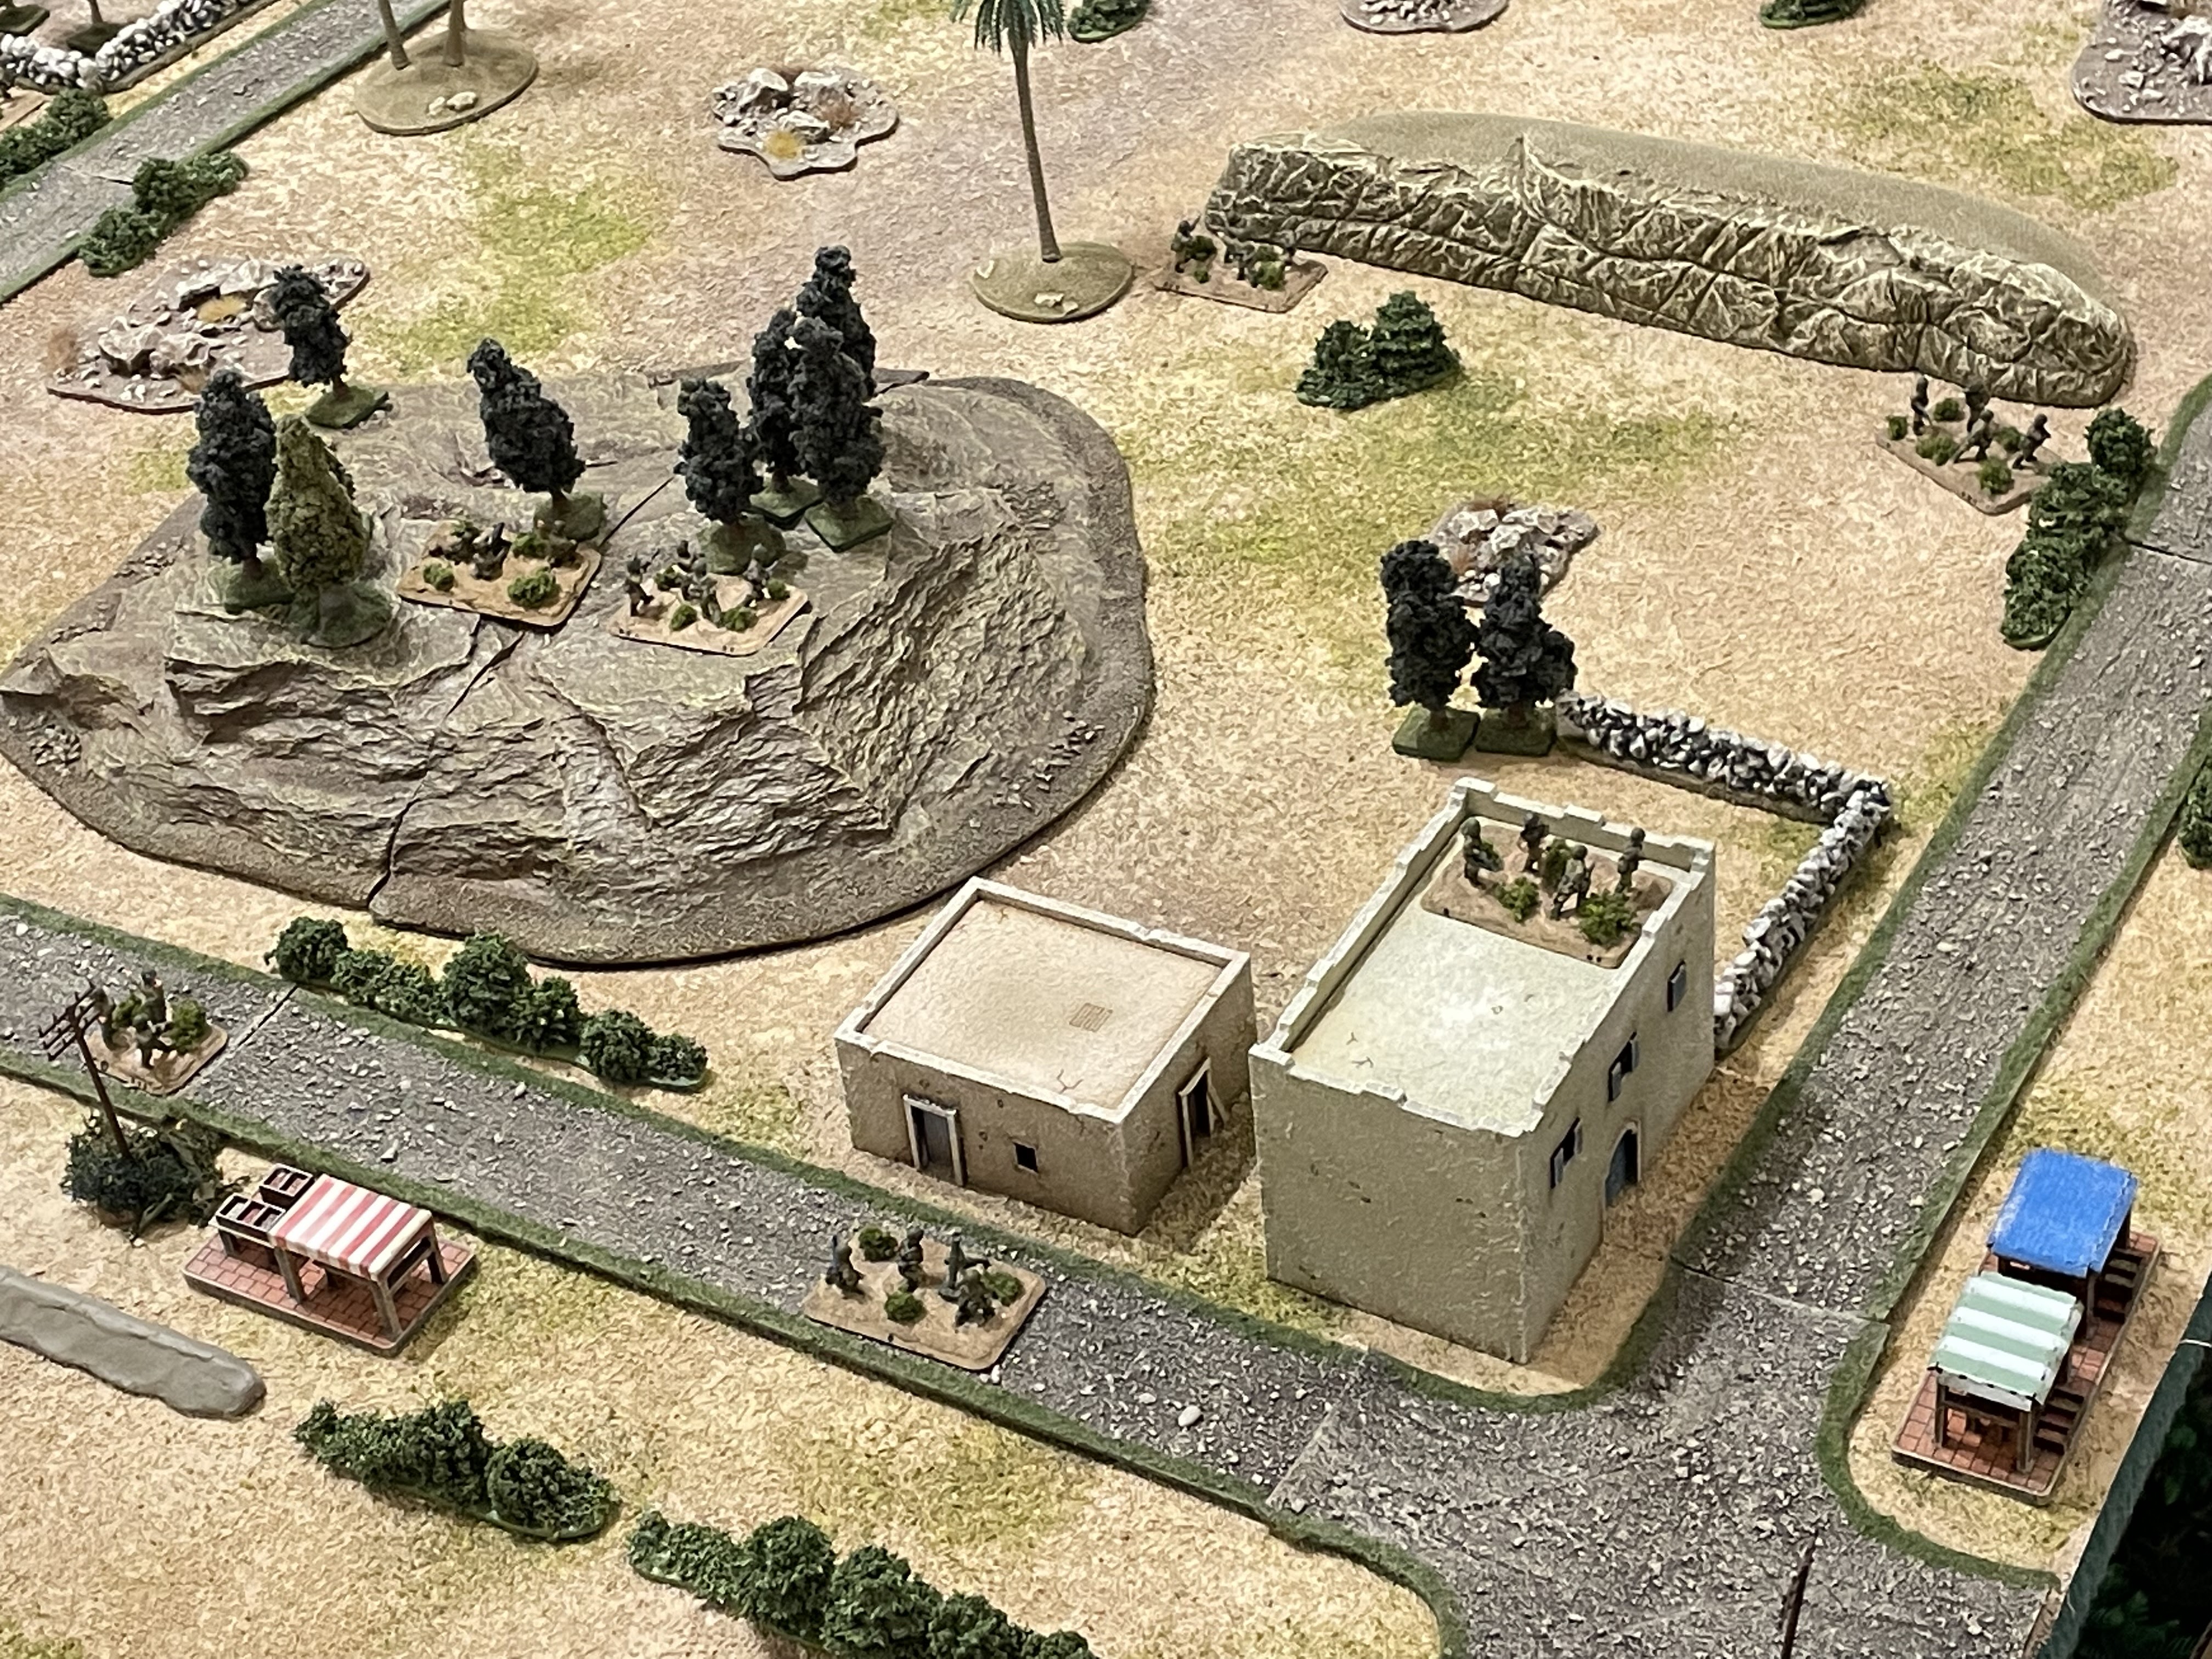
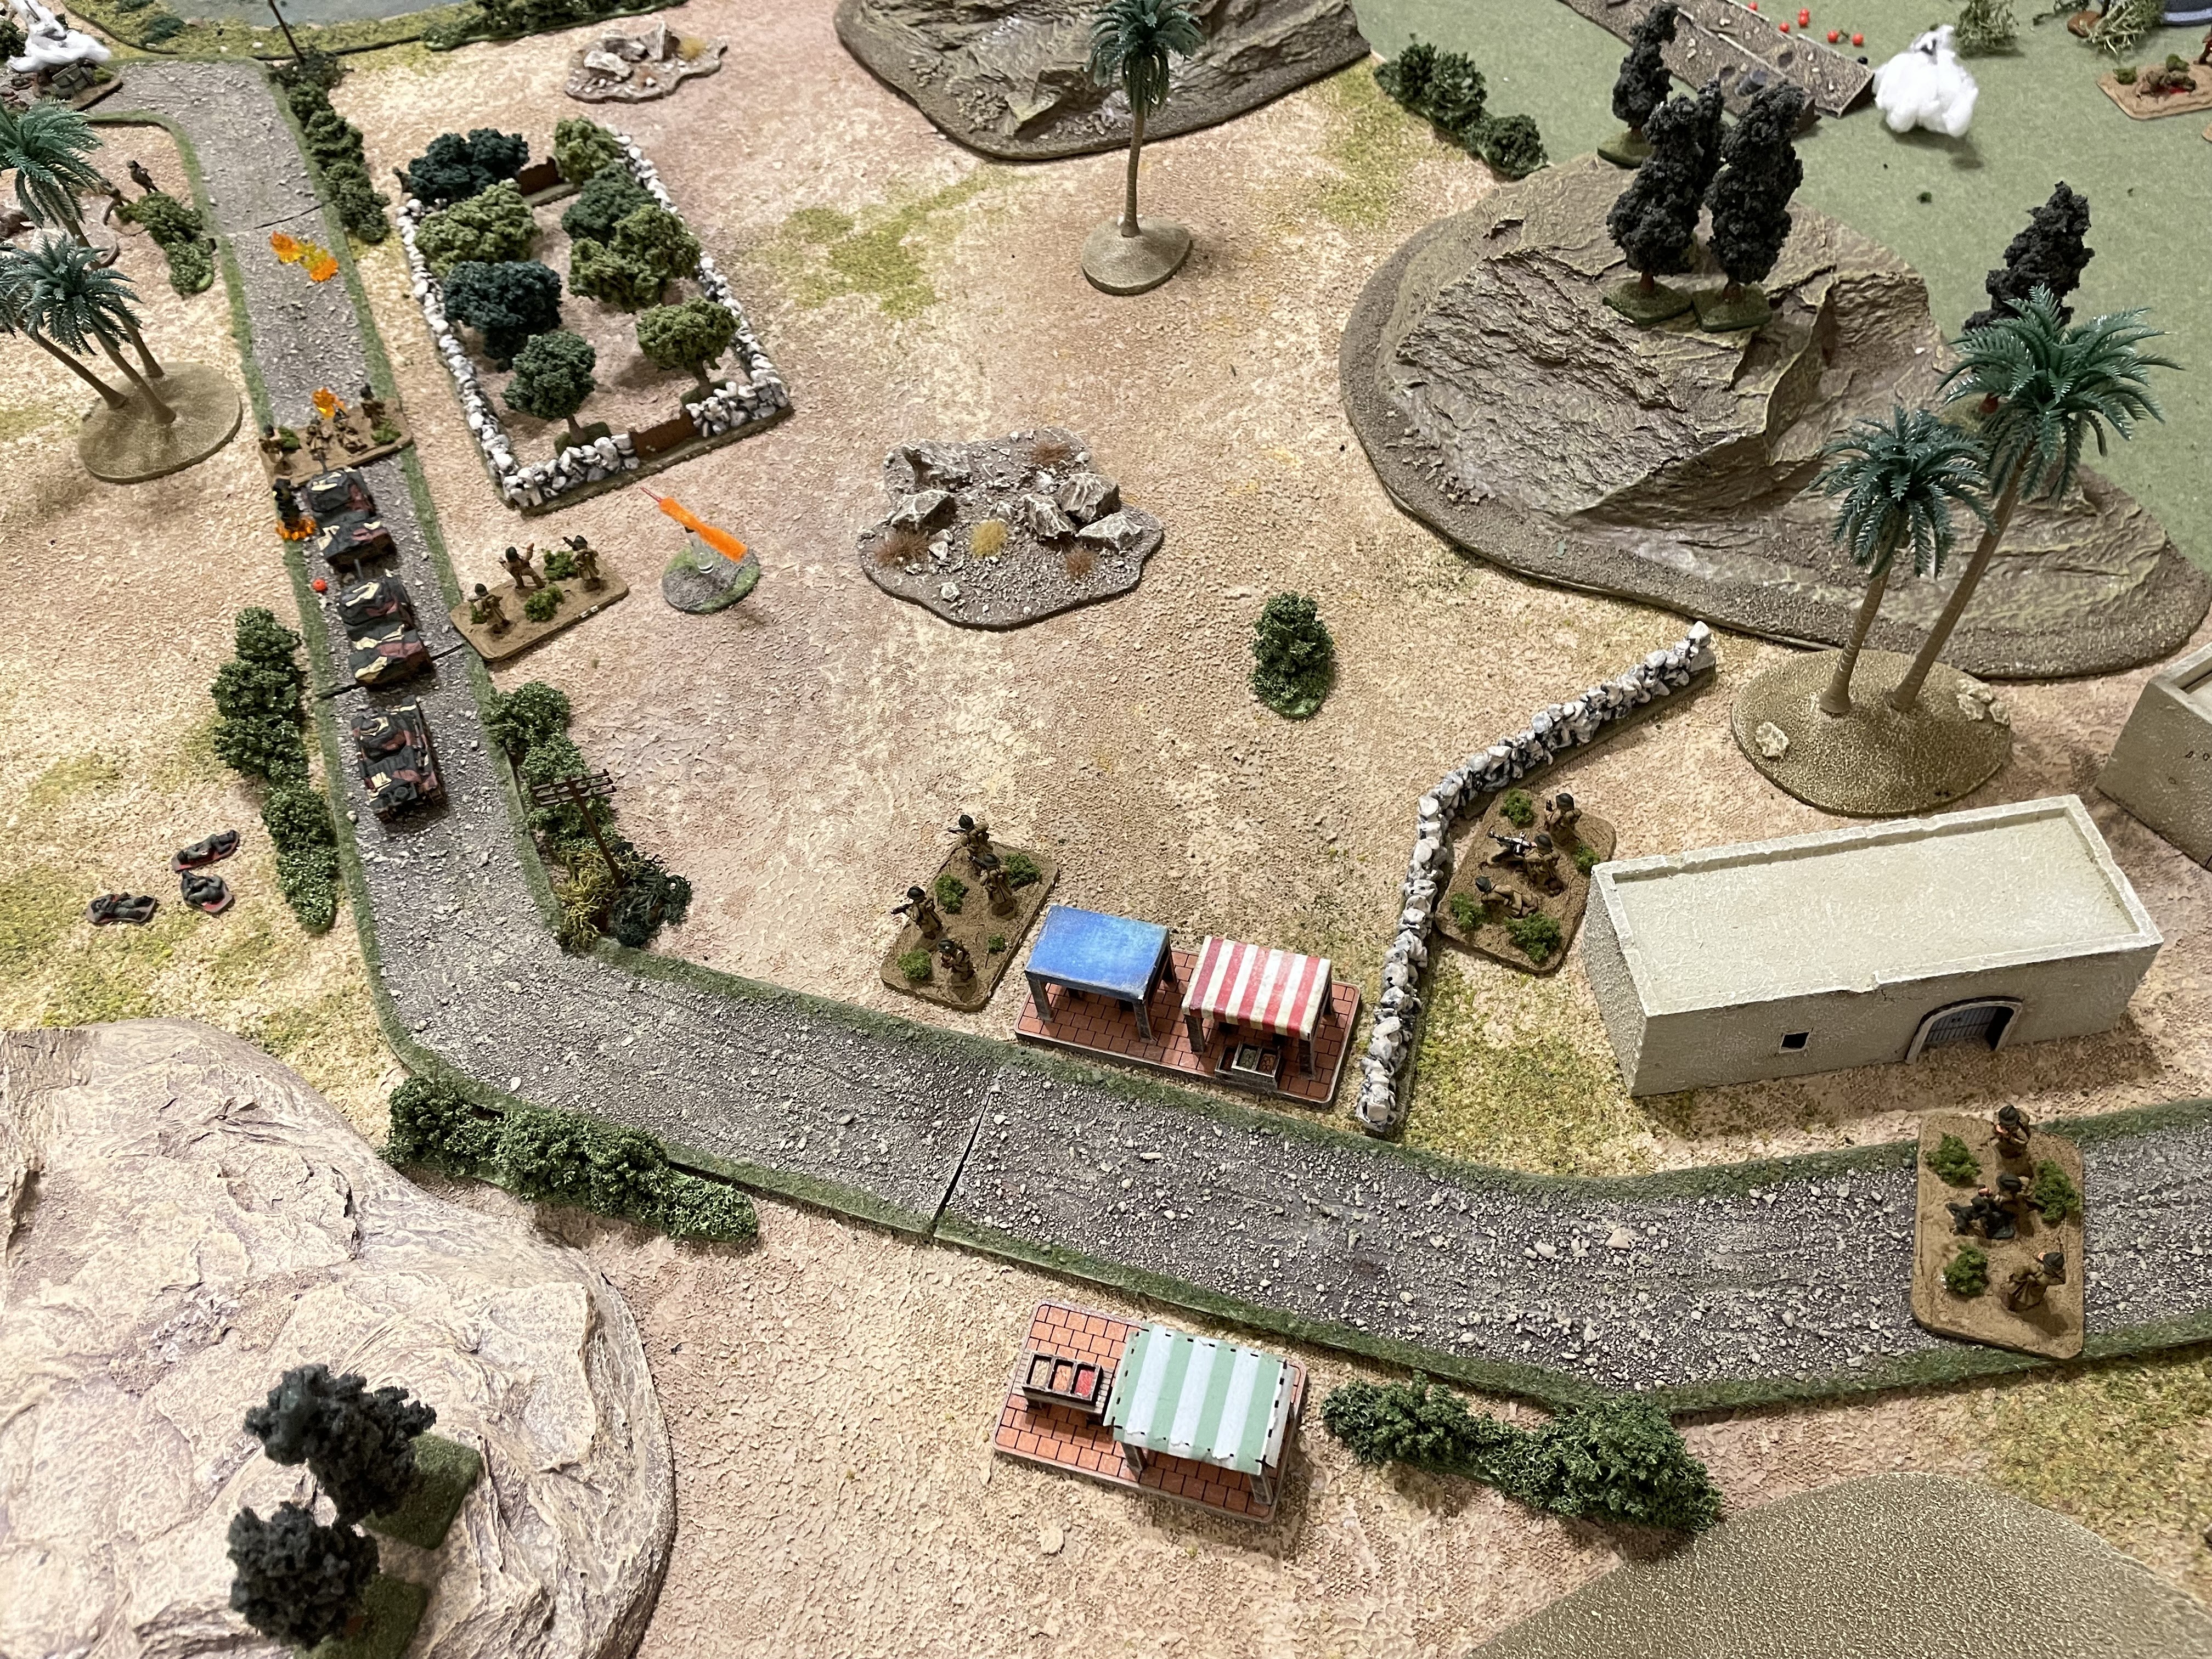
Overview, north is up. The edge of Mehdia is just visible at bottom left, while the village of Jalaat is at top right and the village of Bilal is at bottom right. Hill 41 is at left center, Hill 33 is at top center (with an unnamed hill just right of it), Hill 25 is at far right bottom, and here is a citrus orchard at center top. A bend in the river, known as the 'Wadi Sebou,' is visible at top left.
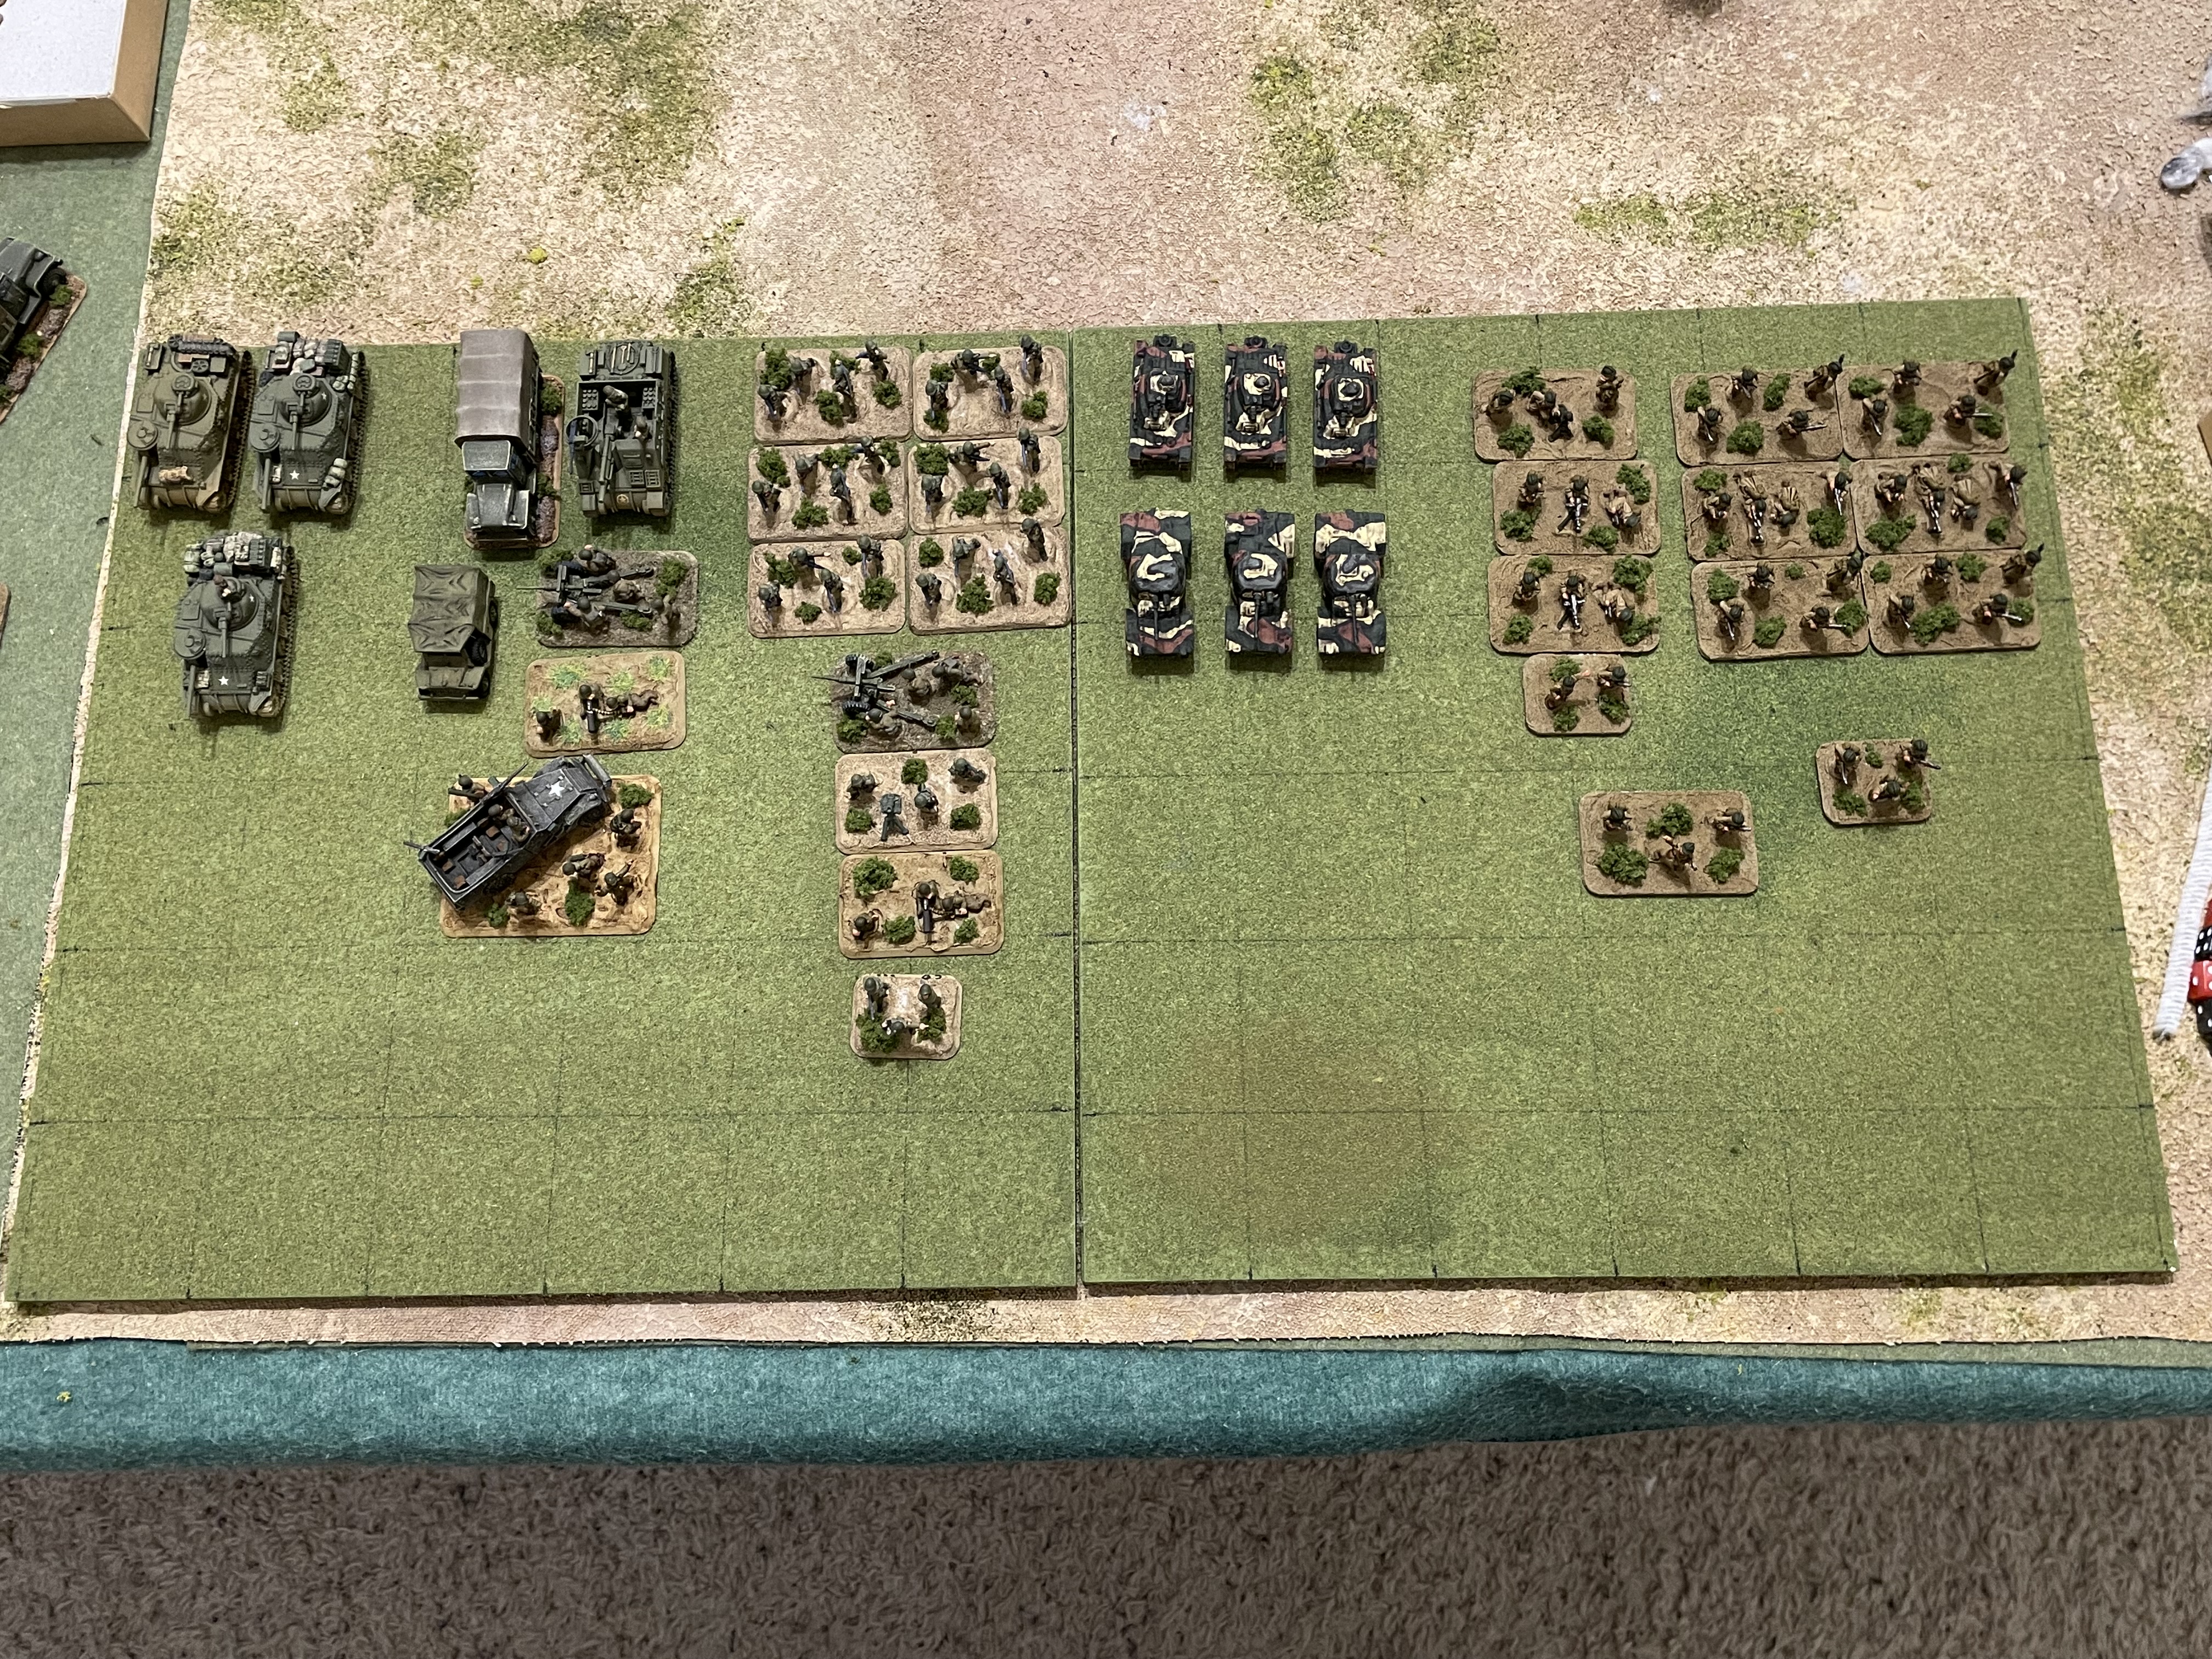
The opposing forces, with US at left and French at right.
The US will start with the forces at top right (two platoons' worth of infantry, a .30-cal MG, 1 60mm mortar, and a 37mm anti-tank gun -ATG-, commanded by 2nd Lt Olsavsky of 3rd Platoon, Easy Company) on the table.
Then the US will receive two waves of reinforcements: first, Major Reisman will lead another .30-cal MG, another 37mm ATG, and an M7 Priest into the fight. These will be followed by three M3 Grants under 2nd Lt Searcy.
The French have two rifle platoons, two MG teams, an 81mm mortar team, three Laffly armored cars, and three R35 light tanks, led by a Commanding Officer (CO), Executive Officer (XO), and a Weapons Platoon Leader, split in two columns.
The table, now with troops. The US forces are spread from top center to bottom center, while the French have a column in the northeast (top right) and southeast (bottom right). Here we go for the US forces, starting at top center:
-Sgt Griggs' 1st Squad, 1st Platoon, Dog Company, is atop Hill 33 (top center)
-Sgt Bush's 2nd Squad, 3rd Platoon, Easy Company, is behind the orchard (left of it, at center top)
-Sgt Jackson's ATG is at the bend in the bend in the road (left top, right next to the river)
-Sgt Norton's machine gun team and Sgt Harmon's 3rd Squad, 2nd Platoon, Easy Company, are atop Hill 41 at left center, with Lt Olsavsky on the road behind (left) them.
-Sgt Martin's 60mm mortar team is on the road just below the Lieutenant.
-Sgt Culver's 1st Squad, 2nd Platoon, Dog Company, is atop the building at left bottom.
-Sgt Hayes' 3rd Squad, 1st Platoon, Easy Company, is at the top end of the sheer bluffs at center bottom.
-Sgt Brown's 2nd Squad, 3rd Platoon, Dog Company, is at the bottom of the end of the sheer bluffs at bottom center.
Major Reisman, the Task Force CO, will bring in the first wave of reinforcements, consisting of:
-Sgt Bledsoe's MG team
-Sgt Brock's ATG
-Sgt Clark's M7 Priest
The second wave of reinforcements will consist of:
-Lt Searcy's M3 Grant
-Sgt Gilbert's M3 Grant
-Sgt Gordon's M3 Grant
Here's how the reinforcements will work: I will roll 1D6 at the end of each US turn, and if I equal or beat a target score the reinforcements will arrive. If I don't, the reinforcements will not come on an I will try again at the end of the following US turn, with a -1 to the target number each turn (so the first turn needs a 6, the second turn needs a 5+, the third turns needs a 4+, etc...). Once I succeed in bringing the first wave of reinforcements onto the table, the target number will return to '6' and I'll carry out the same process to bring on the second wave.
A look at the US defenses, with Sgt Griggs atop Hill 33 (top left), Sgt Bush behind the Orchard (left top), Sgt Norton's MG and Sgt Harmon's squad atop Hill 41 (left), Sgt Hayes at center, Sgt Brown at far right, Sgt Culver at bottom right, Sgt Martin's mortar team on road at bottom center, Lt Olsavsky's command team on road at left, and Sgt Jackson's ATG on road at far left.
Looking from behind the US left, with Hill 33 at top left, the Orchard at top center, and Sgt Jackson's ATG at bottom right.
From behind the US right, with Hill 41 at left, Mehdia at bottom right, and the bluffs at top right.
The French baseline, with one column in the northeast (top left) and one column in the southeast (far right).
The French column in the northeast consists of:
-Their Commander (CO)
-81mm mortar team
-Hotchkiss MG team
-2 x Laffly armored car
-1 x R35 light tank
-3 x rifle squad
The French column in the southeast consists of:
-their Executive Officer (X)
-1 x Laffly armored car
-2 x R35 light tanks
-3 x Rifle squads
-Weapons Platoon Leader and Hotchkiss MG team back at Hill 25 (top right)
Time to fight!!!
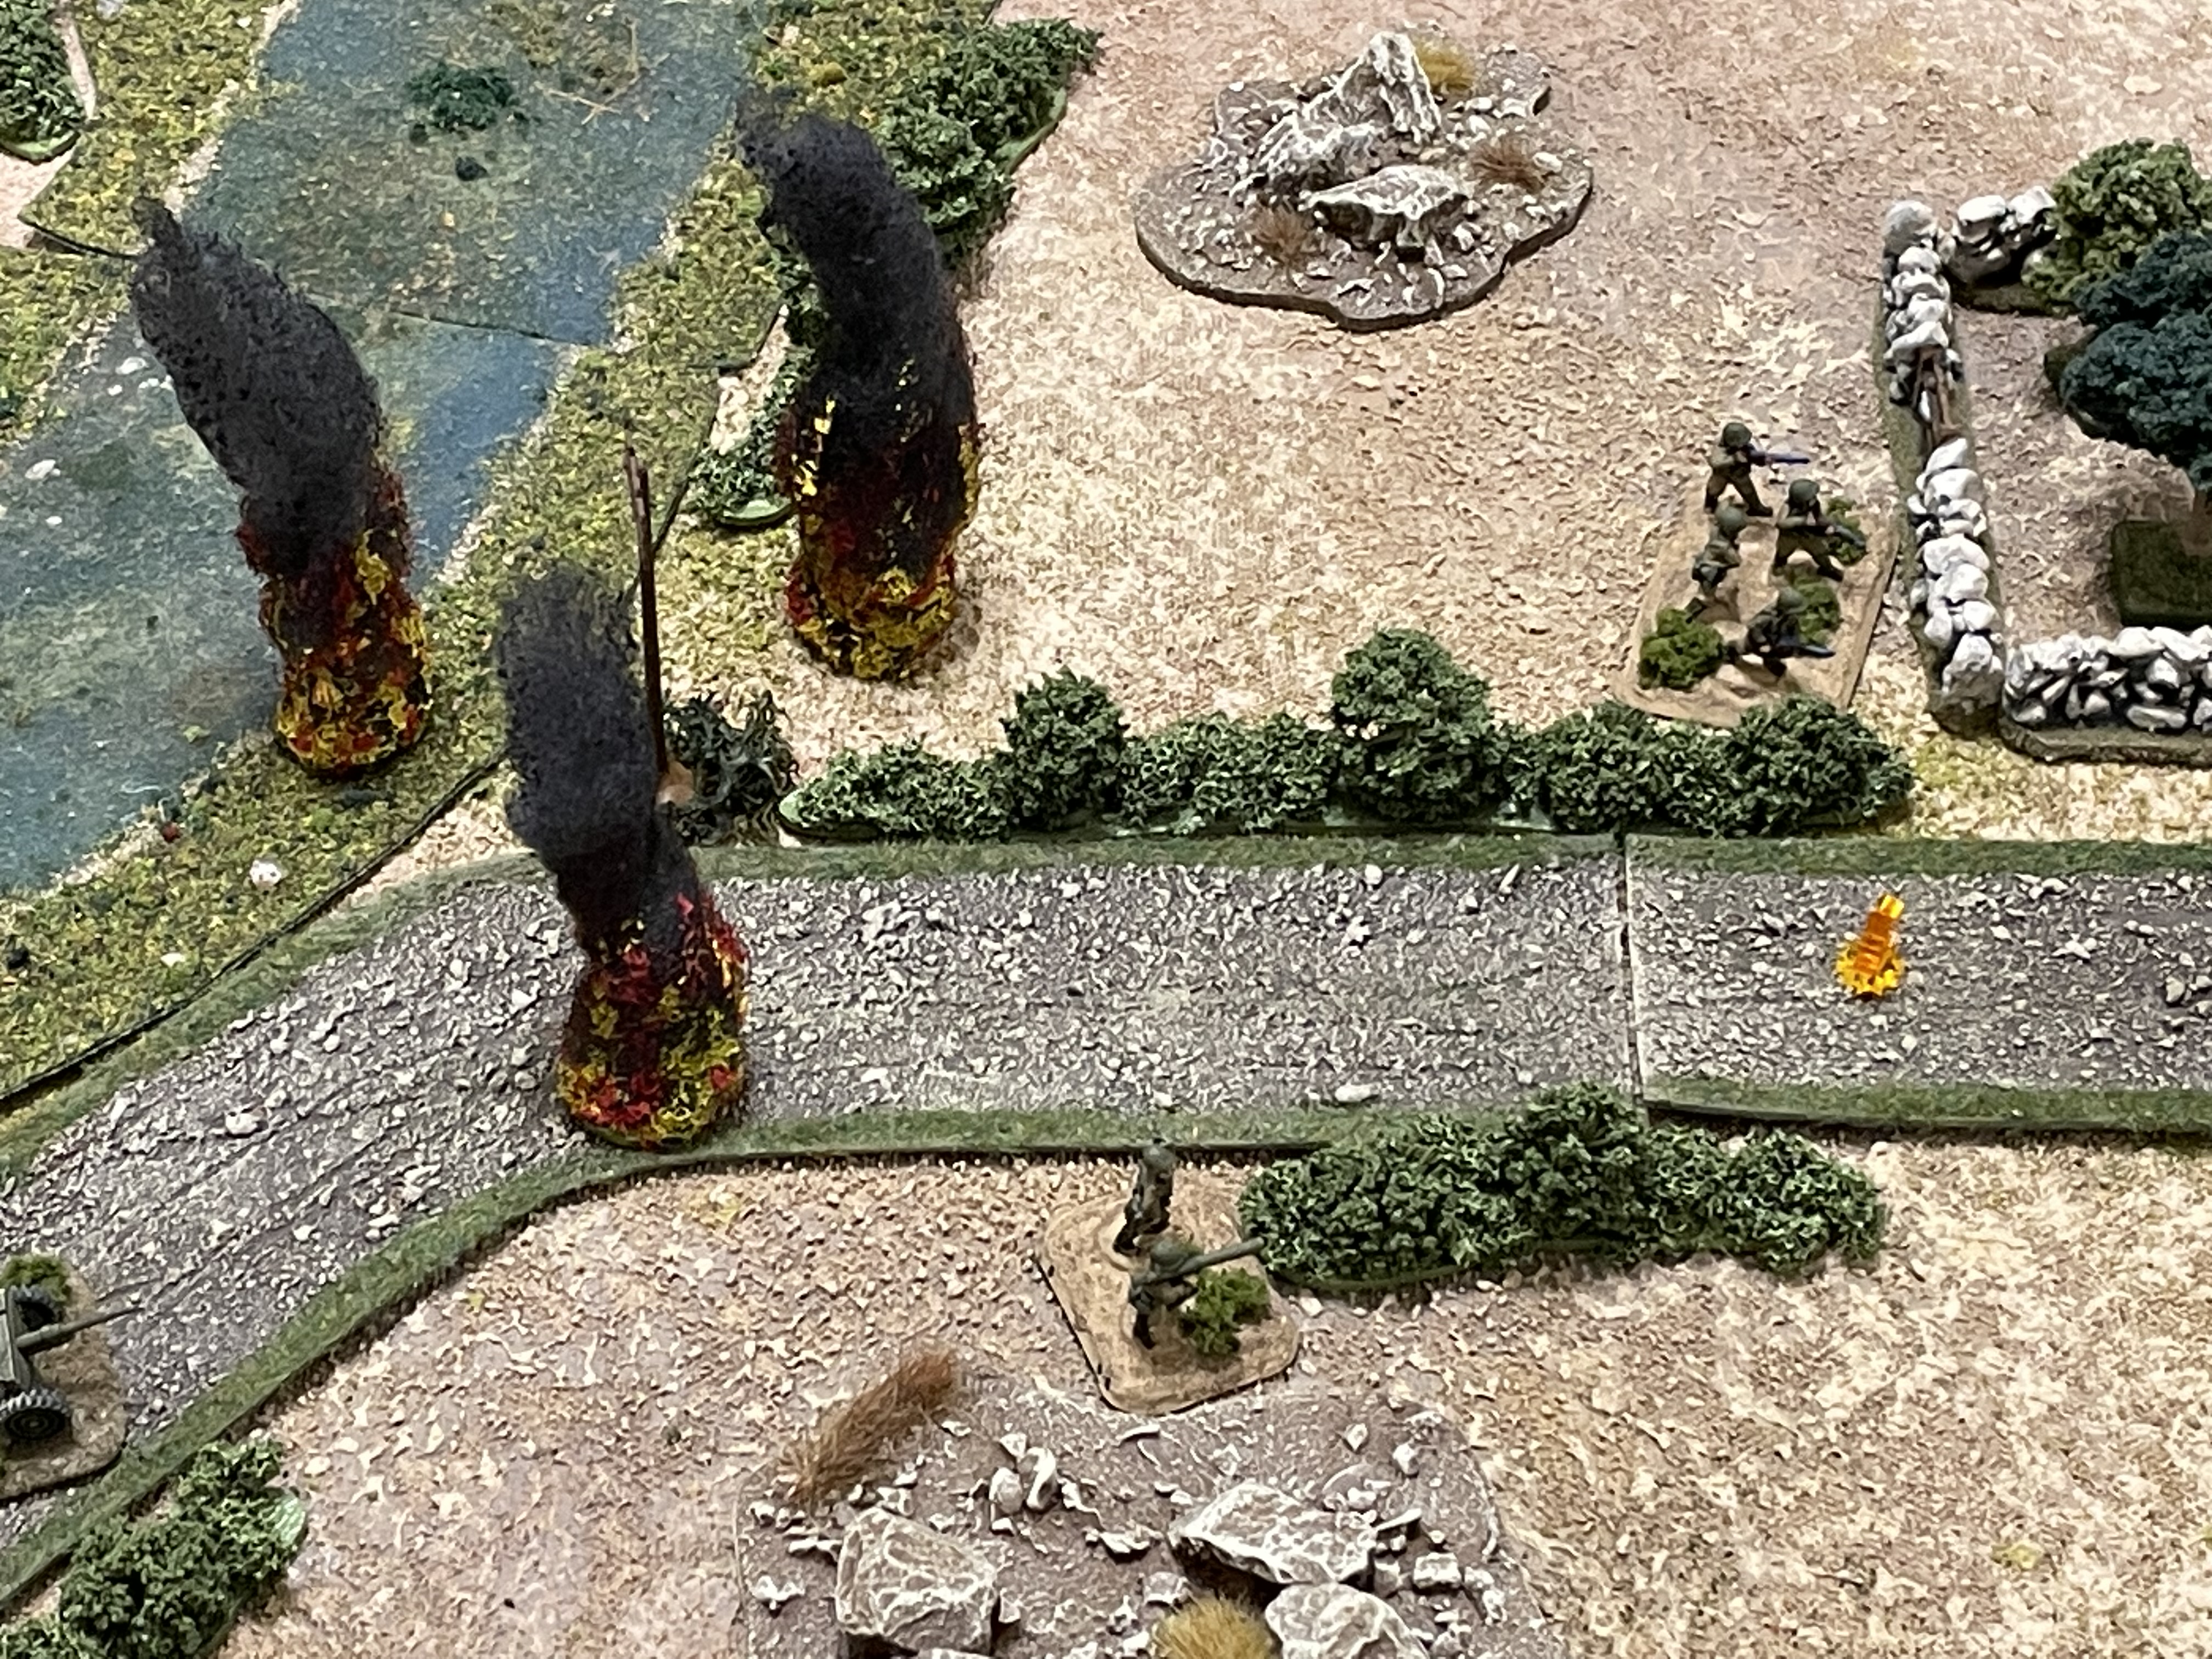
The fight begins in the northeast, where the French being pounding Hill 41 (top left) with their 81mm mortar (bottom right).
**The French have thrown together a hasty counterattack, with no reconnaissance having been conducted, so they have don't know where the US defenders are actually located, but Hill 41 is a great guess.
Sgt Norton (MG team, left) and Sgt Harmon (rifle squad at bottom center) look on as the rounds fall harmlessly on the east slope. Sgt Bush's squad is just visible behind the orchard (top left), and the French northeastern column at top right.
The French MG team atop Hill 25 (bottom right) also begins indiscriminately spraying fire at Hill 41 (top left), to no effect.
The smart thing to do would be to hold their fire so as not to give away their positions, but the green GIs of Sgt Harmon's squad (bottom left, atop Hill 41) return fire on Hill 25 (top right), hitting nothing but confirming Americans are Hill 41...
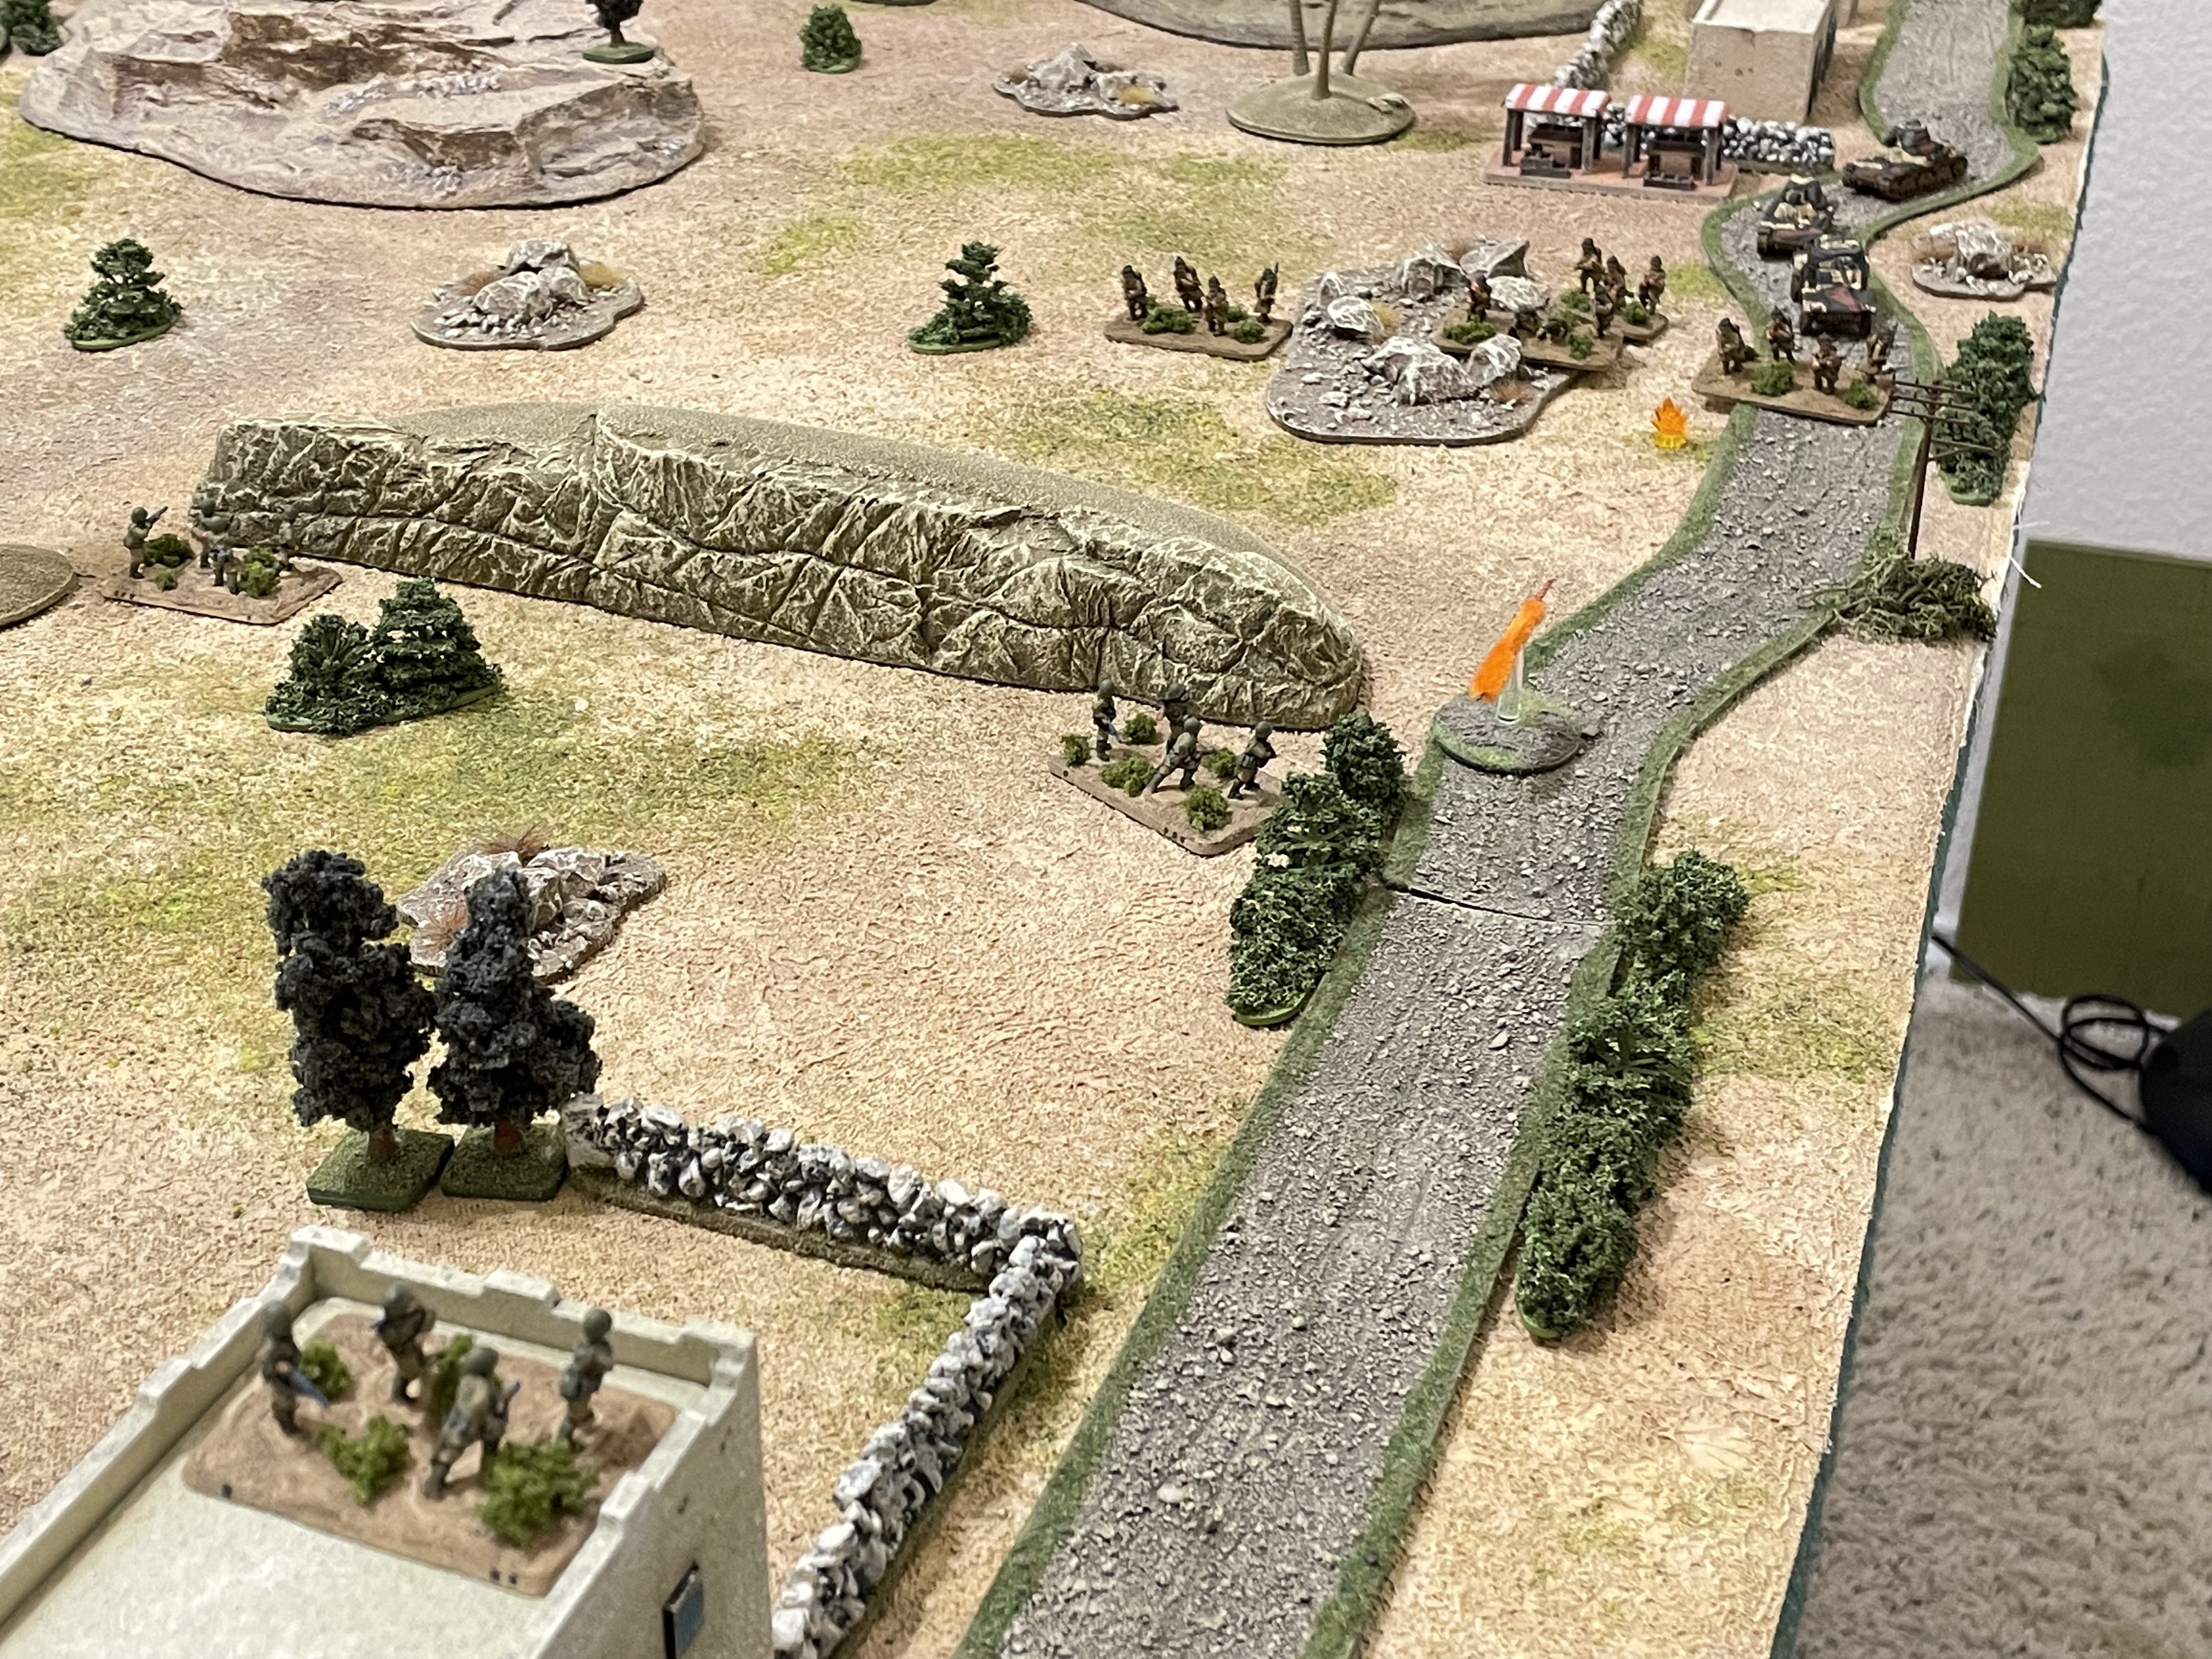
While this harmless exchange of fire is occurring, the French southeastern column moves out, heading west (far/bottom left, from bottom right).
Atop a building in Mehdia, Sgt Culver's squad (bottom left) opens fire on the encroaching French (center/top right)...
And the US small arms fire catches a French squad exposed in the road and knocks them out of the fight! The nearby Laffly armored car (far right) halts...
The vehicle commander (bottom right) directs his gunner onto the target and they begin pounding the buildings of Mehdia (top left) with their 25mm gun...
Suppressing Sgt Culver's rifle squad (far right) and Sgt Martin's mortar team (left)!!!
As the French commander gets the northeastern column moving forward.
Sgt Griggs rifle squad, atop Hill 33 (bottom left, with Sgt Bush's squad at the Orchard visible at bottom right) opens fire on the advancing Frenchmen...
Sgt Griggs' squad (top left) pins a French rifle squad (yellow bead at center bottom), but a nearby armored car (bottom center right) returns fire...
And the 25mm cannon fire knocks the Yank squad out!
And as Sgt Grigg's squad is knocked out (far left), Sgt Jackson's 37mm ATG (bottom right) replies, sending a solid shot towards the French (top left)...
The round is short and suppresses the French commander, but fails to find any French armor.
There is a lull in the firing as the shocked, inexperienced GIs manning the perimeter defenses catch a breath, trying to calm down, trying to make sense of the sights and sounds of battle, made even more confusing in the dark. Some GIs were actually scared this was a friendly fire incident; 'hold your fire, that's gotta be troops from our Armored Recon company coming back in!'
The US rolled a 'Scurry,' which kinda sucks as they can't shoot and they don't really need to move, though it will give them a chance rally some of their suppressed troops, but they need to do it without moving anyone, because if they move any troops it will allow the French troops that see it to move, also. Additionally, the Americans rolled up a random event: turns out one US vehicle is immobilized for the game. Since the Yanks don't have any vehicles on the board I roll to see about the vehicles off the board; turns out Sgt Gordon's M3 Grant, in the second wave of reinforcements, had his tank break down on the way to the fight and won't partake in this evening's festivities...
Sgt Martin's mortar team (left) and Sgt Culver's rifle squad (right) both attempt to self rally: the mortar team is good, but Sgt Culver's boys panic...
And fall back!!! It's not bad enough they didn't rally, but two more things: 1) the French saw the Americans pull back, so they get to move now, and 2) with all these troops being green, I roll to see if this incites a panic...
That's not good (1s and 6s are bad in 5Core)...
Sgt Hayes' and Sgt Brown's squads at the bluffs (bottom and far right) panic and fall back (red beads at center, with Hill 41 at top center and Mehdia at top left)!!!
Lt Olsavsky, in overall command here at the (this section of) perimeter, is wracked with indecision; having already been reprimanded for weak leadership (in the first fight he never even got his platoon off the beach), he girds his loins and pushes right (center, from far left), moving up to try and halt the squads (right) retreating from the bluffs (top right).
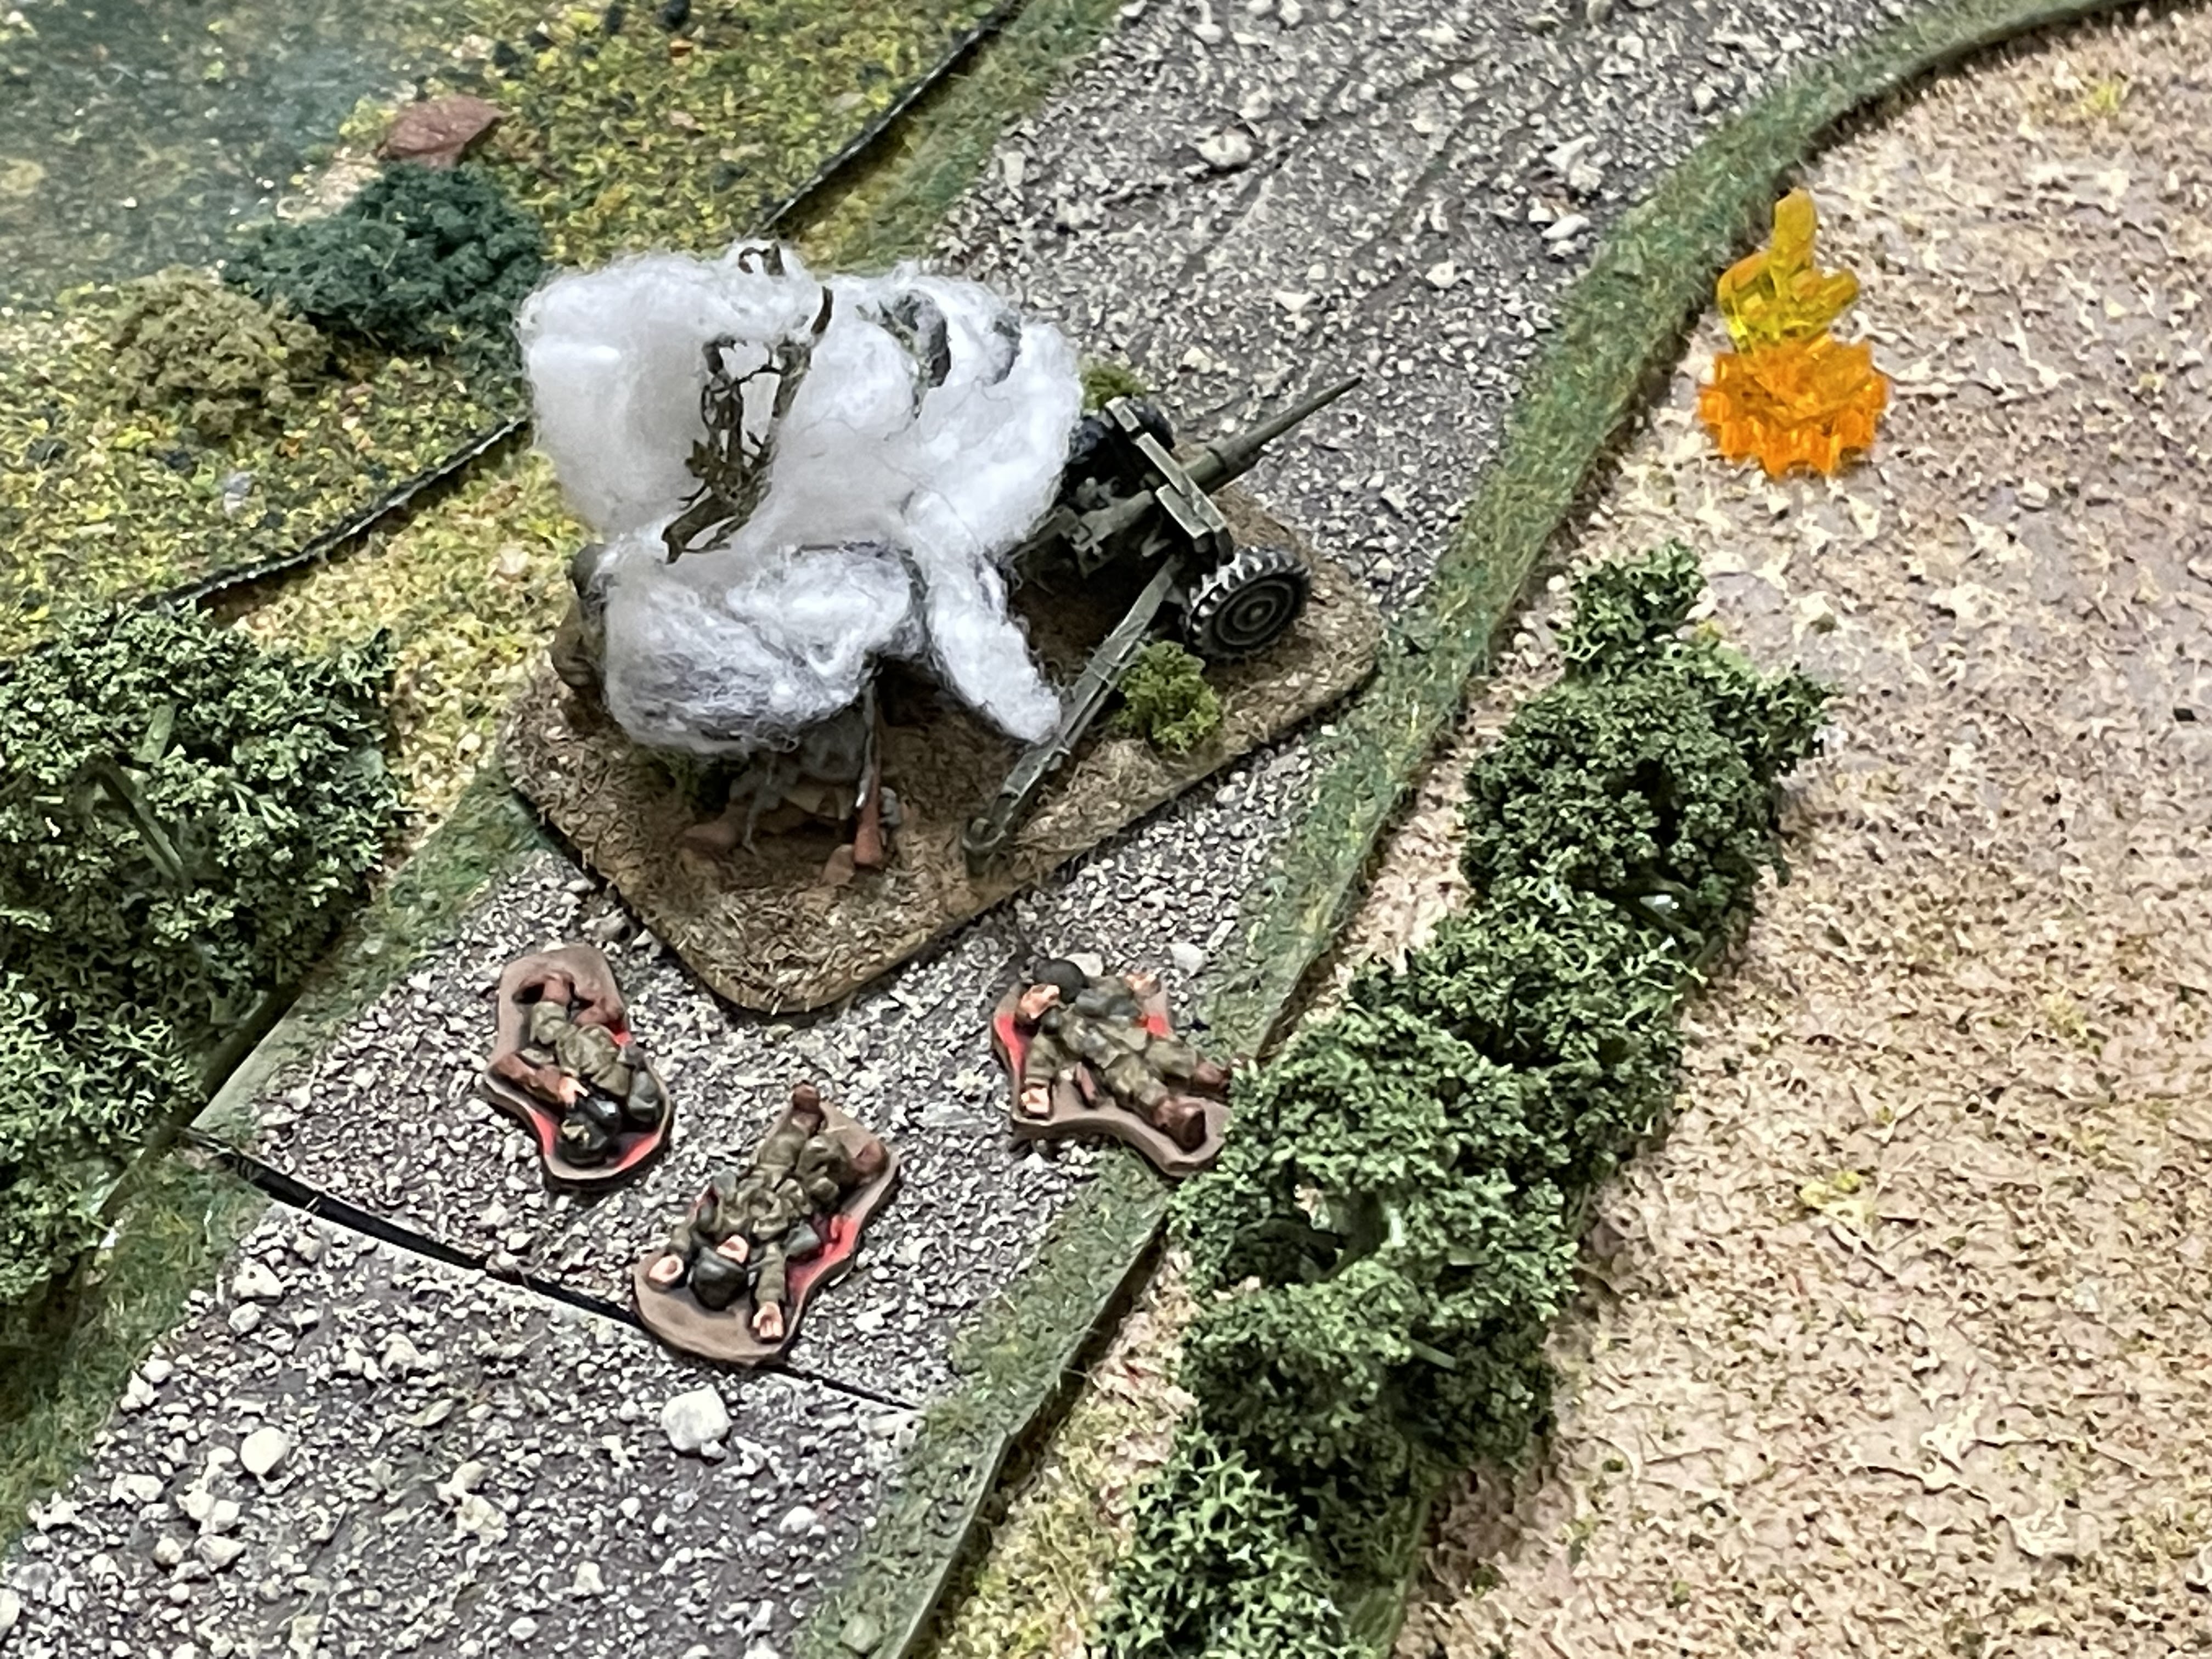
Back in the northeast, the French commander (red bead at bottom left) successfully rallies as his mortar team (top right) continues pumping out 81mm HE rounds...
And they're on target this time, causing casualties amongst Sgt Jackson's anti-tank gun crew!
The French northeast column (minus their CO, who just rallied, and a pinned rifle squad, center) push forward (left) as their Hotchkiss MG team (right top, behind the wall) lays down fire.
Atop Hill 41 (bottom left) Sgt Norton's .30-cal MG opens fire, spitting lead at the French northeast column (top right)...
Sending another out of the fight!
The armored cars (bottom right) return fire on Hill 41 (top left), suppressing Sgt Harmon's squad.
As the French southeastern column pushes up to the bluffs. As the advance, Sgt Brown's squad (top left) comes into view and the French open fire, keeping them suppressed.
With fire coming in on Hill 41 (top) and on his right (French southeastern column is just off camera at bottom right), Lt Olsavsky (center) has a decision to make: be brave (move up and rally Sgt Hayes' and Sgt Brown's squad, right), or be chicken (move up, into cover atop Hill 41, to rally Sgt Culver's squad, top)...
He goes the chicken route, moving up Hill 41, up to Sgt Culver's squad, where he successfully rallies them.
As Sgt Norton's MG team (bottom left) continues spewing lead at the French northeastern column (top right)...
The Yankee machine gun (top left) fire has no effect, but neither does the return fire of one of the Laffly armored cars (bottom center).
While atop Hill 41 (bottom left), Sgt Harmon goes heroic: "Dammit, Lootenat, I had it under control, you shoulda gone down there (right top) to help those guys! You know what, let's go, fellas!" And with Sgt Harmon led his squad downslope to help halt Sgt Sgt Hayes' and Sgt Brown's panicking squads.
But the French (bottom right) see Sgt Harmon and his men come running downhill, and the three American rifle squads, all bunched up, make quite a delicious-looking target. The French open fire, but somehow they miss!!!
Sgt Harmon tries to help the other two squads rally...
Good grief...
**I used a red and a black dice just so I could tell the two squads apart while rolling them up at the same time.
Sgt Harmon and his men (far right bottom) are left in the dust as Sgt Hayes' and Sgt Brown's squads continue their panicked flight west (red beads at center from right)!!!
Sgt Martin's mortar team (bottom left) pumps out rounds at the French southeastern column (top right) as Sgt Culver rallies his squad.
The rounds are a little long and only manage to pin an armored car.
The US side gets a little luck: the French need to keep moving, but they roll up a 'Firefight!' Sure, it's going to suck weathering their fire, but it's great luck they don't get to continue closing, gotta have some room left for the US reinforcements to arrive!
The French attack begins to bog down: both columns (northeast at top right, southeast at bottom left) go firm and look to overwhelm the Americans with their superior firepower: both MGs (bottom right, atop Hill 25, and right top, behind the wall) and their 81mm mortar (top right) pound Hill 41 (far left).
Lt Olsavsky panics (red bead) as Sgt Norton's machine gun squad is knocked out!!!
Sgt Jackson's ATG (top center right) was hit and panicked earlier and still has yet to rally back into the fight, as the French Laffly in the northeast (bottom left) opens fire...
And finishes them off!
As French troops in the southeast (bottom right) continue firing at the US infantry opposite them, inflicting casualties on Sgt Harmon's squad (left top, with Sgt Hayes' and Sgt Brown's squads panicking behind them) and sending them 'men down!'
So much for going heroic, both squads he tried to rally kept running and now his men are hurt, panicked, and ripe to plucked...
Then the US side rolls up a 'Firefight,' which normally is great for defenders, but is the absolute worse thing that could have happened to the US side right now as it allows them to fire but not move or rally, and they don't have hardly anyone that's still able to fire and have a bunch of troops that need to be rallied...
Atop Hill 41, Lt Olsavsky and his command team self rally (I allow the acting CO to self rally on the Firefight, but no one else) as Sgt Martin's mortar team (bottom center left) continues pumping out 60mm HE rounds at the southeastern column (top right)...
Pinning one of the R35 light tanks.
Now the French roll up a 'Scurry,' which allows everyone to move or rally, but not shoot. They'd have preferred a 'normal' activation (so they can move and shoot), but they'll take a Scurry.
The French southeastern column rallies itself and moves up (bottom left), getting very close to the panicking US infantry (center/left).
And then does the same thing on with its northeastern column (the slacking squad at right took two attempts to rally, which is why it's so far behind the rest of the column, at center/left).
While on the US right, Lt Olsavsky (far left) again has a choice to make: go brave, down to rally Sgt Hayes' and Sgt Brown's squads (bottom center), or go really brave, over to rally Sgt Harmon's squad (right)...
He panics and freezes!!!
*Yeah, I'm adding a lot of stuff into the rules, morale-wise, to reflect the low confidence of the green US troops in North Africa. And them just sucking due to being members of the Army...
Sgt Culver has finally managed to calm his boys down and get them back into position (atop building at bottom center, from bottom left) as Sgt Hayes' and Sgt Brown's squads (center, with Lt Olsavsky at top center, Sgt Martin's mortar team at far left, and Sgt Harmon's squad 'men down' behind the trees at right, French just off camera to bottom right)...
Sgt Hayes' squad rallies 'up' to pinned (yellow bead at bottom right), but Sgt Brown's squad continues running (red bead at far left top)!
Sgt Bush's squad is holding down the US far left flank (bottom left, behind the Orchard) has a decision to make: having watched Sgt Griggs' squad get gunned down at Hill 33 (off camera to left) and Sgt Jackson's ATG crew annihilated (off camera to bottom center right), with French armor and infantry (center/top center) bearing down on them. So far they've been content to hide, quiet as a church mouse, behind the Orchard, but that's not really an option now, so Sgt Bush has a decision to make: should they stay or should they go?
Not only will Sgt Bush's squad stay, but they also managed to scrounge up Cpl Miller, 3rd Platoon, Easy Company's anti-tank team leader!
Cpl Miller slinks right (bottom left, next to Sgt Bush's squad), unseen by the French (top right), rises, and prepares to fire a rocket at the nearest enemy armored vehicle... But as he does, Sgt Bush's men open fire with their rifles and BARs!
Pinning the nearest French rifle squad (yellow bead at far right)...
But drawing fire from the Laffly armored car (bottom left) just as Cpl Miller (top right) is steadying the bazooka to fire...
The rounds somehow zip by harmlessly as Cpl Miller fires...
The rocket careens off the front armor of the French armored car, suppressing its crew (red bead at far right), as Cpl Miller curses under his breath and falls back to cover to reload (bottom left, from gunfire marker in the street at left)...
But then Sgt Martin's mortar team (bottom center), firing on the French southeastern column (top right), finally finds the range...
One French rifle squad is knocked out, one is suppressed (red bead), and their XO is 'men down' (white bead)!
The French are ripe to be plucked in close combat (right top), and Sgt Harmon's squad (white bead at left) really needs help, but Sgt Culver's men (atop building at bottom left) are too scared to advance, so they just open fire with their M-1 Garands and BARs...
And they manage to knock out another French rifle squad (casualty figures at top center)!!!
With things turning against the French on the right, Lt Olsavsky finally gets up the gumption to come down off of Hill 41 (far left) to help Sgt Harmon's 'men down' squad (center right)!
Just s Major Reisman arrives with Sgt Clark's SPG, Sgt Bledsoe's MG team, and Sgt Brock's ATG!
The Major immediately breaks his foot off in Sgt Brown's ass (red bead at top left), rallying him and his squad.
As Sgt Clark's M7 SPG leads Sgt Bledsoe's MG team (both at top left, the MG team in the 3/4-ton truck) forward as Sgt Brock and his crew unlimber their 37mm anti-tank gun and manhandle it into place (bottom right).
The French are running out of steam and, even worse, infantry. The Laffly crew checks on their 'men down' XO (white bead)...
He's good, back in the fight, and they both move up (XO on road at right, Laffly at center left, staring at Sgt Harmon's squad (far left).
But Cpl Tippett, 1st Platoon, Dog Company's anti-tank team leader, rushes to the wall and fires his bazooka at the French armored car!
The armored car is hit and immobilized, and its crew bails out and flees for cover!
**I suppose I should admit that my dogfaces shouldn't actually have bazookas until February 1943, but I couldn't help myself...
The Laffly hit and abandoned (center, the two R35 light tanks push past the XO...
Only to run smack into Sgt Brock and his 37mm anti-tank gun (bottom left), which opens fire!
Knocking out the lead tank and suppressing the one behind it!
While on the French right, their mortar team (bottom right) fires on Sgt Bush's squad and Cpl Miller's bazooka team (top left)...
But the rounds go long...
As the French CO dashes up to rally his pinned rifle squad and suppressed armored car. The other Laffly armored car and the R35 move off road to the left, trying to get around them to keep up the impetus of the attack.
Cpl Miller (far left) pops up and fires another rocket, this time at a different armored car...
But he (far left) misses, and return fire suppresses him and his assistant.
But then the Sgt Martin's 60mm mortar team (bottom left) shifts fire and begins dropping 60mm HE rounds on the French northeastern column (top right)...
And it's right on the money: a rifle squad is knocked out, while an armored car (far left), the light tank, and the French commander (center right) are all suppressed!
Sgt Bush (bottom left, with Cpl Miller's suppressed bazooka team at bottom right), his morale bolstered after seeing the French get pasted by the mortars, decides to open fire on the nearby French...
But it doesn't turn out well as their (top center) fire is ineffectual and the unsuppressed armored car (right bottom) returns fire, suppressing the American squad!
But over on the US right, things are looking up...
When Cpl Tippet reloads, then launches another rocket, targeting the sole remaining armored vehicle in the French souteastern column...
The rocket hits the French tank and brews it up (center bottom with the R35 knocked out by Sgt Brock's ATG at bottom left and the Laffly armored car hit by Cpl Tippett and abandoned at center), and the French XO is suppressed (red bead at bottom right)!!!
His armor and infantry decimated, the French XO falls back (red bead at far right, from bottom left), lucky to be alive!
The French CO, with the northeastern column, sees this and orders his men to fall back, too. An armored car lays down covering fire (on road at left) as the rest of the column falls back (center/right, from far left), ending the French counterattack on the US invasions beaches (where they had more success against the 9th Infantry Division sector, capturing some 200 GIs). It was interesting that only one unit (Sgt Brock's ATG) from the first wave of reinforcements did anything to influence the fight, and the second wave never even made it!
Well, that was a fun fight, made even better by the fact the right side won ;) Despite a very uneven defense, the GIs were able to hold out; I didn't mean to play this many fights (seven total) against the French, but I think subconsciously I'm playing this many fights against the French to get as many TF Reisman troops 'blooded' so they're ready when we finally start facing the Germans! Despite the morale failures and falling back, ultimately everyone (that survived) has now 'seen the elephant' and should be a bit more reliable, or at least I'll treat them that way when they see the table again.
Let's get to some stats:
-the US had 10 men killed or wounded
-the US lost an M1 37mm Anti-Tank Gun destroyed
-the French lost 30 men killed or wounded
-the French lost a Laffly armored car and two R35 light tanks destroyed
Characters:
-Cpl Tippett, Anti-Tank Team, 1st Platoon, Dog Company, was awarded the Bronze Star w/V for destroying an enemy armored car and an enemy tank with his rocket launcher.
-2nd Lt Olsavsky, 3rd Platoon Leader, Easy Company, received kudos from Major Reisman for dashing into enemy fire to assist Sgt Harmon's suppressed rifle squad (didn't receive a Bronze Star w/V because of his earlier hesitations to expose himself to enemy fire, though it did wipe out the reprimand he'd received after the beach landing battle)
-Sgt Harmon, 3rd Squad, 2nd Platoon, Easy Company, received kudos from Major Reisman for dashing into enemy fire to assist two suppressed friendly rifle squads (despite both the friendly rifle squads continuing to fall back and Sgt Harmon's squad being caught in the open and taking casualties, which is why it's only kudos and not a Bronze Star w/V)
-Sgt Brock, Gun 3, Anti-Tank Gun Platoon, received kudos from Major Reisman for knocking out an enemy tank
-Sgt Jackson, Gun 1, Anti-Tank Gun Platoon, received a Purple Heart, able to return to duty immediately
-Sgt Norton, Gun 2, Machine Gun Platoon, received a Purple Heart, return to duty 15 Dec 1942
-Sgt Griggs, 1st Squad, 1st Platoon, Dog Company, received a Purple Heart, returned to US and medically retired
-Sgt Brown, 2nd Squad, 3rd Platoon, Dog Company, was reprimanded for a lack of combat leadership
-Sgt Hayes, 3rd Squad, 1st Platoon, Easy Company, was reprimanded for a lack of combat leadership
**On an admin note, I've been screwing up all the ranks for the crew-served weapons, calling them Sergeants when they're all supposed to be Corporals...
So, a pretty good fight. Playing solo, it's common for me to have a problem playing attack/defend scenarios when I'm the defender, seems to work much better when I'm on the move, many more decisions to make, but this worked pretty well, I really liked how I handled the reinforcements.
Next up we have Captain Henry leading the second assault on 'Murderville' and 'The Meatgrinder.' Let's hope it goes better than the first...
V/R,
Jack