Sunday, January 5, 2014

Fight 1 of 4 in my NW Europe Mini-Campaign

All,

Well, I solicited help on several different forums for a plan on how the Germans should allocate their forces to each of four fights in a mini-campaign, and I greatly appreciate everyone that posted.  Here are the results of the first battle.

Below is the scheme of maneuver for the mini-campaign.

Here is the map for the first fight.  North is to the right, with US forces attacking from the NW (top right) corner.

Here is the table:
 Looking from west to east, with road running north to south (left to right).  US forces will enter from bottom left corner.

 Viewpoint looking southeast from US entry point.

 The US force: Company XO (far right, with Jeep), three rifle platoons (three rifle stands, bazooka, and platoon commander, each), weapons platoon (MG, 60mm mortar, PC), weapons company attachments (MG and 81mm mortar), and tank platoon (4 Shermans w/75mm gun).

 Another look at these hard-chargin' doggies.

 The table, with enemy forces added.  Top left (in the woodline) is Strongpoint Helmi, with PC, rifle squad, MG-42, and two PaK-40 ATGs.  Top center right (atop the large hill) is Strongpoint Alma, with Company Commander, FlaK-36 88 AA/AT gun, PaK-40 ATG, 2 rifle squads, 2 MG-42 teams, and an 80mm mortar.  At top right (in woodline south of SP Alma) is Strongpoint Gunter, with PC, 2 rifle squads, and a PzSchreck.  Last is, in the village at center, Observation Point Lois, with two rifle squads.

Everyone except the squads at OP Lois are dug in, and the squads at Lois are in the buildings.

 OP Lois.

 SP Helmi.

 SP Alma.  Top left to right is PaK-40 emplacement, FlaK-36 emplacement, emplacement with CC and 80mm mortar, trench with rifle squad; below (bottom left) is a trench with rifle squad flanked by two MG-42s.

 SP Gunter.

 The results of the US preparatory artillery barrage ("stonk" for you Brits out there), which hit SP Alma: few hits allocated (red dice), and quite a few 'pinned' results (yellow beads).

Let's get this thing started.  So, I'm a bit nervous because I feel like a lot more folks are looking now, since I posted for help online.  As my good friend Ronan put it, "Hey, Jack... now you're fighting ALONE in front of a full HQ of several generals."

So, if you haven't seen my battle reports before, things are run fast and loose, very stylized, sort of a movie version of warfare, which is the way I like it.  Real war isn't all that fun...  Also, I'm playing solo, so I put the enemy forces on blinds (with dummies added), place them on the table in likely defensive spots, then flip them over and place the enemy teams.  This keeps me from unduly influencing the enemy's setup.  And once the game is on, I use a dice-roll matrix to help me make decisions for the enemy, such as when to use opportunity fire, whether to move or shoot, who to shoot at, etc...  So, screwy enemy decisions are not necessarily my fault, but screwy US decisions most certainly are.


 So, the attack kicks off with 1st Platoon entering the table (foreground, with OP Lois directly in front of them, SP Helmi off camera to left, and SP Alma in background).  The MG-42 and rifle squad at SP Helmi open up, getting a hit on 1st squad and three on second squad, as well as pinning them.  1st Squad can't get anything done, but second manages to unpin and hit the deck (green bead for prone).  3rd Squad (3/1, for third squad, 1st Plt) fails its roll, while PC1 goes prone and fires at the rifle squad in the near building of OP Lois, pinning it.  Then the bazooka team (B1) slams a rocket into the building, getting two hits on the hapless Germans.

 Weapons Plt (with Wpns Co attachments) comes on next, and are pretty worthless.  Both MGs fail their rolls, and German MG2 on SP Alma gets two hits on US MG1 (MGs only take three hits before being eliminated, and losses of strength points reduces firepower; an MG rolls 6 firepower dice, and has three strength points, so down to 1 SP means it's down to 2 FP dice...).  The 81mm mortar goes after a German MG on Alma and misses, before the 60mm mortar fails its roll...  As I stated, worthless.

 2nd Plt comes on at a sprint, and runs through some spotty German opp fire to reach the wall outside OP Lois.  An exchange of gunfire occurs, putting a hit on each of the German rifle teams (three total for the left-hand team, one total for the team in right-hand bldg).  Then 1/2 (far left) decides to charge!

The German team already has three hits (rifle squads take 5 hits) and is pinned, so it's not really a challenge for 1st Squad, who quickly puts them away, though they do take one hit themselves.

 Third Plt sprints their way onto the board as well, making it into the western treeline, though 1/3 got blasted by one of the PaK-40s at SP Helmi, taking two hits.  Third Plt's bazooka team passes another roll to move up, then rolls boxcars (for those familiar with the Blitzkrieg/Cold War/Future War Commander series, I flipped it because I like rolling high numbers, so boxcars are two actions and snake-eyes are blunders), so moves up again and slams a rocket into the other Lois house, but got only one hit (B3 is at far right, German team is in right hand bldg at top right w/black bead in front of it).

 Then the cavalry shows up!  The other PaK-40 at SP Helmi (top of photo) has been waiting for just this moment, but misses!    All but the left-hand Sherman are out of LOS to SP Alma, and even then only the PaK-40, and not the FlaK-36, has line of sight.  The Shermans pump a bunch of 75mm rounds into the woodline at SP Helmi, pinning both PaK-40s there (you can see the two yellow beads).

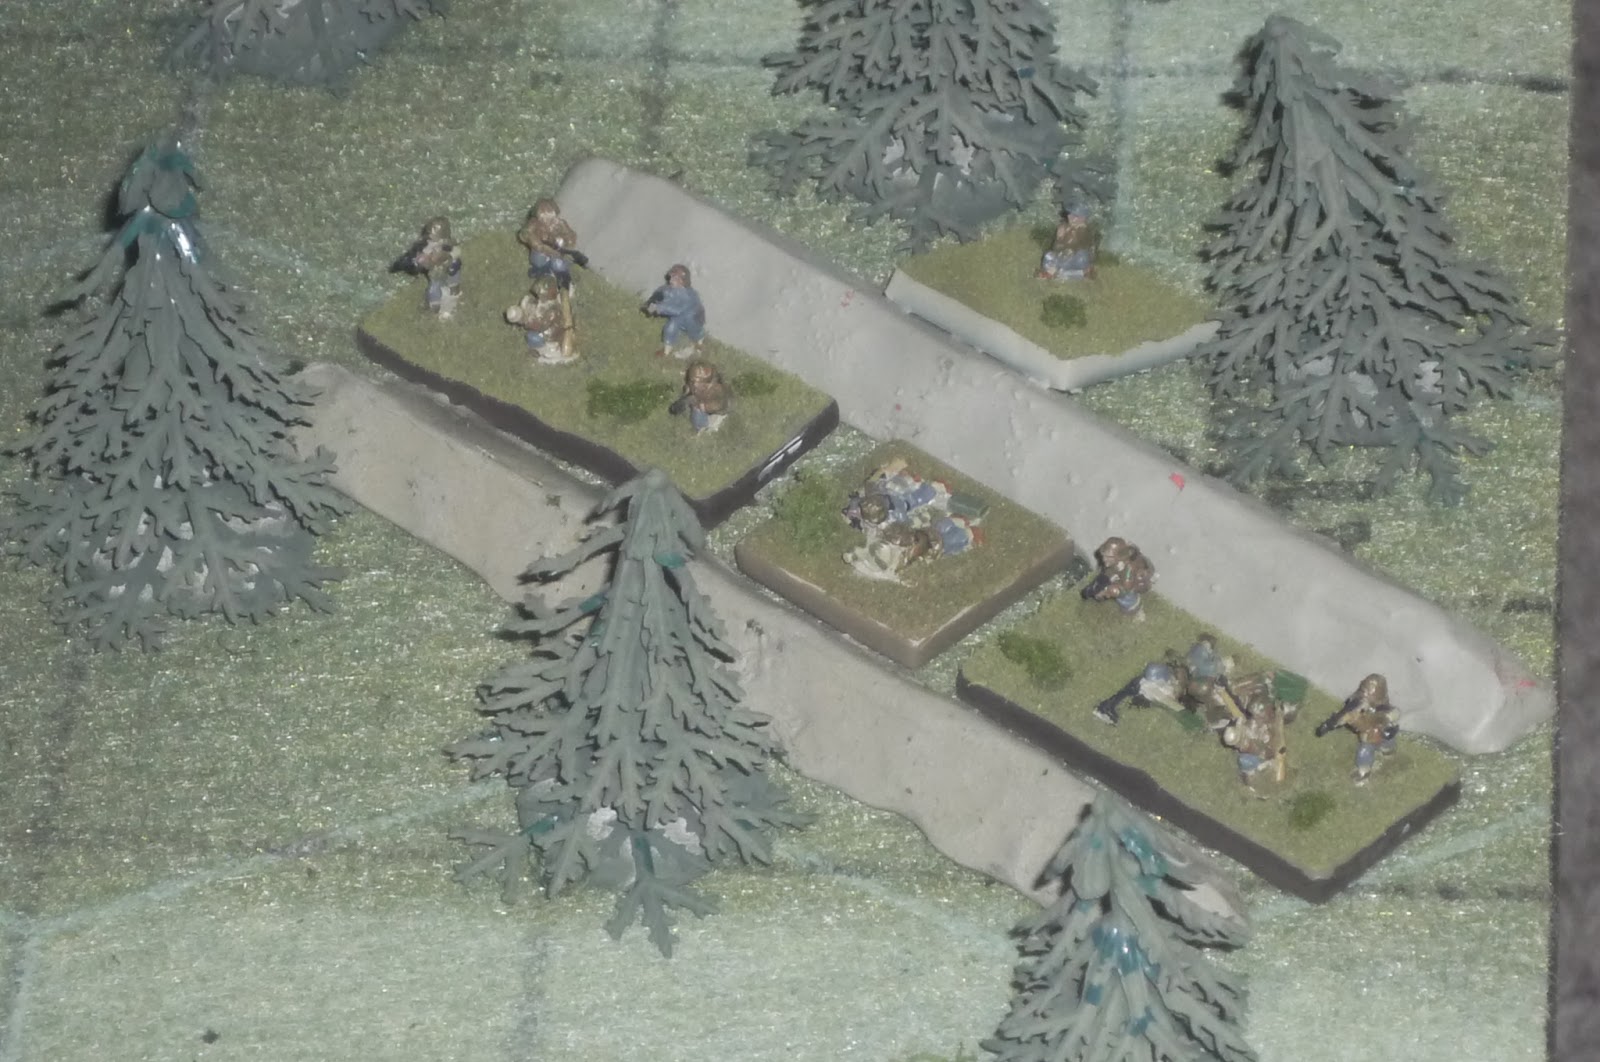
Lastly, the company executive officer (XO) comes on the table between 1st Plt and Wpns Plt, and attempts to call in a fire mission on SP Helmi, but fails...

 The German turn starts with the SP Helmi PC unpinning both PaK-40s, and one of them wastes no time in putting a round into one of the Shermans, but only damages its tracks (1/2 speed for rest of game).  Return fire from two of the Shermans eliminates the gun.  The other PaK-40 fires, and misses!  The remaining two Shermans return fire, eliminating that gun!  Helmi is now down to only a PzFaust for its AT capability.

That probably seemed awful easy, but the Shermans were hitting only on sixes, and saves were on 4+, so it was some pretty interesting die rolls, as opposed to rules issues (I think).

Then the Helmi infantry went to work: the MG-42 team went after 1/1, got three hits and a pin, went after B1, got two hits, then exchanged fire with 3/1, with both units getting a hit and pinned.  The Helmi rifle team fired at 2/2 (at the wall near OP Lois) and got two hits, though the return fire got one hit and pinned them.

On SP Alma, the German Company Commander (CC) had to make a decision; does he make calling for fire the priority, or unpinning troops the priority?  He chose unpinning his troops, who were still suffering from the initial arty barrage (pinned troops can't exercise opportunity fire, and have a harder time activating when it's their turn).  The German CC was able to unpin the mortar team and the PaK-40, but failed on MG3.

The 80mm mortar went after 3/2 (at the wall at OP Lois) and got three hits and a pin.  Then it went after B2, and eliminated them!  The SP Alma PaK-40 went after one of the Shermans, but the round bounced (2 hits, 2 saves), while the FlaK-36, unable to see any Yankee tanks, went after 1/1 and eliminated them.  MG2 went after B1, killed them, then put a hit on 3/1 before return fire from 2/1 got a hit and pinned MG2.

Neither of the rifle teams on SP Alma, nor MG3, were unable to unpin themselves.  The small force at SP Gunter sits tight.

 The toll.  You'll notice that, while the US tanks are okay, the infantry got pretty chewed up, with a few teams being eliminated.

 The last German move was having the remaining rifle team at OP Lois make a run for it.  They got out of the building and onto the road (far right), but then B3 (center far left) makes an impossible shot, getting only one hit, but pinning them.

 The situation at the main defensive position at SP Alma.  The PaK-40 has taken a hit, as has the Flak-36, which is also pinned.  The mortar is in good shape, though the rifle team to its right is still pinned, and the forward trench is pretty beat up.  The CC is in the center, running to and fro, trying to motivate (unpin) his troops.

 The US turn starts with the XO attempting to call fire down on SP Alma, and again failing...

The 81mm mortar gets two rounds of fire on the FlaK-36, getting one hit and pinning it.  The 60mm mortar went after the remaining PaK-40 (on Alma), got one hit.  Then the damaged Sherman fired at the PaK-40, missing, and received return fire, though it missed also.

Meanwhile, the other three tanks went after the remaining PC, rifle squad, and MG at SP Helmi.  The MG was eliminated, and the rifle team was shot up before the PC and the remainder of the rifle team made the decision to head for the door.

PC1 unpinned 3/1, then consolidated them with 2/1, then they sprinted south towards the wall at Lois.  1st Plt is now only the PC and one rifle squad.

The Wpns Plt MGs decided to move up a bit, though the first MG got gunned down by one of the German MGs on Alma.

 The 2nd Plt PC unpinned 3/2 and merged 2nd and 3rd Squads, then rushed forward (top right).  Once there they gunned down the retreating German rifle squad.  1/2, with four hits, is at bottom left.
 
 Then the blunders started...  3rd Plt, which was sheltering in the west wood, with its only casualties a couple hits on one of its squads, decides to move up.  The PC issues a group order to all members of the platoon, and rolls a blunder!  It was move two full moves towards nearest enemy, which, in this case, was SP Alma, which wasn't so bad, but then every unit under command was pinned, which really sucks.

 On the German turn, their CC again decided to try to unpin his forces to get them into fighting shape.  However, he was only able to unpin the FlaK-36 before failing his command roll.

Then the German mortar went to work putting a hit on the remaining US MG team, then going after 2/2 (in the right-hand house at Lois) and getting a hit and a pin, before going after the US MG team again, getting another hit.  The PaK-40 fired at the already damaged Sherman, knocking out its main gun, and return fire from the Sherman's box MG had no effect (I couldn't believe they hadn't bailed).

But then the US MG and the 1st Plt rifle squad and PC returned fire on the PaK-40, getting a kill, pinning it, then forcing them to flee!  The FlaK-36 fired at the 2/2, getting two hits and pinning them.  1/2, with only 1 FP dice, returned fire on the 88mm, and got a hit on a 6, which was unsaved (needing a 4+).  The FlaK-36 took the hit in stride and fired again, getting another hit on 2/2.  Then the German MG2 got in on the act, but fired to no effect (1 hit, 1 save).  Meanwhile, the other MG manages to unpin, then fail its roll, and the rifle team that's been pinned since the opening stonk managed to unpin, but also failed its next command roll.

The pic above shows the situation at SP Alma at the end of the Germans' turn.

 This pic shows the situation around Lois.  1st Plt is at far left, with one rifle squad and its PC.  2nd Plt is at top, with 1st Squad (left bldg) down to its last hit, and 2nd Squad (right bldg) with three hits.  3rd Plt is at bottom, with all its units in pretty good shape, but all of them also pinned (from their blunder).

 The overall situation.  SP Helmi is abandoned, OP Lois has been subdued, SP Alma is cracking under the pressure, and SP Gunter is on an extended smoke-break.

The US turn starts, and the XO finally is able to call in up a battery of 105mm arty...

 For a special delivery at SP Alma.

 The aftermath: the FlaK-36 took two hits and pinned; MG2 was eliminated; Rifle2 took one hit; MG3 was eliminated; CC is fine (2 hits, 2 saves); 80mm mortar took two hits and is pinned.

 The XO then moved over and tried to begin unpinning 3rd Plt, but failed his next roll.  The Wpns Plt 81mm then went after one of the rifle teams on Alma and eliminated it (3 hits, 0 saves on 4+!).  The 88mm gun crew saw that and left town.  The 81mm then went after the other rifle team and missed, but then the 60mmm mortar got two rounds of firing in, in which it put two hits on the rifle team and pinned it.  One more round of fire saw 1 hit, 1 save.  Pic shows all that's left on Alma.
 Some inspired rolling saw the 1st Plt Cmdr move over to help the 3rd Plt Cmdr, getting two of their rifle squads and the bazooka team unpinned.

Then the remaining MG went after the German Company Commander.  First round of firing, no effect; second round, no effect, third round, blunder!  "Unit becomes confused and fires on furthest friendly unit in LOS."  This turned out to be 1/2 in one of the buildings, which probably saved them (2 hits, 2 saves).  But then the German CC returned fire and eliminated the US MG...  The US Wpns Plt PC put one hit on the German CC.

2/3, 3/3, and B3 moved up to the wall, and drew some rifle fire from SP Gunter (very top right of photo), receiving one hit.

 Then 1/3 tried to unpin itself and rolled a blunder, fall back two full moves and remain pinned...  3rd Plt is at top right, minus its 1st Squad, which fell back into the woods (bottom center).

 The remaining 1st Plt rifle squad moved up (bottom left, with 2nd Plt in the bldg at center and most of 3rd Plt at wall on right).

 And then the tank platoon moved up and swung south.  This ended the US turn; at the German turn, their commander decided to abandon their heavy weapons and make their way back through the forest to cross the river to safety.

 German survivors of the battle.  Far left are the untouched units from SP Gunter.  At center are the beat up 80mm mortar team and CC team.  At right is a composite rifle squad made up of a few riflemen and ATG crewmen, and the PC from SP Helmi.

US survivors of the battle.  1st and 2nd Platoons both have one full rifle squad left, each, while 3rd Plt has two and its bazooka team.  Weapons Plt lost its MG, as well as the one on loan from Wpns Company.  The tankers suffered only one damaged vehicle, with track damage and main gun KO.

Surprisingly, neither side lost any leader stands.  At this point I also noticed I shorted the US side their company commander...

So, I had a good time, but not a great time.  First, and the more minor of the two problems, were the rules.  I've used the rules quite a few times, though this game was bigger (more forces on the table) than I'd ever tried previously, and there's a couple minor things I need to hammer out, particularly with regard to the arty, which probably had too easy of a time cleaning out the dug-in defenders atop the hill in SP Alma.

The second, somewhat small problem was me: I was rushed as I got started let, then was running up against the start of the football game, so I was rushing things a bit.

Third, I need to work up a force morale system.  Not hard to do, it's just it had never come up in my asymmetric games (insurgents keep coming regardless of their casualties, and the Legionaires are fighting for their lives, and surrender's not an option).  So, both sides suffered horrendous casualties and probably would have given up the ghost a lot earlier than I called it.  Though the US force 'won,' they're in no shape for continued combat operations.  They have only four of nine rifle squads left; although it's really not that bad for the campaign.  You figure after the battle the KIA/WIA get sorted out of the sick, lame, and lazy, and you get another 2 or 3 of those squads back, putting you conservatively at 2/3 strength, which really sucks but they can be used as battalion reserve until replacements get brought up.

Lastly, the big problem was also my fault: the map.  I got so wrapped into the mini-campaign, my force structure, the enemy force structure (via continually peeking at the internet to see what had been added), all the various thoughts about the next fight, etc..., that I let myself walk into a trap with the map.

I play games to make decisions; right or wrong, that's the fun of gaming for me, seeing how it all turns out.  But when I set the map up, I didn't offer any opportunities for decision-making.  There was only one way to attack, or, at most, a variation on a theme: you could charge up the road across open ground, or charge out of the NW corner across open ground.  So, I wasn't happy about that; my only real decisions were sequencing (what order to bring units on, what order to activate the units once they were on the table) and targeting (should unit 1 shoot at enemy unit 'X' or 'Y'?).  It may again be a matter of scale, i.e., I need to set up my 6' x 4', or even my 6' x 8' table, but I'm not sure that's the issue.  I think I just need to set the table up better.

I'm sure a lot of guys are thinking, "man, you're really screwed with Map #2 then," because of the bridge, but I'll come up with something, and most likely it will be the simple solution: multiple fords, to make the Germans defend more and give the attacker more options.  We'll see what happens.  In any case, fight #1 is in the books, and I'll look to get to fight #2 next Saturday.

Thanks for looking!

V/R,
Jack

Saturday, January 4, 2014

Operational Prep for Upcoming Game(s)

All,

So, I've been trying to figure out how to play a mini-campaign, ostensibly using one of the many company-sized scenarios around to play a series of platoon fights.  Forgive me as I'm figuring this out as I type, but I'm thinking the below map will get me four fights, with the attacker attacking from north to south (right to left), and the final objective being the village at far left.


The scheme of maneuver for four fights:

Orders of battle:

Attacker (US):

Battalion HQ
CO
XO
FO

A, B, and C Company (each)
CO
1st, 2nd, and 3rd Plt - 3 rifle squads and Infantry AT
Wpns Plt - MG, 60mm Mortar, and Infantry AT

Weapons Company
2 MG, 2 81mm Mortar, Infantry AT, 2 ATG

Attachments:
1 x Engineer Platoon (3 Engineer Squads)
1 x Tank Company (3 platoons of 4 M4 Shermans each)
1 x AT Platoon (3 M10 GMC)
1 x SPG Section (2 M7 GMC)
1 x Battery of 105mm Howitzers (eight total fire missions)

I will be soloing as the US force commander, playing against the Germans.  So, here is my scheme of maneuver:

Fight 1:
A Company in assault
-1 x Wpns Co MG and 1 x Wpns Co Mortar attached
-1 x Tank Platoon (4 x M4)
-Attack led by XO, who can call fire at -1
B Company in local reserve
C Company as battalion reserve

Fight 2:
B Company in assault
-1 x Wpns Co MG, 1 x Wpns Co Mortar, 1 x Infantry AT
-1 x Tank Platoon (4 x M4)
-1 x SPG Section (2 x M7)
-Attack led by CO, FO accompanying
C Company in local reserve
A Company in battalion reserve

Fight 3:
C Company in assault
-1 x Wpns Co MG, 1 x Wpns Co Mortar, and 1 x Wpns Co ATG
-1 x Tank Platoon (4 x M4)
-1 x AT Platoon (3 x M10 GMC)
-Attack led by XO, who can call fire at -1
A Company in local reserve
B Company in battalion reserve

Fight 4:
A Company in assault
-1 x Wpns Co MG, 1 x Wpns Co Mortar, 1 x Infantry AT, and 1 x Wpns Co ATG
-1 x Tank Platoon (4 x M4)
-1 x SPG Section (2 x M7)
-Attack led by CO, FO accompanying
B Company in local reserve
C Company as battalion reserve

**If A Company is too beat up for the assault position, B Company can be switched in (A Co becomes local reserve), but enemy receives 1 x infantry platoon reinforcements.  C Company is out of fight #4 as it is consolidating its position on the hilltop then looking to isolate the fight #4 objective from enemy reinforcement.
**If B Company is too beat up to take assault position from A Company, the two may be combined to bring A Co up to full strength (with the remainder of B Co being the local reserve), but the enemy receives 2 x infantry platoon reinforcements.   C Company is out of fight #4 as it is consolidating its position on the hilltop then looking to isolate the fight #4 objective from enemy reinforcement.

Commanding Officer (CO)
Forward Observer (FO)

1st and 2nd Company (total)"
Company Commander (CC) 1
CC 2
Rifle Plt 1 - 3 rifle squads and Infantry AT
Rifle Plt 2 - 3 rifle squads and Infantry AT
Rifle Plt 3 - 3 rifle squads and Infantry AT
Rifle Plt 4 - 3 rifle squads and Infantry AT
Wpns Plt 1 - 2 MGs, 1 80mm mortar, and Infantry AT
Wpns Plt 2 - 2 MGs, 1 80mm mortar, and Infantry AT

Weapons Company
MG 1
MG 2
Mortar 1
Mortar 2
PzSchreck 1
PzSchreck 2
PaK40 1
PaK40 2
PaK40 3

Attachments:
Engineer Plt (3 Engineer Squads)
Panzer Plt 1 (2 Pz Mk IV)
Panzer Plt 2 (2 Pz Mk IV)
FlaK 36 88mm ATG 1
FlaK 36 88mm ATG 2

1 x Nebelwerfer Battery (5 total fire missions)

Now, I need the same thing for the defenders...  I'm going to post on some forums to solicit help.  Using the German order of battle, I need assets allocated for each battle, 1 through 4, and here are the rules:

-When allocating troops, the rifle platoons and Wpns platoons must stay together as a platoon, and each fight must have at least one infantry platoon allocated.  There are four total rifle platoons and two weapons platoons, so the easy thing would be to allocate each of the rifle platoons to a fight, and add Wpns platoons where you want them, but you don't have to do it that way.

-Don't forget there are Wpns Co MGs, Mortars, Infantry AT weapons (PanzerSchrecks), and Anti-Tank Guns.

-You can mix the forces (in 'packages,' as listed above, i.e., Rifle Plt 1, Wpns Plt 2, PaK40 3, etc...) however you like, but each unit can only be used once.

-I would advise to go relatively light in fight #4 as that is well everyone will regroup.  That is, I hope the Americans are going to win each fight.  If that is true, the fight's will continue in order, 1, 2, 3, then 4 (if not, I'll have to figure something else out).  Each surviving German element from the defeats in fights 1-3 will fall back to #4 for the fight there.  Be careful though, as there's no promise as to what/who will survive from fights 1-3.

-Regarding leaders, the Germans have a battalion commander (CO) and two company commanders (CC1 and CC2).  They also have a forward observer (FO), who does nothing with regards to leadership but can call for fire from the Nebelwerfer batteries.  The CO can call for fire at -1 and the CCs at -2.

-You don't need to worry about allocating the Nebelwerfer fire missions, there are eight total that will/can be used by the CO, either CC, or the FO throughout the various fights.

-If you've cheated and looked at the American scheme of maneuver, don't worry about local reserve/battalion reserve, it doesn't apply to the German side.

So, please staff the four fights as you would see fit, for example:
Example Fight #1:
CC1
FO
Rifle Plt 1
Wpns Plt 1
MG 1
Mortar 1
PzSchreck 1
PaK40 1
FlaK 36 88mm ATG 1

So, have at it:
Fight #1

Fight #2

Fight #3

Fight #4

I look forward to seeing these, if anyone can be bothered to read this whole thing and actually fill it out ;)  If not, I'll figure something out, but I wanted to see if it would work.

V/R,
Jack

Hell on Wheels, 'Blade Force' Fight #10

All, 1030 Local Time 26 November 1942 Near Chouigoui, French Tunisia At dawn the tanks of 10th Panzer Division crashed into Blade Force'...