All,
I am back! I haven't posted a batrep in ages; I've played a few games with different rules, but they all left me cold, aggravated, and frustrated, so each time I threw in the towel and went back to painting. I suppose I've known all along what I needed to do to get my mojo back: go home ;) If you're not aware, 5Core Company Command is home, my happy place, the set of rules that's never let me down. I'm not sure why it took me so long to go back home; too caught up in wanting to try different rules, I suppose, but damn I'm glad I did. For the first time in a LONG time I played a wargame and actually had a bunch of fun doing it, and I absolutely can't wait to play more.
Part of my issue was also venue; that is, ongoing campaigns that actually didn't fit well with 5Core Company Command (5CCC). I'd played a ton of 5CCCC on my 'Cuba Libre' blog, but there is a bunch of admin stuff and painting I need to do before I get back to that. I'd played a bunch of 'Kampfgruppe Klink' with 5CCC, but it doesn't feel right anymore, I want something bigger (higher echelon, but without losing individuality and without taking too long; this is where I've spent most of my time so far, haven't found a suitable solution) for Operation Barbarossa. Then there were others, like 'Two Brothers' (Vietnam), my Marines in WWII, French IndoChina, my Israeli War of Independence, etc..., that aren't ready or don't match up well. So, what to do? Start a new campaign, of course ;)
So what did I do? It's time to follow some dogfaces trudging through and across the Mediterranean and European Theaters of Operation, kicking some Nazi butt! And who better to lead them than Lee Marvin???
This is Major Lee Reisman, Commanding Officer of "Task Force Reisman," a combined-arms force of roughly battalion size, consisting of the following:
-1 company of tanks (four platoons, two each of M-3 Stuarts and M-3 Grants)
-2 companies of infantry (three rifle platoons, each)
-1 armored reconnaissance company (1 platoon of M-3 Scout Cars and two platoons of halftrack-mounted armored infantry)
-attached heavy weapons (a platoon each of M1 37mm ATGs, M1917 MGs, 60mm Mortars, Combat Engineers, M-7 Priest Self-Propelled Guns, and M-3 GMC Tank Destroyers)
And what shall we watch them do? Here's my (once again, overly ambitious) plan:
-Operation Torch, the landings vs Vichy France in French Morocco
-Tunisia, from assisting 'Blade Force' early on through Kasserine, to the bloody end
-Operation Husky, the invasion of Sicily
-Operation Avalanche, the invasion of Italy (Salerno)
-Operation Shingle, the landings at Anzio, up to Rome
-Operation Dragoon, the landings in Southern France
-Cracking the Siegfried Line/Hurtgen Forest
-The Battle of the Bulge
-Operation Grenade, Into the Ruhr
But let's not get ahead of ourselves: right now it is approximately 0400 Local Time on 8 November 1942, off the coast of French Morocco, near Port Lyautey, the assault elements already forming up in their landing craft for the run into the beach, which everyone hopes will not actually be defended by the poor souls of the Vichy French Army. The plan for TF Reisman is for both infantry companies to land simultaneously, Dog Company on the left and Easy Company on the right, with two platoons of tanks landing between them, able to support in either direction, as appropriate, with the remainder of the Task Force in reserve and scheduled to arrive approximately two hours later in the second wave.
Of course, things do not go according to plan: with Allied Forces coming from various locations (primarily the US and UK), the need for operational secrecy, and the ever-present threat posed by German U-Boats, there wasn't much time or opportunity for amphibious exercises and rehearsals. Add to this the fact the transports were not combat loaded ("last on, first off"), confusion as to the nature of the landings (Allied officials were attempting political overtures to ensure French cooperation/non-aggression right up to the last minute, to the point preparatory naval and air bombardment was not conducted), and horrible weather, and the green US troops were lucky to get ashore at all!
But get ashore they did; they had a heck of a time forming up, with units missing each other in the dark and chop, then promptly headed towards shore, where French shore batteries added to the chaos by engaging the Allied Fleet. Dodging incoming shells in the dark, in heavy seas (enough to swamp several landing craft), without land-based beacons, the inexperienced Americans were tossed up on shore in a confused mass of cold, wet, miserable, confused, and scared GIs. Small unit leaders, or at least those able to function, immediately set about untangling the units and getting them moving inland, waiting to see would the Frenchmen turn out to be friend or foe.
A look at the map, north is up, the Allied invasion fleet out to see to left (west). At top right is Hill 88, and just below it is the river "Wadi Sebou." At far right is the outskirts of the town of "Mehdi," and just below it are karst bluffs rising up out of the sand, matched by a similar escarpment at bottom center, just off the south end of Dog Company's invasion beach. There is a coastal road running north-south just beyond the beach, with an artery running east into Mehdi. The remainder of the area is desert pocked with broken ground and scrub brush.
The opposing forces, with Yanks on the left and Vichy French on the right.
**And my most humble apologies to my French friends; please let there be no hard feelings. I know this is an uncomfortable time in history, and I mean nothing by it, just starting here as it is the earliest possible opportunity for TF Reisman to get into combat. And because I happen to have French troops painted up for the desert and absolutely have to use them ;) Don't worry, they will fight side by side as comrades in Tunisia (which is what I'd originally painted them for).
The US force: the US has a Company Commander, a company of infantry (-), a platoon of armored vehicles, and a platoon of support. The units are understrength and intermixed, in order to demonstrate the chaotic nature of the landings.
CO: Captain May, Dog Company commander
2nd Lt Carney and his 2nd and 3rd Squads from 2nd Platoon, Dog Company
2nd Lt Morris and his 1st and 2nd Squads from 1st Platoon, Easy Company
2nd Lt Olsavsky and his 1st and 3rd Squads from 3rd Platoon, Easy Company
2nd Lt Figures and Sgt Simpson's M-3 Stuarts from 1st Tank Platoon
Sgt Dawson's M-3 Grant from 3rd Tank Platoon
Sgt Martin's M-3 GMC Tank Destroyer from the Tank Destroyer Platoon
Sgt Humphries' 1st Squad from the Combat Engineer Platoon
Cpl Tolbert 's 3rd Squad from the Machine Gun Platoon
Cpl Noonan's 2nd Squad from the 60mm Mortar Platoon
The Vichy French defenders:
-Commanding Officer, Capitan Oulette, who's heart really isn't in it, but their Commandant is quite the committed Quisling, having already arrested several officers who refused to fight, now threatening executions for cowardice in the face of the enemy and vowing traitors' families will face repercussions
-A reduced Battery of one 25mm ATG and one 75mm dual-purpose gun.
-A Weapons Platoon of 2 machine guns and one 81mm mortar
-A Rifle Platoon of a Platoon Leader and three rifle squads
Overview, now with troops, with Americans in their landing craft at far left (west) and the French deployed across their baseline at far right (east). The French artillery battery is atop Hill 88 (top right), the Rifle Platoon is dug-in on the outskirts of Mehdi (far right), and the Weapons Platoon is dug-in atop/behind the southeastern bluffs (bottom right).
The Yanks in their transports.
The Americans are on their run in to the coast; please understand the next few pictures are just for fun and dramatic effect, they have no impact on the game.
A look at the coast (looking east, from the water, sorry I didn't include any water to give you better context for the shot). The Americans will land across the bottom, with Hill 88 (top left) on their far left, Mehdi (top center) dead ahead of them, and the southeastern bluffs (top right) on their far right.
The French positions atop Hill 88, with the 25mm ATG (top left) and the 75mm gun (right), both dug in.
The French center, with their Rifle Platoon dug in and their CO atop the roof at center right.
The river is not fordable, which is a double-edged sword: it means the Americans won't be able to close with the battery atop Hill 88, but it also means the two French guns atop Hill 88 are completely cut off from assistance. This would prove a thorn in the side of the defenders during the fight to come.
And the French left, with two Hotchkiss MGs dug in atop the southeastern bluffs (top left and bottom right) and their 81mm mortar emplaced on behind them (right top).
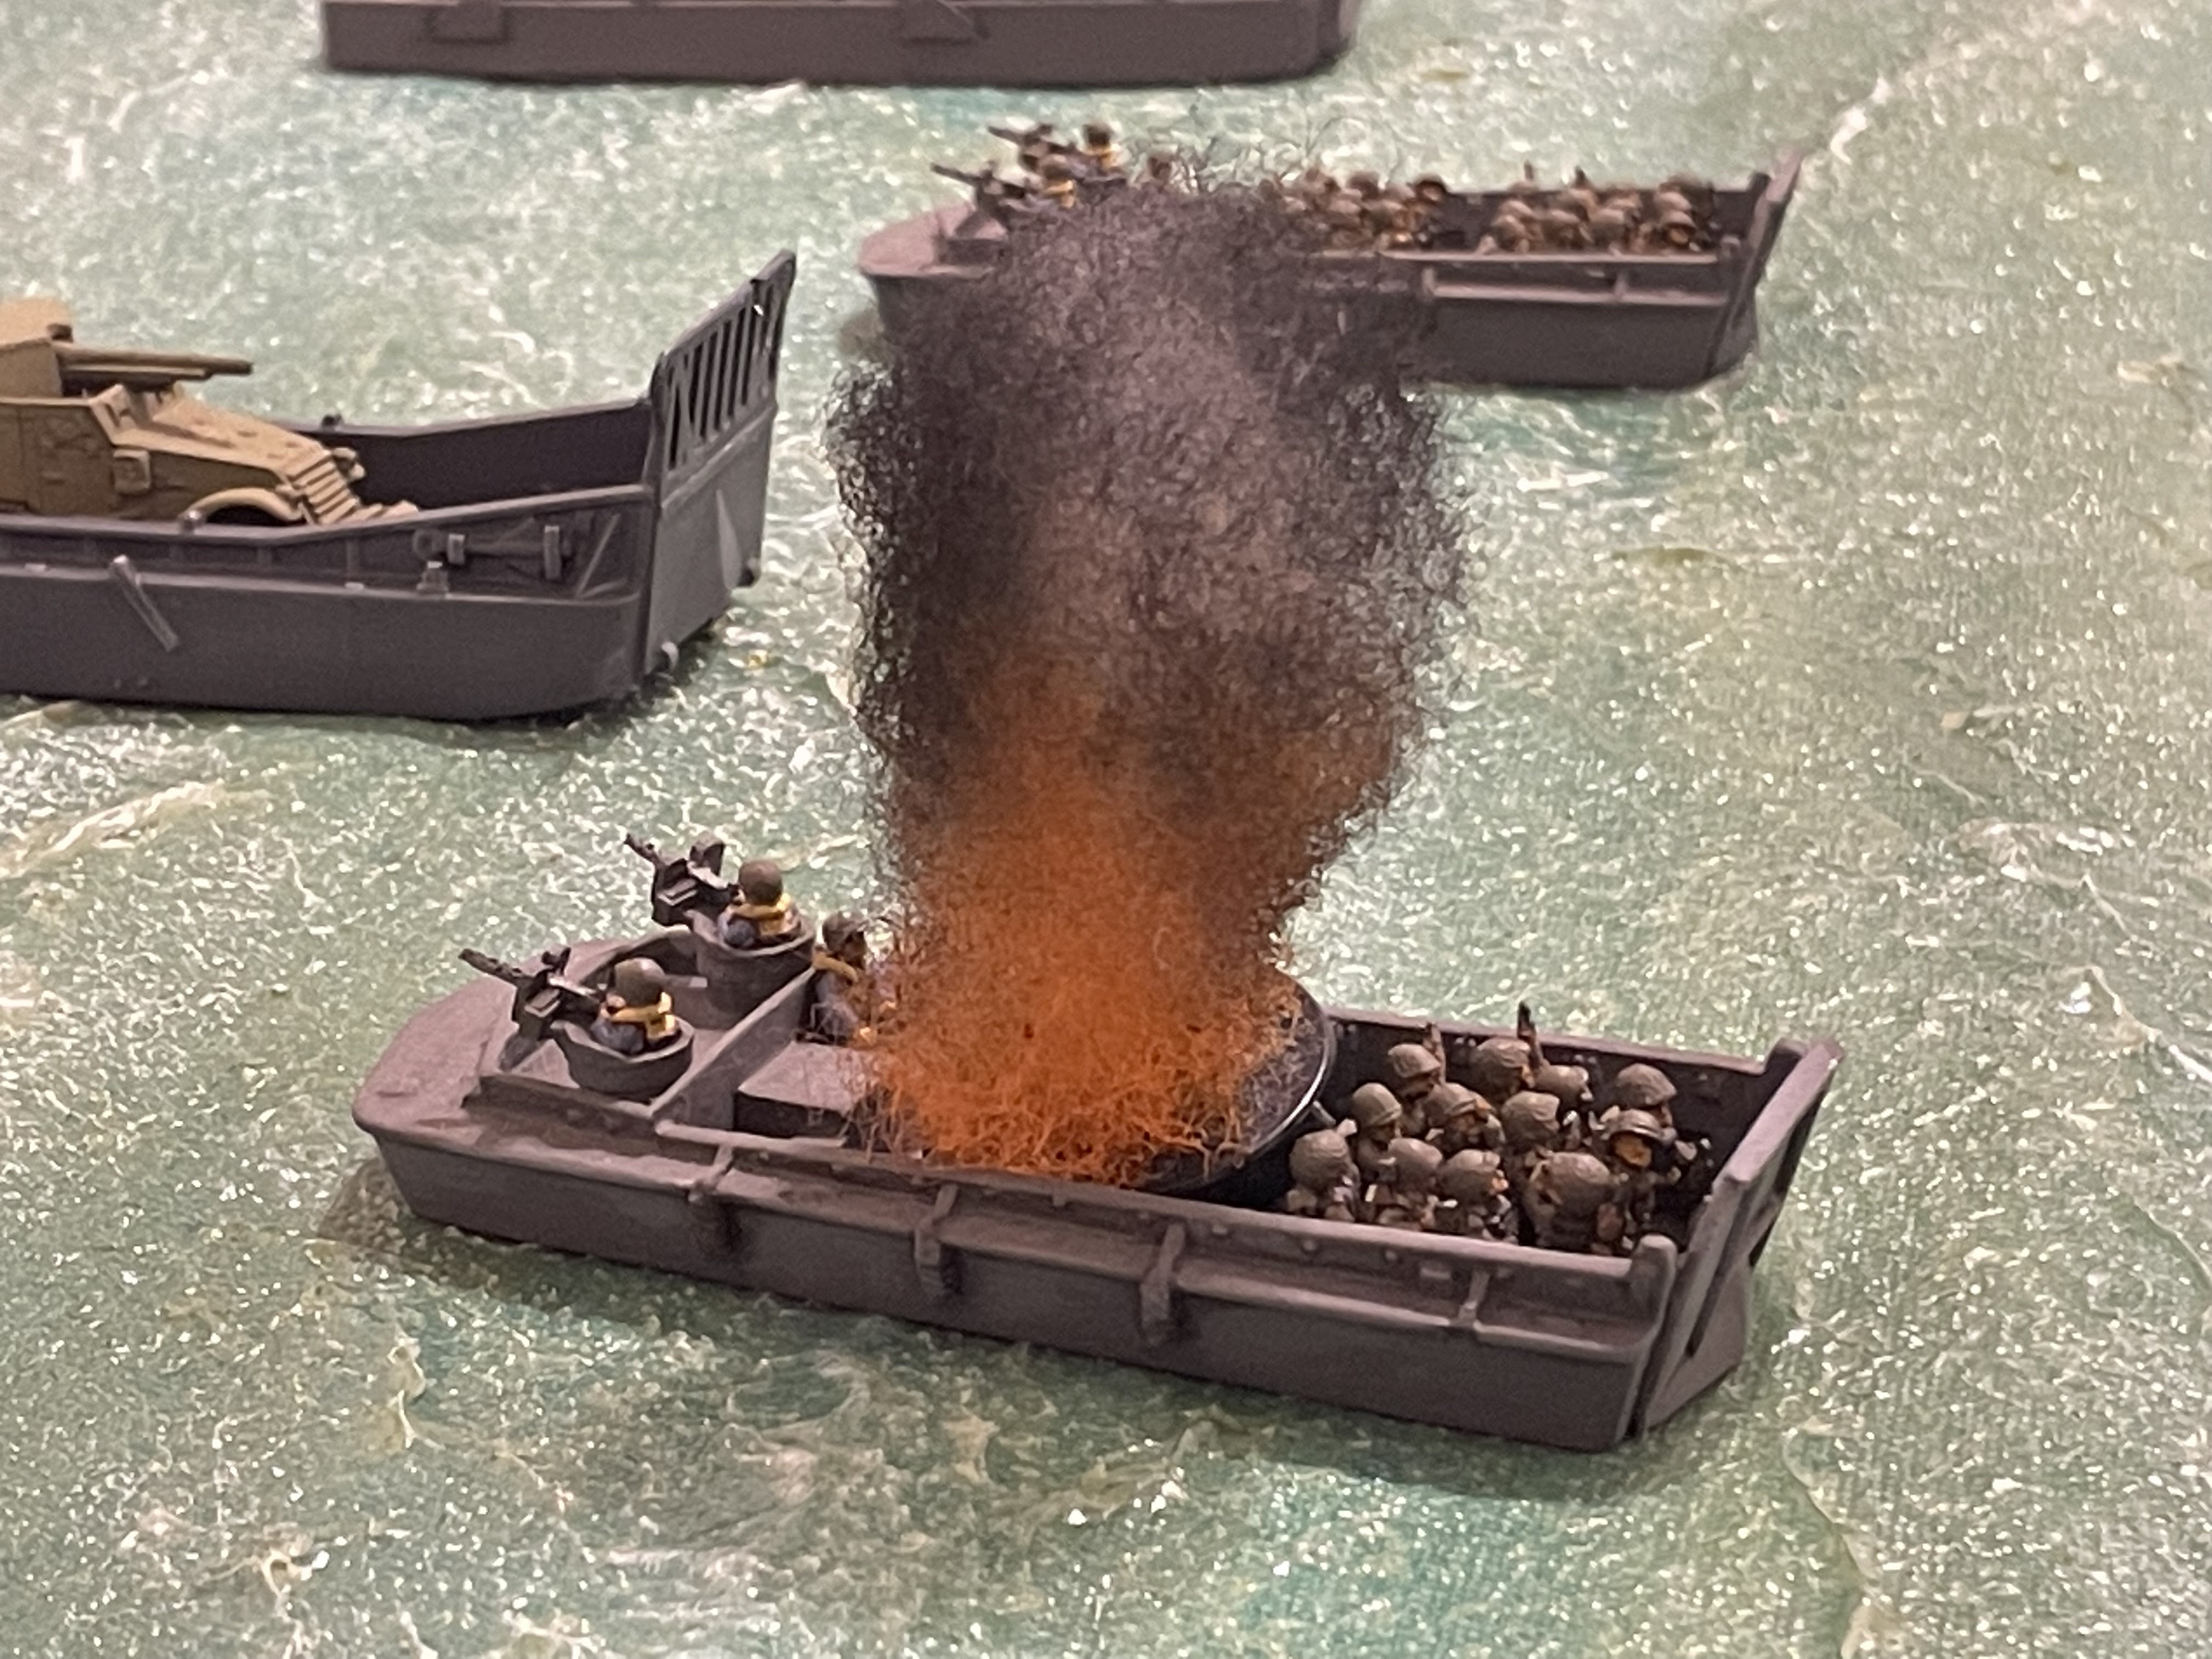
As the American landing craft press towards the landing beaches, French batteries at "The Kasbah" (an ancient fort manned by Vichy French forces and containing two 5.5" guns and four 155mm howitzers, would be off table a couple klicks to the northeast) open fire, sending towering plumes of water into the air. The landing craft coxswains immediately began evasive maneuvers, considerably upping the difficulty of maintaining the integrity of the waves and landing on the correct beach...
Made even worse when French shells began finding their marks, hitting a transport carrying Stuarts...
And then an LCVP packed with assault troops!
More shells rained down, and several collisions were narrowly averted, but at long last the first wave of TF Reisman neared the beach, though with its units severely intermixed, and with some missing...
The boats hit the beach and bow ramps immediately went down, men and vehicles dashing up the beach. There is an eerie silence, save for the sound of large-caliber shells howling overhead and out to sea; instinctively, and against all orders, the men and vehicles halt just yards up the beach, every sense straining to understand the Vichy French troops' intentions...
It was quite fortunate all these boats actually hit the beach; in Easy Company's sector, several landing craft hit a sandbar and disgorged their troops several hundred yards from the beach, though, luckily, they managed to land opposite a Vichy French unit that disregarded the Commandant's orders and promptly embraced their American cousins!

The French feel it, too; the silence and inaction drags seemingly forever, no one quite sure what to do. Capitan Oulette, sits atop his command post (larger building at right), mouth dry, scanning the beach and his own lines, knowing what he wants to do, but quite unsure of what to actually do. Just then the field phone rings, startling Capitan Oulette so badly he nearly wets his pants! It's the Commandant, cursing up a storm, ordering Capitan Oulette to engage the Americans! And, just to be sure, the Commandant sent two squads of trusted soldiers (bottom left) to ensure Capitan Oulette carried out his orders; the French commander swallowed hard, muttered 'forgive me' under his breath, then rose and fired a flare into the pre-dawn sky, ordering his men to open fire...
**Rules note: the French won the initiative, and the 'lull' was actually caused by them rolling a 'scurry' but not wanting/needing to move anyone, and then they rolled a random event that resulted in two squads of reinforcements, which came in on the southeast corner.
Seeing the flare, Captain May instinctively knew what it meant and acted immediately: "Move!!! Move it, move it, go! Go! Go!" The Americans go charging up the beach, all forces advancing, taking advantage of the gap between Capitan Oulette's signal and his unwilling troops' response.
From top left to bottom right: Sgt Dawson's M-3 Grant, 1st Platoon, Easy Company (with Cpl Noonan's 60mm mortar), the CO and Lt Figures' reduced platoon of M-3 Stuarts, 2nd Platoon, Dog Company (with Cpl Tolbert's MG), 3rd Platoon, Easy Company (with Sgt Humphries' Engineer Squad), and Sgt Martin's M-3 Tank Destroyer halftrack.
The French battery atop Hill 88 is the first to fire, with their 75mm gun (bottom left) firing on Lt Morris' 1st Platoon (top center) and their 25mm ATG (bottom right) firing on Sgt Dawson's M-3 Grant (behind scrub brush at top center)
The fire is ineffective, allowing Sgt Dawson't tank (top left) and Lt Morris' platoon (right) to return fire, which suppressed the French 75mm gun!
Next, the French Rifle Platoon in Mehdi (bottom right) engages Lt Carney's 2nd Platoon (top left) and Lt Figures' Stuart Platoon (at crossroads)...
Both American platoons (bottom left) immediately return fire, but all the two forces do is exchange ineffectual fire.
While on the French left, their machine guns (bottom center/far right) open fire on Sgt Martin's halftrack and Lt Olsavsky's 3rd Platoon (top left), pinning Sgt Harper's 3rd Squad and the Tank Destroyer!
Cpl Tolbert's MG (far left) and the remainder of 3rd Platoon (bottom left) return fire...
And manage to suppress BOTH of the French machine guns (red beads at top left and bottom center). But then the French 81mm mortar (right) goes to work...
And the mortars are on target, causing casualties amongst Lt Olsavsky's command squad and Sgt Seals' 1st Squad (white beads at center bottom) and pinning Sgt Humphries' Engineer Squad (yellow bead a bottom left)!
Cpl Noonan's 60mm mortar team (bottom left) replies, firing on the French battery atop Hill 88 (top right)...
But the rounds fall long, impacting harmlessly on the rear slope of the hill.
**I got a bunch of new markers from Litko, not sure I love them for this, though... I'm using the black smoke with orange base to show impacts from the cannons/tank main guns, and the taller, all black ones to show mortar impacts.
Sgt Dawson's M-3 Grant (bottom center) moves up and continues firing on the French battery atop Hill 88) top left, suppressing the French anti-tank gun!
**I spoke of this earlier; the French only have two units on Hill 88, the 75mm gun and the 25mm ATG, and they're behind the river, so no one can easily get to them. Now both units are suppressed; with limited activation 'points,' it's going to be very difficult to have them self-rally, and their CO (atop house at top right) can't get to them to assist. Both gun crews being suppressed is about as good as knocking them out, at this point... The French will have to hope for something lucky (a 'scurry' or 'firefight' roll that will allow them to self-rally, or a random event that helps get them rallied.
As the CO, Captain Mays, braves intense enemy fire to move over and rally Lt Carney's 2nd Platoon...
Lt Carney then presses his riflemen forward (patch of rough ground at center bottom, from far left), accompanied by Lt Figures' tank platoon (just above them), pouring 37mm main gun and .30-cal machine gun fire into the French Rifle Platoon's trenchline (top right)...
The French Platoon Leader and 2nd Squad are suppressed (red beads at left), but the other two rifle squads return fire, suppressing Sgt Siever's 3rd Squad (top center).
Momentum is swinging the Yanks' way: Lt Morris leads his understrength 1st Platoon forward (from the patch of rocky ground at left up to center, just above the two M-3 Stuarts and Lt Carney's 2nd Platoon, with Cpl Noonan's 60mm mortar at left, Sgt Dawson's M-3 Grant at top left, and the CO, Captain May, at bottom left).
The French riflemen in Mehdi (bottom right) spot Lt Morris' encroaching platoon (top left) and open fire, to no effect.
As the French CO, Capitan Oulette, moves to his left and rallies one of the suppressed MG teams on the southeastern bluffs (red bead at bottom left, French Rifle Platoon in trench at top center).
The French machine gunners (bottom right) immediately open fire on Lt Carney's 2nd Platoon (left center)...
Suppressing Lt Carney (in rough patch at far right) and forcing Sgt Warren's 2nd Squad to fall back (red bead at top left, they ran and jumped through the hedge for cover, between the two M-3 Stuarts), as Cpl Tolbert's MG team returns fire, pinning the recently rallied French MG team.
The two French rifle squads that arrived as reinforcements then move up on the southeastern bluffs, hoping to bolster the French line and help the two French machine gun crews rally.
Cpl Tolbert spots the newly arrived French riflemen atop the southeastern bluffs and orders his gunner to shift fire...
But the fire is ineffective, allowing the far-left French MG team (bottom center) to rally and open fire on Lt Carney's 2nd Platoon (left center, in the rough patch just below the M-3 Stuart)...
Lt Carney (yellow bead at right) and his Command Team look on as Sergeant Sievers and his 3rd Squad, 2nd Platoon, Dog Company, are gunned down (casualty figures at far left)!!!
Sgt Sievers received a severe head wound; luckily, he was able to be evacuated back to a hospital ship, saving his life. The Docs say he will recover and return to full duty eventually, but he's got a long way to go and they don't expect him back for duty until June 1943.
Lt Figures slews his tank to the right (bottom left) and rakes the southeastern bluffs with fire, pinning a rifle squad and suppressing the French MG team that just shot Sgt Siever's squad up (top right)...
As the French mortar team (far right bottom) shifts fire, dropping rounds on Lt Morris' 1st Platoon (top left)...
But the 81mm HE rounds fall slightly short (the three ugly black smoke markers at right, with 1st Platoon at left, Sgt Simpson's Stuart below them, and Sgt Warren's 2nd Squad, 2nd Platoon, still suppressed -red bead at bottom left- below them), only managing to pin Sgt McAfee's 2nd Squad (yellow bead at center).

Back on the US right, and still on the beach, Lt Olsavsky's 3rd Platoon has been roughly handled by the enemy. With fire on his men at least temporarily lapsed as the enemy's attention has wandered elsewhere, he stands up (three man stand at top center), dusts himself off, and begins working to get his men back into fighting shape, but it doesn't work... Sgt Humphries' Engineer Squad (far left) is okay, but Sgt Seals' 1st Squad (blue and white beads) has taken casualties and they are panicking. Even worse, Sgt Harper's 3rd Squad, previously pinned down (yellow bead), sees this, and now they begin to panic, too!!!
**The white bead on 1st Squad denotes they are 'Men Down,' and the blue bead shows they are low on ammo, which was the result of a random event. They have yet to fire a shot, so my guess is they departed the landing craft into deep water and soaked their ammo, rendering it useless.

Cpl Noonan's 60mm mortar team (bottom left) pumps out rounds at the French Rifle Platoon in Mehdia (top right) as Sgt Simpson moves his M-3 Stuart up (center), pumping main gun rounds into the enemy trench...
Forcing the French platoon leader and a rifle squad, both already previously suppressed, to fall back (far left, from trench at right)!!!
With the French battery on Hill 88 (just off camera to left top) silent, Sgt Dawson pushes his M-3 Grant right (bottom left), where he begins pounding the enemy trench at Mehdia (top center) with his 75mm gun, though they only manage to pin a French rifle squad.
The US commander, Captain May, once again dashes forward under fire to rally the troops: Sgt Warren's 3rd Squad, 2nd Platoon (bottom left) is good, but Sgt Mcafee's 2nd Squad, 1st Platoon (yellow bead at center) remains pinned...
Despite Sgt McAfee's 2nd Squad remaining pinned, Lt Morris advances nonetheless, taking Sgt Lake's 1st Squad with him (center top left)!
But the Frenchmen in the trench (bottom right) spot Lt Morris and Sgt Lake (top left) and open fire, pinning Sgt Lake's squad.
The French defenses erupt: from the southeastern bluffs, two rifle teams and an MG open fire, though they only manage to pin down Cpl Tolbert's MG team (behind scrub at top center), as their suppressed MG team (red bead at bottom left) attempts to rally...
But they fail, panicking and falling back down the hill!!!
As Lt Carney (far left), his command team all alone with Sgt Siever's squad out of the fight and Sgt McAfee's Squad haven dashed for cover (off camera to left, across the road), and Sgt Martin's Tank Destroyer (bottom left) return fire on the southeastern bluffs (top right), suppressing the French MG still emplaced (the other having panicked and fallen back down behind the bluffs).
In the French center (right/far right), the Rifle Platoon's commander and rifle squad that had fallen back both rally as the two rifle squads still in the trench open fire on 1st Platoon (top left), pinning Lt Morris' command team.
But the weak French rifle fire is returned by all three American tanks and two rifle squads return fire on the hapless enemy Rifle Platoon...
A French squad is knocked out (casualty figures at top center), while the other squad in the trench is suppressed (red bead at bottom right), while the platoon leader and the squad that fell back with him (and had just rallied, top left) are pinned.
As the French mortar team (bottom right) again goes to work on 1st Platoon (top left)...
But somehow the French mortar rounds fall short, again!
**I swear, I gave them plenty of dice and there is no logical explanation for this. Whenever a mortar fires for the first time on an unseen target (indirect fire) I short them on dice; in this case, I gave the French mortar 1K 2S for their first round of fire, and all they scored was a single pin. Okay, but this time I gave them 2K 3S, and they didn't score a single hit...
Perhaps more importantly, the French battery atop Hill 88 finally gets a chance to rally, but while the 25mm ATG makes the best of it and is back in the fight, the 75mm gun crew blows it! They fail the rally attempt, panic, and fall back down the hill (red bead at far right, from sandbagged position at far left)!!!
With mortar rounds dropping and small arms fire abounding, the American CO, Captain May, again dashes forward to get his men moving (right center, from far left), rallying all of Lt Morris' 1st Platoon!
Sgt Dawson orders his driver to move their M-3 Grant forward in support (top left)...
And the French battery atop Hill 88 blows it again! The 25mm ATG crew, just rallied back into the fight (bottom right), spots Sgt Dawson's tank (left top) moving. "Gunner, target, tank, 200 yards, armor piercing, fire!"
And completely misses the barn-sized tank, which is full flank-on to the French anti-tank gunners...
Sgt Dawson doesn't even notice the errant AP round as he pushes his tank forward (center top, from explosion at far left), pounding the enemy trench as he goes.
But Cpl Noonan (bottom left) saw the French battery atop Hill 88 (top right) get back into action, so he orders his gunners to crank their sights over and they begin dropping 60mm HE rounds on the hill...
Pinning the French anti-tank gunners.
As Sgt Martin's Tank Destroyer uses its 75mm cannon to fire onto the southeastern bluffs, causing casualties and sending one of the French rifle squads there 'Men Down.'
**As a refresher, 'Men Down' is a step below being 'Suppressed,' meaning it can't move, can't shoot, can't self rally, and suffers a very nasty penalty (-3) in close combat. All it can do is sit there and hope a friendly unit comes over to help it rally.
Lt Carney (bottom right) looks on as Sgt Warren's squad follows Lt Figures' M-3 Stuart up the street into Mehdia, 37mm gun and .30-cal machine guns belching fire...
Forcing the remaining French MG team atop the southeastern bluffs to panic and fall back (red bead at center right, from sandbagged position at far left)!
That's the French mortar team at far right, and the French CO, Capitan Oulette, next to the house. The other MG team is panicked and suppressed just off camera to bottom right, while there are two French rifle squads atop the bluffs; the white bead is the squad that is 'Men Down,' while the yellow beaded squad is 'Pinned.'
And with that, Lt Morris leads 1st Platoon forward to pierce the center of the French line! Lt Morris' command team and Sgt Lake's 1st Squad charge into close combat with the sole French rifle squad left in the trenchline...
The French squad is put out of the fight!
**Sorry, had to use German casualty figures, I actually don't have French casualty figures.
Lt Morris and Sgt Lake lead their men forward (center, from far right), crashing into the French Rifle Platoon leader and his last remaining rifle squad... The French Lieutenant and his last squad immediately raise their hands in surrender!!!
**I rolled it up as a 'normal' close combat, and the Americans won, so rather than continue the bloodletting, I figured it made a lot more sense in this context to have the French surrender.
And that was just the break the French commander, Capitan Oulette, and his men were looking for! Their honor intact, having spilled blood and bled for their country, they immediately cast aside their weapons and raised their arms, eagerly surrendering to the advancing Americans.
The men of the hour, 2nd Lieutenant Morris and Sgt Lake, standing atop the southeastern bluffs, supervising the orderly surrender and processing of the French garrison.
Man, what I fight! As simple as it was, I can't tell you how much I needed that, I really had a lot of fun and feel like I'm back to my old (wargaming) self. It's been quite a long time.
Here are the stats:
-US suffered 15 casualties
-French suffered 20 casualties and 60 captured, including their Commander, two MGs, and a medium mortar.
-The French artillery battery on Hill 88 escaped, spiking their guns and retiring towards Port Lyautey.
Characters:
-Captain May, Dog Company, was awarded the Bronze Star w/V for braving intense enemy mortar, machine gun, and small arms fire to rally and inspire his men on no less than three separate occasions, leading the assault to defeat enemy positions IVO Mehdia, Morocco, and secure Dog Green Beach.
-2nd Lt Carney, 1st Platoon, Easy Company, was awarded the Silver Star for leading his platoon into close combat that breached the enemy line and led to its collapse.
-Sgt Lake, 1st Squad, 1st Platoon, Easy Company, was awarded the Bronze Star w/V for leading his squad into close combat that breached the enemy line and led to its collapse.
-2nd Lt Olsavsky, 3rd Platoon, Easy Company, was reprimanded for a lack of combat leadership in the face of the enemy.
-Sgt Seals, 1st Squad, 3rd Platoon, Easy Company, was reprimanded for a lack of combat leadership in the face of the enemy.
-Sgt Harper, 3rd Squad, 3rd Platoon, Easy Company, was reprimanded for a lack of combat leadership in the face of the enemy.
-Sgt Siever, 3rd Squad, 2nd Platoon, Dog Company, was severely wounded, but will return to the Task Force on 1 June 1943
Situation: Captain May and the men under his command have secured Dog Green; they immediately set about consolidating their position, treating the wounded, redistributing ammunition, and untangling the mixed-up units. Captain Kirkland had a much easier time on Easy Green, where the French unit opposite him quickly surrendered without engaging the American landing force.
Rather than risk allowing the French time to counterattack while sorting out the mixed-up units on both landing beaches, Major Reisman has ordered Captain Kirkland to take what forces he has immediately available and push west to encircle the town of Mehdia (in order to prevent the garrison from escaping) and probe towards Port Lyautey for potential exploitation by the Task Force's Armored Reconnaissance Company.
Coming soon!
V/R,
Jack


Really good stuff Jack, thanks for posting. Just for my understanding, what exactly was lost during the run-in to the shore? One stuart and one rifle squad?
ReplyDeleteHello, John, thanks for the kind words. The landing craft getting hit was purely aesthetic, it didn't affect the game at all. I had rolled up the force I was going to use pre-game, and that's what I used in the fight, no casualties on the run in.
DeleteV/R,
Jack
Ah okay, that makes sense, thanks. Also, just want to say I love the look of the whole battlefield, especially the hill that the French howitzer and anti-tank gun were on: I want one (or several)!
DeleteIncidentally, in the interests of wargaming science, you should write up your failed experiments too...;-)
DeleteYeah, sorry man, it was all about the narrative, mostly to explain why the American forces were hitting the beach with less than T/O-strength units. I was pretty happy with how the table looked, but I am conscious that it's probably not very representative of Morocco (and later Tunisia), I'm putting too much green scrub and terrain pieces on the table, to make it look pretty, rather than just leaving it table-flat sand, like real life.
DeleteThose rocky hills are all from Battlefront; I think they're no longer in production, but you can find them on Ebay every now and again. Expect to pay a premium for them. But they do look nice, and I've certainly gotten my money out of them, they're on every table in my North Africa fights!
V/R,
Jack
Oh, looks like we're typing at the same time; yeah, I actually started, then lost heart (writing up the 'failed' games). The Chain of Command game was the only one I played to completion; I didn't even finish the two Eastern Front games, made it around halfway in and called it quits.
DeleteThe big problem is the move to 15mm; in some ways I love it, and in others, it was a horrible idea. It's seems elementary, but you just can't put the same amount of toys on the table as you can with the smaller scales, and when you do it just looks ridiculous, both from the standpoint of looking like a parking lot and from the whole fight occurring with the attacker never even really leaving his startline.
So you make a valid point, but I didn't have the strength...
V/R,
Jack
Jack! The rest of us were wondering what happened to you so I'm glad to see you're back in the fight! This was a great looking game and I'm glad you went back to your roots and played a rules set that you're happy with. I'm gearing up for an eastern front convention game in early February and after that my attention is turning to Fulda '85 so if you're still interested and have bandwidth we'll have plenty of battles to fight.
ReplyDeleteSteve,
DeleteYeah man, just 'real life,' lots going on at work and school, and all three kids playing ball (was actually coaching two of them at the same time!), but yes, I was going a bit insane not playing and needed to get back into the swing of things. 5Core Company Command is definitely the remedy for me.
A convention game, eh? Where and when's that going to be? Again, it's tough right now due to family commitments, but I've never been to a convention, but I definitely plan to one of these days when the timing is right.
And yes, I'm definitely still interested in Fulda man, can't wait, probably about 65% where I want to be with forces (Americans and Soviets are about 90%, Brits and West Germans are considerably further back but on the way).
V/R,
Jack
The convention is hosted by the "on military Matters" bookstore and will be the first weekend in February over in the "People's Democratic Republic of New Jersey". I'll also be going to Cold Wars in March in King of Prussia but won't be GM'ing a game
DeleteYes, I'm familiar with OMM, I've bought some stuff from them in the past. Thats super cool man, I hope it goes great for you, and hopefully someday I'll make my way out there for a convention.
DeleteV/R,
Jack
PS the terrain and setup from this game is outstanding. Like you really nailed it here.
ReplyDeleteThanks man! Pretty happy with how the table looked, but I'm not happy with the explosion markers (those black translucent ones from Litko) at all, working on improving them.
DeleteI'm overall happy with my tables for this campaign but, you'll see, searching for the wargamer's aesthetic, I couldn't help but add too much green scrub and too many terrain pieces to break up the table. It probably looks good, but not particularly representative of Morocco or Tunisia ;)
V/R,
Jack
Good to have you back Jack. What great report, and the game looks fabulous. One day I will buy some landing craft!
ReplyDeleteHey Martin, thanks! I'm glad you liked it, it was a lot of fun, and more to come, I promise! Yeah, the landing craft, like helicopters for modern games, are actually pretty useless in wargaming terms (for the most part, in my opinion), but they do look pretty cool ;)
DeleteV/R,
Jack