All,
0930 Local Time
8 November 1942
Near Port Lyautey, French Morocco
"@#$%," exclaimed Major Reisman, frustrated with the slow pace of operations being carried out by his combined arms task force. They'd landed nearly five hours ago; sure, confusion about what posture the French defenders would adopt caused apprehension, dismal weather caused delays and units to become intermixed, and then there was the natural hesitation and fear of the unknown caused by green troops seeing their first combat, but the Major was severely nonplussed, nonetheless. On the Task Force's left, Dog Company had run into very stiff resistance, but dogged determination by its commander (Captain May, who was awarded a Bronze Star w/V for his combat leadership in the battle) led to the Yanks carrying the day, while on the right, Easy Company had the good fortune to land opposite a French unit that was only too happy to cast aside its weapons and surrender (despite the threats of retribution from their Commandant).
But that was exactly the point: following Dog Company's victory, Major Reisman had ordered Easy Company to rush forward and seize the back end (east) of the town of Mehdi, thus bottling up the French garrison there. But that was over two hours ago, and here was Captain Kirkland, Easy's commander, still standing on the landing beach! "What the hell are you doing, Captain! And why aren't you behind Mehdi by now!!!???" "Sir! We're still attempting to untangle the units and..." "Look here, Kirkland! If you want to keep those Captain's bars you will drop whatever nonsense you're up to, grab the nearest men with guns you can find, and go, secure the @#$%ing east end of that @#$%ing town! Do you understand me?" "Yessir!" And off Captain Kirkland went...

The table, north is up. The town of Mehdi stretches across the top of the table, with Hill 27 at bottom left, Hill 32 at bottom right, and sheer bluffs present at top right.
The opposing forces, with Americans on the left and French on the right.
The US force:
-Command stand: Captain Kirkland, Easy Company commander
-Two M3 Stuarts: 1st Lt Seay, the tank company's Executive Officer (XO), and Sergeant Keith's vehicle from 2nd Tank Platoon
-Two M3 Grants: Sgt Gildon and Sgt O'Neale's vehicles from 4th Tank Platoon
-M3 Scout Car: Sgt Perry's vehicle from the Armored Car Platoon
-M7 Priest: Sgt Johnson's vehicle from the Self-Propelled Gun Platoon
-1st Rifle Platoon: 2nd Lt Steed leading Sgt Bruschi and Sgt Marion's squads from 1st Platoon, Dog Company
-2nd Rifle Platoon: 2nd Lt Davenport leading Sgt Kalis and Sgt Williams' squads from 2nd Platoon, Easy Company
-3rd Rifle Platoon: 2nd Lt Crittenden leading Sgt O'Donnell and Sgt Wilfork's squads from 3rd Platoon, Dog Company
*The platoons are mixed from the different companies and missing squads/vehicles to reflect the confusion and intermingling on the beach, and the Major pushing Captain Kirkland to attack before it was all sorted out.
The French:
-Commanding Officer
-2 x Rifle Platoons of three squads each
-1 x Weapons Platoon of a 25mm anti-tank gun (ATG), Hotchkiss machine gun, and an 81mm mortar
-1 x Laffly armored car
Overview of table, now with troops. The Americans are bunched into the southwestern (bottom left) corner. The French garrison of two rifle platoons, their CO, and the ATG are in the town, right up against the northwestern table edge (top left), with the MG and Mortar holding Hill 32 in the southeast (bottom right) and the Laffly armored car sitting astride the hardball road in the northeast (top right, between the bluffs).
The concept here is this: the French garrison in the town is caught completely off guard, expecting a head-on attack from Easy Company (which is just off camera to the west-northwest, or top left), with heavy weapons support in the southeast (bottom right) and a (very small) armored reserve in the northeast (top right). But the threat is not coming from ahead of them, it's coming from their left flank, and they are caught with their pants down!
But all is not great for the Americans: Major Reisman's intent was for Captain Kirkland's force to drive east and then north to seal off the back (east) end of Mehdi, pocketing the garrison, but the good Major didn't allow Captain Kirkland to properly organize his forces, so he's got a mixture of troops from different companies and, more importantly, his infantry platoons are understrength and lacking transport. So Captain Kirkland intends on pushing his mechanized forces east and north to encircle Mehdi, but his infantry are going to have to take a more direct route, lest they arrive well after the battle is over...
The US baseline, looking south to north, with 1st Platoon at top left, 3rd Platoon atop Hill 27 (right), 2nd Platoon at far left, the CO in the middle, the Scout Car and Stuarts at bottom right, and the Grants and M7 Priest at bottom left.
Looking again, from west to east: 1st Platoon at bottom left, 2nd Platoon at bottom center, 3rd Platoon at top center, Scout and Stuarts at top right, Grants and M7 Priest at bottom right, and the CO in the center.
The west end of Mehdi, where the French were expecting to be attacked head on: 1st Platoon at top, 2nd Platoon at bottom, CO at center left top, in the square (next to the fountain), and the ATG a little further right.
The French Hotchkiss MG atop Hill 32, their 81mm mortar team down behind.
And the Laffly armored car (far right), waiting for trouble.
I roll for initiative and the US wins, so they'll go first.
The M3 Scout Car and M3 Stuarts go dashing off the east (far right, from bottom left).
Followed by Lt Crittenden leading 3rd Platoon down the forward slope of Hill 27 (with Lt Steed's 1st Platoon at top left).
And drawing fire from a French rifle squad in Mehdi (bottom left), though it is ineffectual.
Sgt Johnson's M7 Priest leads the dogfaces of 1st Platoon forward, providing a bit of mobile cover for the infantry (or a bullet magnet).
*As an aside, what you'll notice with these early fights, I'm looking at a trained, professional force (while of course there are conscripts in the unit as the draft began in 1940, overall this is a unit of long-service regulars that have been together awhile and have been well trained), albeit one that has yet to 'see the elephant.' What that means to me is, these guys are confident in their training and believe in themselves (as opposed to, perhaps, the draftees that come later in the war), there are just some jitters and a lot of confusion owing to the fact they are yet to be blooded. I'm trying to reflect this by having the Americans be overly aggressive, very impatient, willing to push ahead without proper preparation or support, willing to make the mistake of overextending themselves, so they're going to take fairly heavy casualties or get very lucky with some Hollywood-style heroics (maybe both), but hopefully they'll learn some tough lessons and come out a much more competent, professional, and capable force on the other side.

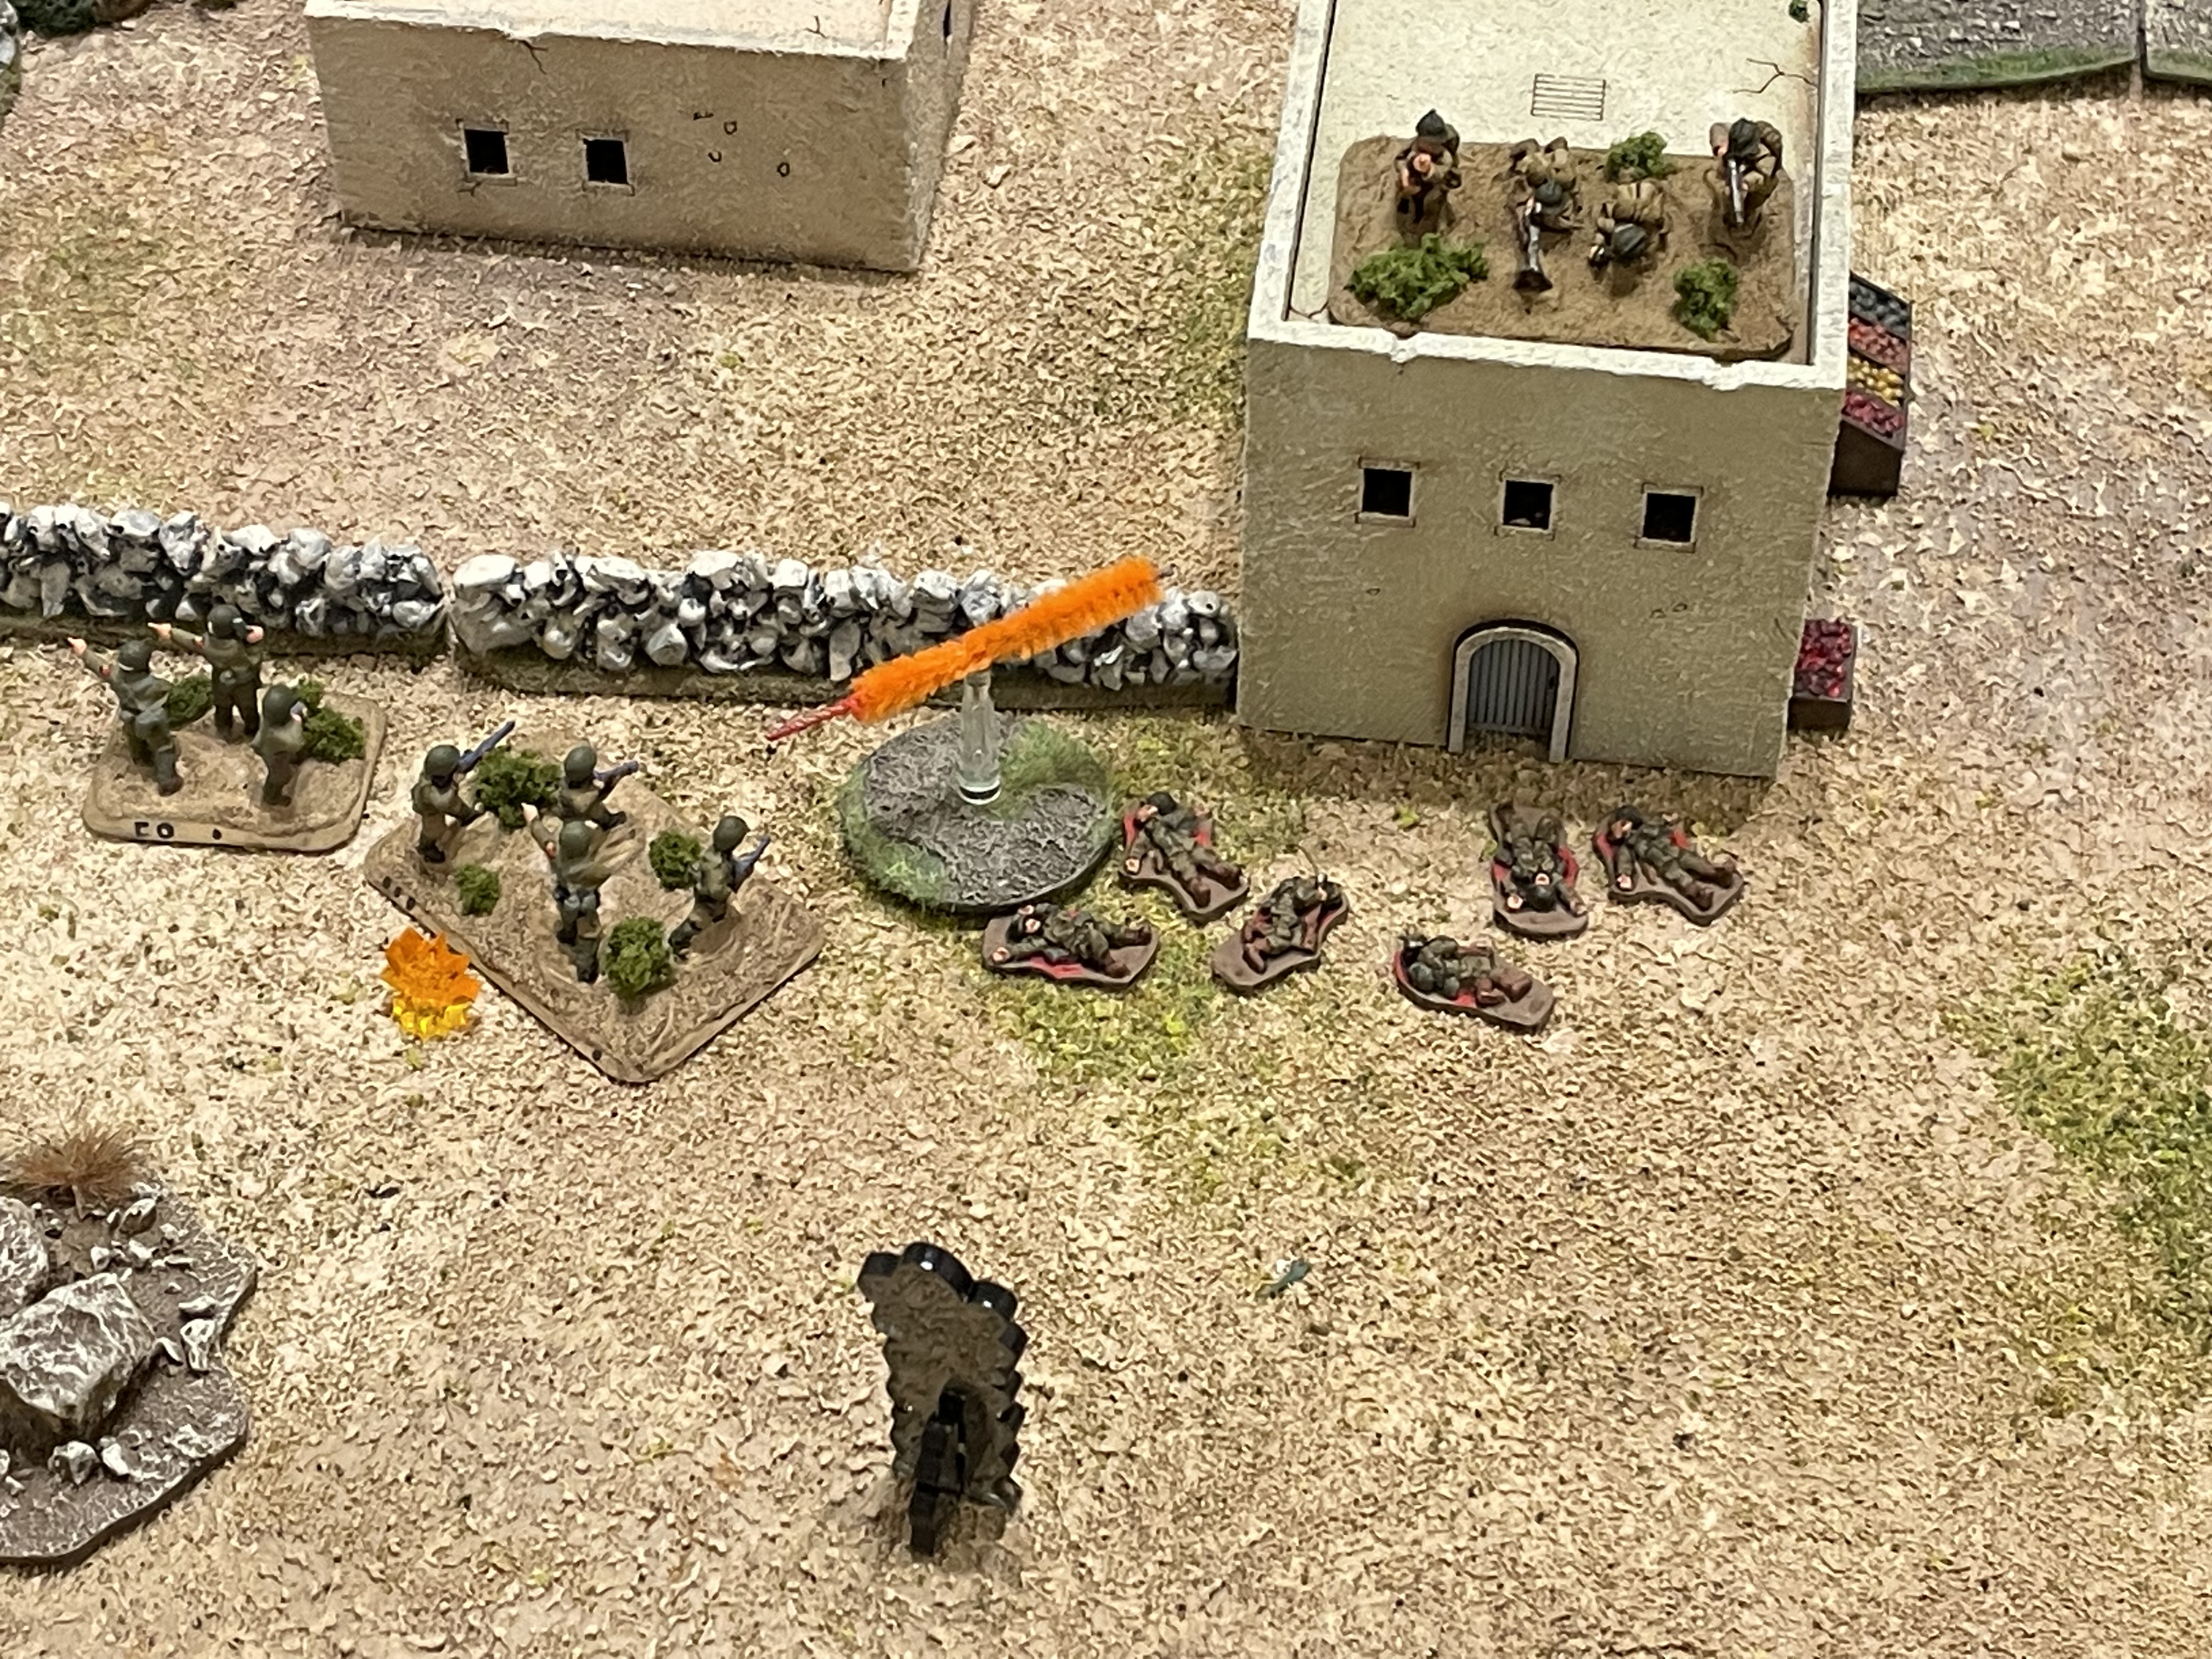
But as they advance, the French anti-tank gunners (bottom right) spot them (top left) and open fire.
Lt Steed's command team is taking casualties (white bead), the M7 is suppressed (red bead), and Sgt Bruschi's squad is pinned (yellow bead)!
French riflemen (bottom left) add their fire to the fight, pinning down Sgt Marion's squad (top right)!
The M3 Grants push up between 3rd Platoon (top right) and the beleaguered 1st Platoon (bottom left), as Captain Kirkland rushes forward to rally the troops: Lt Steed and the M7's crew are both good to go, but both rifle squads panic (become suppressed)!!!
"Sacre bleu!" The French commander, over the initial shock of Amis appearing on his undefended left flank, makes a tactical decision: this is no longer an attack-defense battle, it is a fighting withdrawal! The French commander's goal is now to get as many of his men safely to the rear (off table to the east).
The French 1st Platoon immediately begins falling back (top center, just right of their CO, from far left), as their 2nd Platoon turns to face the Americans (bottom left/center, with ATG at far right).
The French commander joins 2nd Platoon (right).
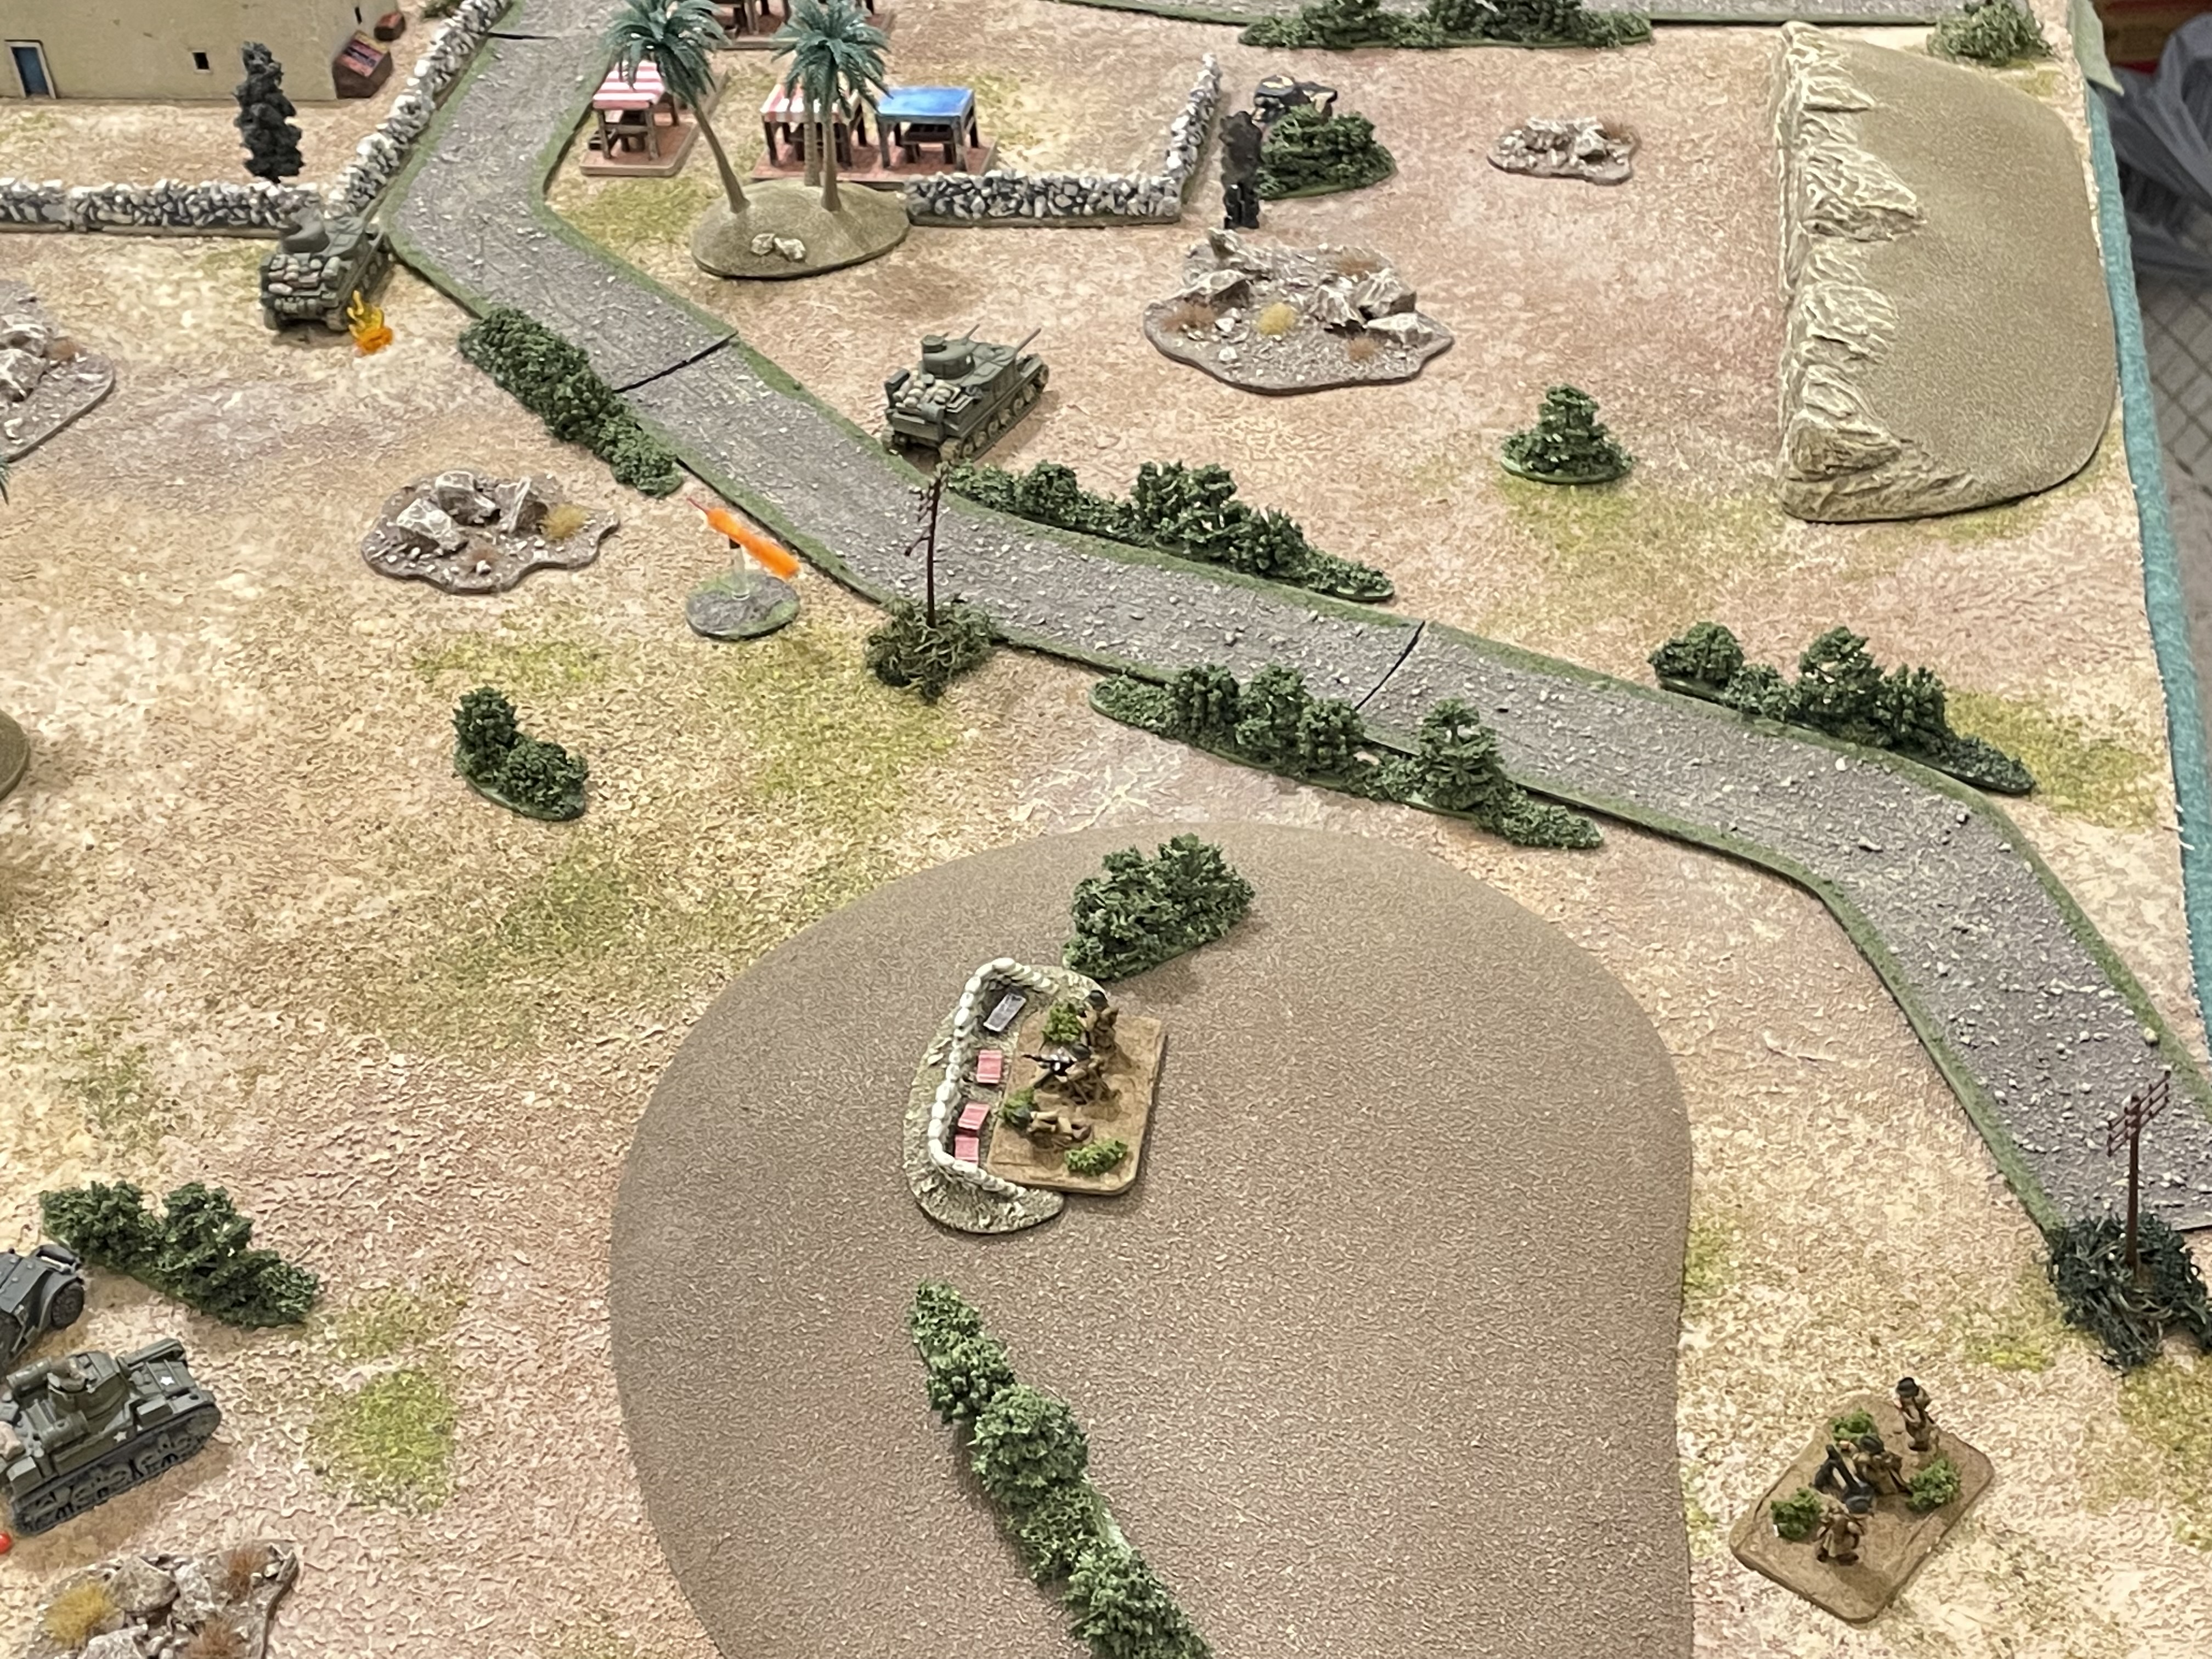
The French mortar (bottom right, with MG above them on Hill 32) fires a spotting round at the US 3rd Platoon (far left top)...
A little short.
As the French armored car pushes forward into a hull-down position (bottom right) and opens fire on the lead American elements (top left) with its 25mm gun...
Sending several armor-piercing rounds into the flank of Sgt Keith's Stuart, brewing up the tank and killing him instantly, as Lt Seay (bottom left) and Sgt Perry (bottom right) look on in horror!
Lt Seay pushes his Stuart forward (far right) preparing to engage the French armored car (behind trees at top left)...
But the Lieutenant (far left) is caught completely off guard when suddenly a French machine gun (right) opens fire on him, suppressing the American tank!
*For anyone that has any issues with a tank being suppressed by a machine gun, first, I think there are plenty of accounts of WWII action that show this happening, and second, especially when the fire is coming from an unexpected quarter, or at close range, or when they are not being closely supported by friendly infantry, and this had all three!
And yes, even though all the forces start on the table, I still play it as my guys can be unaware of the location/presence of enemy troops when relevant, and allow them to be surprised, as happened here.
Sgt Perry (bottom left) immediately racks his Ma Deuce (M2 .50-cal HMG) and opens fire on the French armored Car (top right), pinning it down.
As Sgt O'Neale pushes his Grant forward (top center, from far left, where Sgt Gildon's Grant is sitting)...
But the French ATG (far right bottom) spots him (top left) between the buildings and fires...
The 25mm round clangs harmlessly off O'Neale's vehicle; the tank pivots and returns fire with its 75mm gun, suppressing the French anti-tank gunners (top left).
As Sgt Gildon pushes his M3 Grant forward (center, from far right), leading Lt Crittenden's 3rd Platoon and firing on nearby French infantry (far left), suppressing a French rifle squad and pinning their commander.
As the French 1st Platoon continues falling back (this is looking northwest to southeast; the French 2nd Platoon is just visible at far right, the Americans off camera to top right and right, while the French 1st Platoon is spread from far left to center, coming from the square at center bottom right), and they attempt to help their anti-tank gunners to rally (center)...
But the gunners are panicking, so they spike their gun (bottom left) and haul ass down the street (red bead at top center)!!!
As the French 2nd Platoon begins a more measured, fighting withdrawal. Two rifle squads move east, each heading for a suppressed unit (the French CO and a rifle squad), helping them to rally back into the fight (French 1st Platoon visible at top center/right)...
The just-rallied rifle squad pushes east (far right, from bottom left), as the just-rallied CO moves atop the building at bottom left, joining one of his rifle squads already there.
*A little clumsy to write up/show, but hopefully you get the gist of it: the French CO and 2nd Platoon are leapfrogging their way back in order to maintain a better combat posture, while their 1st Platoon, which is out of the line of fire, is able to pin their ears back and go.
Also, there is no shooting because the French rolled a 'Scurry,' which works out very well for forces trying to pull off a fighting withdrawal. But it also allows the US troops to advance/rally unmolested.
In the French rear, the MG team slaps a fresh belt in (atop Hill 32, left), the mortar team (bottom left) prepares more ammo, and the Laffly crew (top right, between scrub and wall) rallies back into the fight.
While over on the US left, Captain Kirkland sets about getting 1st Platoon back into the fight: it works for Sgt Marion's 3rd Squad, but Sgt Bruschi's 2nd Squad (bottom left) fails again...
And falls back (red bead at center, from bottom left, with 2nd Platoon at far right)!!!
The US infantry, minus Sgt Bruschi's squad (bottom right), takes advantage of the lull in the firing and advances en masse (1stPlatoon at bottom left, 3rd Platoon at center left, and 2nd Platoon at center right), as Sgt Johnson's M7 Priest holds fast to cover the infantry and Sgt Gildon pushes his M3 Grant right to join Sgt O'Neale's tank (center top).
*The US infantry has a nice 'two-up, one back' formation going on ;)
While on the US right, Sgt Perry pushes his M3 Scout Car over to check on Lt Seay's M3 Stuart, and the Tank Company XO has got his marbles back.
Sgt Perry (in the M3 Scout Car, bottom left) immediately sets about hammering away at the Laffly armored car (top center) with his .50-cal HMG again, pinning its crew again...
But again the French MG atop Hill 32 (bottom right) lets rip, this time into the clustered light American armored vehicles...
And it's a disaster: both Lt Seay and Sgt Perry's crews are suppressed, but even worse, the M3 Scout Car is immobilized!!!
Sgt O'Neale pushes his M3 Grant forward, banging away with his 37mm gun at the French armored car, but it's a very tough shot with the Frenchmen being hull down behind the wall and partially obscured by the scrub brush. Nevertheless, Sgt O'Neale's gunnery manages to suppress the Laffly's crew.
As Sgt Gildon's M3 Grant (bottom right, with the US CO and 3rd Platoon at bottom left) fires on the French infantry (top left), suppressing a squad (from their 2nd Platoon, in the building) and pinning another (from 1st Platoon, in the street at top left)...
Before pushing his tank right (top right, from far right), joining Sgt O'Neale's tank.
As Sgt Johnson's M7 Priest (bottom right) engages the other French 2nd Platoon position (top left), lobbing 105mm HE rounds into it...
Which suppresses a rifle squad and pins the French commander (red and yellow beads, respectively, atop the building at bottom left, with the French 2nd Platoon squad that Sgt Gildon's tank suppressed at top left), which encourages Captain Kirkland to charge ahead, bringing Lt Crittenden's 3rd Platoon with him (center, from far right).
But there is another lull in the fighting as the inexperienced GIs halt at the very precipice, allowing the French to regroup (ANOTHER damned French 'Scurry')! The French continue their orderly withdrawal, with a rifle squad from the French 2nd Platoon moving up (bottom left) and rallying the suppressed rifle squad and pinned commander that were there, which allows both of them to push east (center/center top), to rally suppressed French troops there.
And as the French CO and 2nd Platoon stay firm (far right), the French 1st Platoon continues falling back, reaching the crossroads (center/left), where they again attempt to rally the French anti-tank gun crew...
But they continue to panic and flee (center, from bottom center), though it really is working out for them as it's a retreat, anyway ;) The French Laffly armored car crew (just visible at right top, between the wall and the scrub) rallies once again.
The US infantry continue to advance (1stPlatoon at far left, CO and 3rd Platoon above them, 2nd Platoon and the M7 Priest behind them, center, and Sgt Bruschi's suppressed 2nd Squad, 1st Platoon, at bottom right). Captain Kirkland, the US overall commander, is filled with a sense of dread, realizing he's allowing the French to slip through his fingers...
In the rear, Sgt Bruschi attempts to rally his panicking squad of riflemen...
But they break and run (far right, from bottom left)!!!
Sgt Gildon pushes his M3 Grant up (left, from bottom left), where he has an clear, unobstructed line of fire through the crossroads on the east end of town, effectively sealing off the French escape route(?), with Sgt O'Neale (just below him) warily eyeing the French armored car (far right)...
**And I screwed up here; I didn't allow Sgt Perry's (immobilized) M3 Scout Car, and Lt Seay's M3 Stuart, to do anything because they're suppressed, but I should have allowed them to attempt to self rally...
Sgt O'Neale breaks the silence by resuming fire with his 37mm gun on the French Laffly armored car (top right), suppressing its crew!
As Sgt Gildon's tank opens fire down the street, engaging the withdrawing French 1st Platoon (left/top center)...
A French squad caught in the street (bottom right) is knocked out, as the other two squads are suppressed (red beads at far left and top center, with the French CO visible at top left)!
Sgt Johnson's M7 Priest resumes hammering away at French riflemen in an nearby house, to no effect, as the sturdy stone walls successfully shelter the troops inside. Nevertheless, Lt Crittenden (center) decides it's time to go! He leads his command team and Sgt Wilfork's 3rd Squad, 3rd Platoon, forward...
French riflemen hastily open fire on the advancing GIs...
And Sgt Wilfork's squad is rendered hors de combat!!! But Lt Crittenden and his command team press home their attack!!!
And they fight like tigers, knocking out two French squads in close combat!!!
Inspired by his subordinate (Lt Crittenden is just visible at top left), Captain Kirkland grabs Sgt O'Donnell's 1st Squad, 3rd Platoon, and dashes forward into the fire...
Both American elements make it into close combat (yeah, I wasn't going to put that giant command stand, with its M3 Scout Car on the base, on top of the building), where intense close combat with pistols, grenades, submachine guns, entrenching tools, fists, and teeth breaks out!
But the French squad emerges victorious, knocking out Captain Kirkland's command element and Sgt O'Donnell's rifle squad!!!
**I am now in the very awkward situation of having two 2nd Lieutenants running around the battlefield by themselves, their rifle squads having either been knocked out or fled. And another thing, owing to the confusion on the invasion beaches, Captain Kirkland of Easy Company was actually leading two platoons, 1st and 3rd, from Dog Company, with only 2nd Platoon actually from his own company. Captain May, the Dog Company commander, made note of the fact Captain Kirkland had decided to lead the assault on Mehdi with the two Dog Company platoons, leaving his own platoon from Easy Company in reserve.
Captain May was looking forward to raising the issue with Captain Kirkland but, given Kirkland's current status, it would have to wait until after his convalescence...
Doing their best to support their beleaguered compatriots, the French mortar team (bottom right) fires on the US 1st Platoon (top left)...
But again the round falls short (bottom center), as the French squad that just defeated Capt Kirkland and Sgt O'Donnell opens fire on 1st Platoon...
Lt Steed looks on in horror as Sgt Marion's 3rd Squad is knocked out!
The French rifle squad, having just knocked out 3rd Squad, 1st Platoon (off camera to left), now decides to descend and move east, crashing into Lt Crittenden's isolated command team! A vicious melee breaks out between the two buildings (the French CO is just visible at top right)...
That sees both sides fall back under pressure, the French going north (red bead at far left, next to their CO) and the Yanks going south (red bead at far right), both suppressed!
*A draw??? Good grief...
Th French commander immediately rallies his squad (bottom center), then moves up the street to assist 1st Platoon (top center), where he rallies both squads suppressed by Sgt Gildon's M3 Grant (off camera to top right).
As if on cue, Sgt Gildon's main gun (left, with Sgt O'Neale's tank just below him) roars again, sending fragments from 75mm HE all about the crossroads and pinning one of the recently rallied French squads (top right).
As Sgt O'Neale pushes his Grant (bottom left) to point blank range, attempting to knock out the French Laffly armored Car (bottom right), but he just can't seem to hit the damned thing!!!
Back on the US left, a French squad from their 1st Platoon (top left, the one that knocked out 3rd Squad, 1st Platoon, and was fought off by Lt Crittenden, who is the red bead at center) is holding the rear as Lt Davenport leads Sgt Johnson's M7 Priest and his 2nd Platoon forward to assist Lt Crittenden, who is rallied.
Desperate to 'hold the door open' for his comrades, the French mortar team (bottom right) targets Sgt Gildon's M3 Grant (top left). They know they can't destroy the American tank, but if they can at least get him to button up they know their comrades in the rifle platoons will stand a much better chance in getting through the crossroads (just off camera t top center left)...
And the 81mm HE rounds do the trick, pinning the Grant's crew (yellow bead at left; the pin means the crew won't be able to react fire when the French rifle platoons (top right) attempt to get across the crossroads)! The French CO rallies the pinned rifle squad (yellow bead at top right)...
And they make a run for it, dashing across the crossroads, almost catching up to the panicked ATG crew (red bead at far right).
Another lull in the fighting ensures (the US rolled up a 'Scurry')...
Lt Steed, despite being all alone, pushes his command team (bottom left) and faces east (towards top center right), down the road (a single French rifle squad is present at center left, while their CO, two rifle squads, and ATG crew are through the crossroads at top center). Lt Crittenden and Lt Davenport, with 2nd Platoon, moved up (center left), before spotting the French rifle squad on the other side of the building and deciding to slow down a bit (actually, they know he's there but you can't move into close combat on a 'Scurry,' and I couldn't think of anything more clever to do with them). Sgt Johnson backs his M7 Priest out and begins heading east (far right, from center), as Sgt Gildon rallies his M3 Grant crew (center right top).

Feeling a bit exposed, Sgt O'Neale reverses his M3 Grant away (center left, from top center) from the still operable French armored car (between wall and scrub at top center), while Lt Seay's M3 Stuart and Sgt Perry's M3 Scout Car (bottom center) finally get rallied back into the fight!
The French infantry continue their retreat, with the CO, ATG crew, and 1st Platoon nearing the edge of the battle area (top left) and the last remaining squad from 2nd Platoon nearing the crossroads (center, from bottom right, where the US 2nd Platoon and Lt Crittenden are just visible). The Laffly armored car (top center left) successfully rallies.
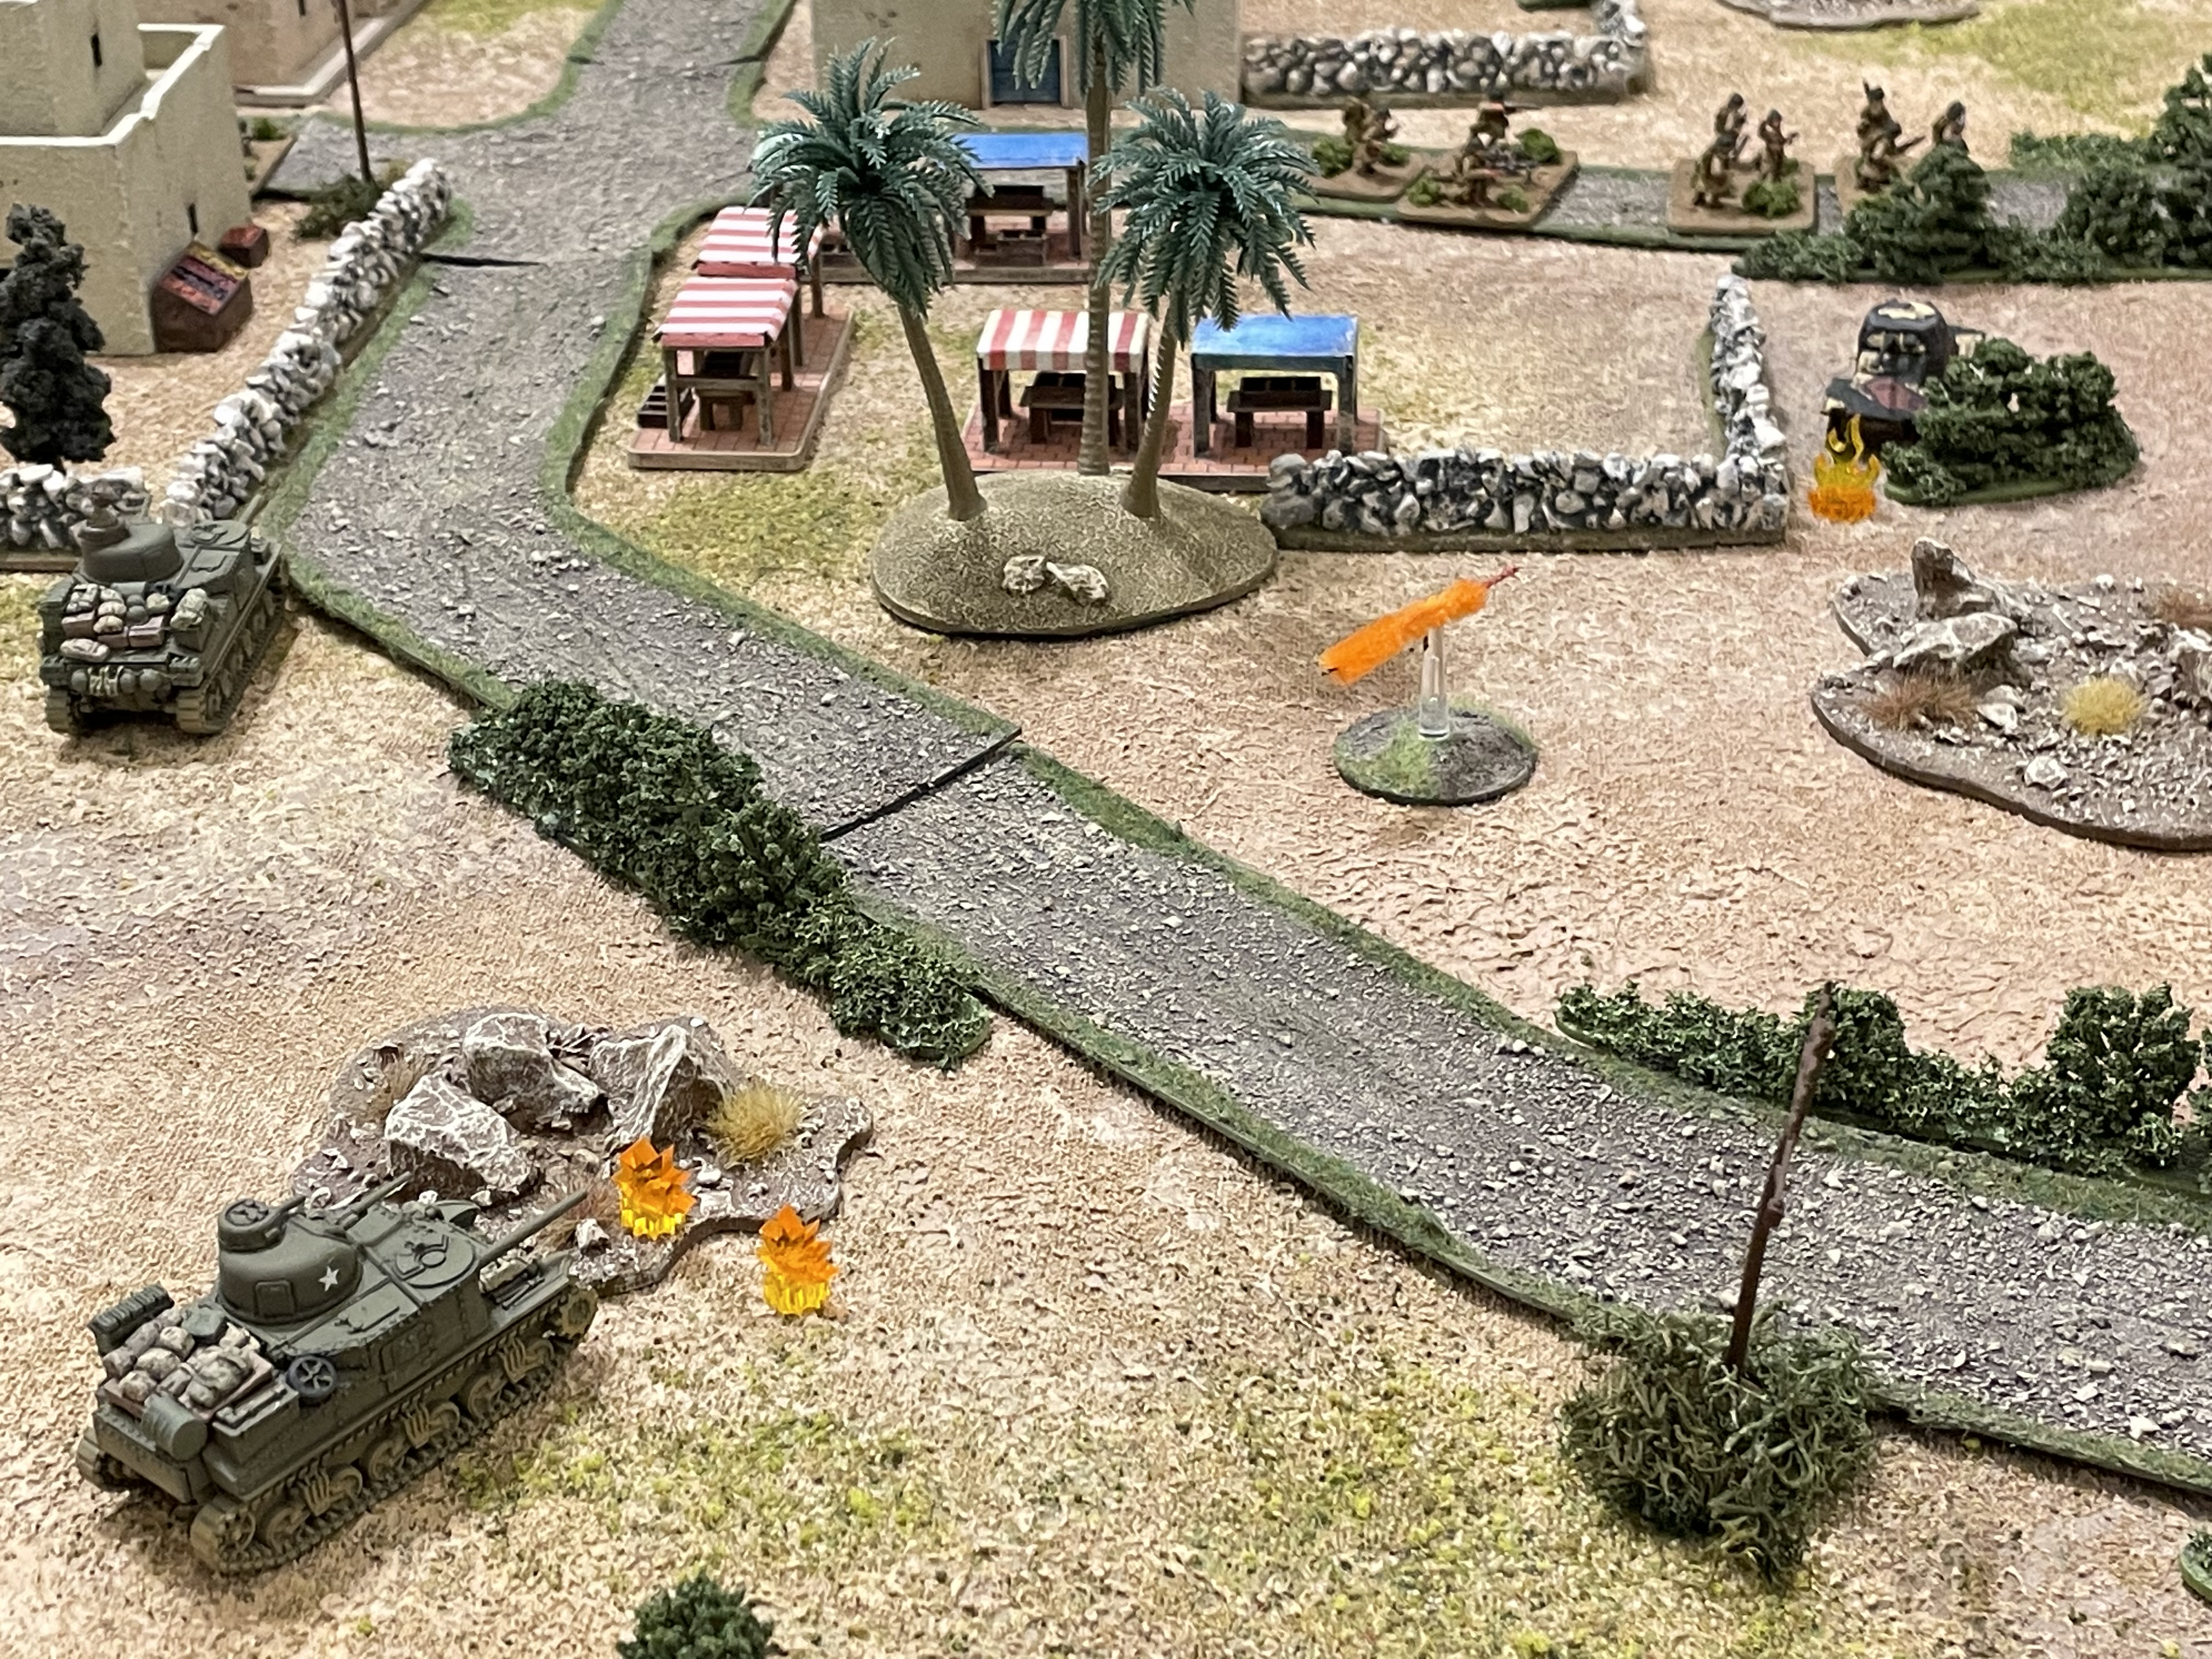
And finally the Laffly (bottom right) gets its due: the Frenchmen open fire with their 25mm gun, but the rounds skitter harmlessly off the Grant's thick frontal armor...
Sgt O'Neale howls at his gunner to return fire!
The Laffly (bottom left) is hit and bursts into flames!
While back on the US left, Lt Steed (bottom center), spots the retreating French squad from 2nd Platoon (top center, with the US 2nd Platoon at center right) and opens fire...
The Frenchmen, caught exposed in the street, are pinned down, as Lt Crittenden and Lt Davenport and his 2nd Platoon dash out to finish them off; the dejected Frenchmen, having successfully bought their comrades time to escape, toss aside their weapons and surrender.
As the French CO, ATG crew, two rifle squads (top right, with the two US M3 Grants at far left) and the French MG and mortar team (bottom right) make good on their escape, ending the fight and leaving the Americans in control of Mehdi!
A entertaining, and very interesting fight! Not often I get to play a 'fighting withdrawal' type of scenario, and even rarer that it actually plays out the way it's supposed to! The French got very lucky with a total of three 'Scurries' (lulls in the action that allow movement with no firing/reaction firing or close combat), but the Americans had their chances, just a lot of unfortunate occurrences. I say it that way because I don't want to blame it on dice, and that's absolutely not how it felt, it just felt like a really organic type of 'man, these guys just can't get it going,' which seems and felt right.
So, I guess both sides won: the Americans, though taking fairly heavy casualties, are in position of Mehdi, and the French, though taking fairly heavy casualties, escaped with a sizeable portion of their force preserved. The French rearguard put up a particularly bloody resistance, which successfully delayed the American advance; the US tankers, understandably, were unwilling to move into the city streets in order to cut off the French escape route, and their interdiction by fire proved to be inadequate.
Here are the stats:
-The US suffered 20 casualties
-The French suffered 25 casualties and 10 captured, with one ATG and one armored car destroyed (actually, the French destroyed the ATG themselves as they pulled out)
-The French commander, two rifle squads, an anti-tank gun crew, an MG team, and a mortar team escaped to fight again
Characters:
-2nd Lt Crittenden, 3rd Platoon Leader, Dog Company, was awarded the Silver Star for single-handedly leading three close assaults that eliminated two enemy rifle squads, fought another off, and captured one more, resulting in the capture of the town of Mehdia
-Sgt Bruschi, 2nd Squad, 1st Platoon, Dog Company, was relieved of duties, reduced in rank to E1 (Private), and reassigned, for cowardice in the face of the enemy
-Sgt Perry, Vehicle 3, Armored Car Platoon, Armored Reconnaissance Company, was able to salvage his immobilized vehicle and make it serviceable
-Captain Kirkland, Company Commander, Easy Company, was severely wounded but will return 15 Jan 1943
-Sgt O'Donnell, 1st Squad, 3rd Platoon, Dog Company, was wounded but will return 1 Jan 1943
-Sgt Wilfork, 3rd Squad, 3rd Platoon, Dog Company, was severely wounded but will return 10 Feb 1943
-Sgt Keith, Vehicle 2, 2nd Platoon, Tank Company, was killed in action
-Sgt Marion, 3rd Squad, 1st Platoon, Dog Company, was slightly wounded and immediately returned to duty
Situation: Both of the Task Force's invasion beaches are secure, as is the town of Mehdia, directly behind the beaches. Friendly forces from the 60th Infantry Regiment, 9th Infantry Division, on the Task Force's left, have suffered badly in their attempts to advance upon the 'Kasbah,' the French fortress further up the river 'Wadi Sebou.' Despite the attacks, and continued pounding by air and naval gunfire, the fortress continues to stymie any attempts to secure Port Lyautey, and its batteries continue to rain down death and destruction on the US forces ashore.
Major Reisman believes a possible solution to the tactical problem lies in a broad, sweeping advance by mechanized forces around the right flank, well to the south of the Kasbah. To that end, Major Reisman called in Captain Henry, the Armored Reconnaissance Company commander, briefed him on the situation, and ordered him to carry out the armored thrust. "But Sir, all our troops and gear are still not ashore, and the forces that are ashore are hopelessly intermingled..."
"Dammit, Captain! Why do I constantly find myself in the position of having to beg my company commanders to attack? Now you listen, ad you listen good: I am ordering you to grab anything with tracks or four wheels, load as many men with guns as you can find into or on them, and you push them forward now, before the enemy has time to catch their balance. Do you understand me? Don't speak, simply nod your head, salute, and move out smartly. Go!"
But apparently the Captain didn't understand, and it would have repercussions he would feel for the rest of his life...
V/R,
Jack


No comments:
Post a Comment