All,
Following last week's runout of One Hour Skirmish Wargames, the boys lined it up to give the Battle of Biazza Ridge another go, and it was a helluva fight! It's July 11, 1943, on the island of Sicily, where American paratroopers are facing off against tanks and troops of the Hermann Goering Panzergrenadier Division. The paratroopers have landed inland to screen the beaches as infantry come ashore, and they're being put to the test at a place called Biazza Ridge as the Germans mount a counterattack, advancing towards Gela in order to push the Yanks back into the sea.
Last week we played and had a good time, but the scenario (a great scenario, from Steve over at "Sound Officer's Call!" blog) starts with a very small amount of forces on the table and feeds in quite a bit of reinforcements, but the rules don't handle reinforcements very well (in my humble opinion, or at least we didn't handle how the rules handle reinforcements very well). Ultimately there was a fierce firefight and a daring close assault, but the Americans broke when their reinforcements arrived en masse and were caught bunched up by German mortars, which pounded them unmercifully.
So we had a lot of fun, but were convinced the scenario and rules together could give us even more fun if we tweaked a few things, so that's what we did, and it worked like a champ.
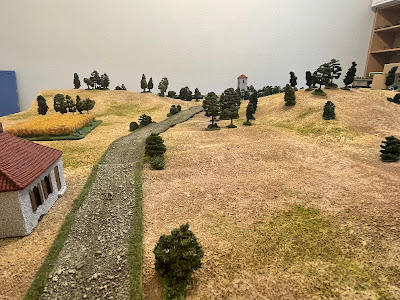
Overview, north is up, with the German baseline to the west (left) and US to the east (right). Biazza Ridge runs from south-southwest to north-northeast across the center of the table, with scattered fields, orchards, hedges, and olive trees scattered across landscape. There is a bombed-out church in the northwest (top left) and a stone farmhouse in the southeast (bottom right), which represents the only hard cover on the table.
The opposing forces, with US on the right and Germans on the left. All forces will start on the table, no off-table reinforcements this time; I basically called Biazza Ridge a 'DMZ,' and each boy could place his forces anywhere from his baseline up to the edge of the DMZ, and I had them place units in an alternating manner with the Germans going first since they have one more unit than the Americans. There was one more restriction, the German tanks had to start at their own baseline.
The Yanks: they are led by the CO of the 505th Parachute Infantry Regiment, Colonel Jumpin' Jim Gavin (who is a +2 leader in the rules), then they have three rifle platoons consisting of two rifle squads and a bazooka team each, and they are supported by two 75mm pack howitzers, with a Forward Observer (FO) in a jeep.
Yeah, no Naval Gunfire support in this fight, sorry ;) And last week I was mistakenly referring to Gavin as 'General,' but if I'm understanding correctly he was still a Colonel during Sicily.
The Germans: they are led by their CO, and they have three rifle platoons of three rifle squads, except the third platoon, which is down to only two rifle squads, and they are supported by an MG-42 (on tripod) team, an 80mm mortar team with FO, and two Tiger Is.
Looking east to west from the American baseline.
A ground level view, where you can see the contours of the ridge, with rises to the south (top left) and north (top right), with the road running through a saddle between them.
The two rises will be referred to as the South Spur and the North Spur, with the land between (where the road runs through) referred to as the saddle.
Looking north at the German baseline.
Looking west to east from the German baseline.
Another look at the elevation of Biazza Ridge (top left and far right), with the road running through the saddle at center top.
Again, you see the North Spur at left and the South Spur at right. These two spurs/hills are where the vast majority of the fighting will occur.
The entire table, with forces deployed, Germans in the west (left) and Yanks in the east (right).
The American side of the board; at bottom left the 82nd Airborne troops have their 1st Platoon (including a bazooka team) and the FO deployed in and around the crops, looking up the slopes of the South Spur, with one of their 75mm pack howitzers backing them up. In the center the paratroopers have their 2nd Platoon (and its bazooka team), the 3rd Platoon's bazooka team is hovering nearby, and their Commanding Officer, Colonel Jumpin' Jim Gavin, while they have the two rifle squads of 3rd Platoon in the groves below the slopes of the North Spur, backed up by the other 75mm pack howitzer (top right).
The younger boy (aged 7) is commanding the Americans, and I helped him a little bit with deployment, but it was mostly him. The only thing we discussed afterwards was maybe putting Gun #1 above the road, where it could hit either of the hills; where it was (bottom center), it really could only effectively reach all of the South Spur and the southern end of the North Spur. We discussed keeping a rifle platoon out of the line, in reserve, but with the dearth of cover east of the ridge, the fact the objective is the ridge itself, and the fact the fight will at/on the ridge, I thought it prudent to have all three rifle platoons in the line, in a position where they could at least sort of be mutually supporting.
The US 3rd Platoon in the grove (center), with their bazooka team at bottom left and the #2 gun at far right.
The US center, showing 2nd Platoon at left, with Colonel Gavin behind them (center bottom), 3rd Platoon's bazooka team above him, and 3rd Platoon at top right. I liked that he kept the CO in the center, in order to be able to provide support in either direction, but the fight got down and dirty so fast I don't know that it actually mattered.
The US left, with 1st Platoon in and around the fields at left, with the FO below them and the #1 gun backing them up (bottom right, with the CO and 2nd Platoon just visible at top right). I've thought about this a lot, about whether it's better to push up onto the South Spur or hold here and make the decisive fight be on the North Spur. I still like the idea of pushing onto the South Spur and getting into the trees up there, make the Germans come dig you out.
The German side of the table, with their 1st and 3rd Platoons, as well as their FO, near the North Spur (top center right), their MG team in the bombed-out church, their mortar team at top left, their CO in the patch of woods just below the bombed-out church, and their 2nd Platoon escorting the Tigers at bottom left. The older boy (aged 12) commanded the Germans.
A couple things about the Tiger/infantry team: the Tigers are big and cumbersome in real life, so I only allowed them to move at the same rate as infantry. Another thing we discussed was the point of tank-infantry cooperation, that tanks button up and can't see anything, so we house-ruled it that a tank firing at infantry/guns WITHOUT a friendly infantry unit in base contact would require the Tiger to pass a spotting test in order to be able to fire on enemy infantry/guns. The boy did really well keeping them working together, and using his mortars in support; the only thing we discussed is that he didn't need to start with his 2nd Platoon in the open with the Tigers, he could have placed the infantry in the wood below the South Spur (far right bottom) and let the tanks catch up to them.
Also, he placed his MG team in the bombed-out church, probably mostly because it turned out to be a good idea in the game we played last week. It didn't play any part in this week's game and we discussed it afterwards; I thought it was a good initial deployment, but fairly early on it became apparent it wasn't going to have much to do and so he should have begun pushing the gun forward into a position it could support by fire. Having said that, he had also left one of 1st Platoon's rifle squads back with it, and we discussed how it was a really good idea to have a second line to fall back on in case the assault didn't go as planned. Lastly, I understood what he was doing, putting his CO all alone in the center of the table, but we discussed the perils of leaving his CO isolated like that. The funny thing is, he came out of it smelling like a rose!

The German left, with their 3rd Platoon on the far left (left top) and their 1st Platoon at center, escorting the FO and having detached a rifle squad in the nearby field (left).
The German center, with their MG team in the church (far left, with a 1st Platoon rifle squad visible in the field at top left) and their CO in the woods at bottom right.
This is the second line I discussed above, but the CO (bottom right) didn't need to be alone, the boy could have put his 2nd Platoon in the trees to his right and let the Tigers catch up to them. C'est la guerre...
And the German right, with the dismounted 2nd Platoon leading the platoon of two Tiger Is towards the South Spur. My hat's off to him though, he knew what he wanted to do and so he kept them together, and it all worked out for him.
And the German rear, where there 8.0cm mortar team is set up (bottom left, with the MG team in the church (top right).
These guys are probably the real stars of the whole dam thing... And I know the Germans used "8.0cm," but I can't stand it, I have to go with "80mm."
The fight kicks off with the German 1st Platoon and FO pushing up the slopes of the North Spur (top center, from center), as 3rd Platoon (far left) and the MG team (bottom left) look on.
The boy did a really good job of not overextending himself, pushing troops forward on the North Spur but waiting until he'd massed both 1st and 3rd Platoons before breaking cover onto the crest.
And their 2nd Platoon leads the Tigers towards the South Spur.
The US 1st Platoon reacts by pushing to the base of the South Spur (center, from right).
And the 2nd Platoon pushes up in the center, between the two spurs (left, from bottom center).
The little one didn't have much command initiative, so he couldn't move both 2nd and 3rd Platoons, so we discussed it and he opted to move 2nd up, which could support 1st Platoon (on the South Spur, off camera to bottom left), or potentially get hammer and anvil on the German force coming up onto the North Spur (between the US 2nd and 3rd Platoons).
And the Yanks continue pushing up the South Spur, with their FO reaching the military crest (top left).
This is the move that will haunt me: should the little one have done this, or kept 1st Platoon in the woods at the base of the South Spur and pushed 3rd Platoon up onto the North Spur?
While the German commander continues pushing troops towards the North Spur, but holds 1st Platoon until 3rd Platoon can catch up.
The boy is marshalling his forces out of sight, preparing to spring onto the North Spur.
The US 2nd (far left) and 3rd Platoons (far right) converge on the North Spur, with Colonel Gavin advancing behind them (bottom left).
So the 2nd Platoon pinches in and the 3rd Platoon gets a bit of a late start up the slope...
And the two bazooka teams (from 2nd and 3rd Platoons) move into the treeline near the road (right bottom, with 1st Platoon and the FO visible on the South Spur at top left, North Spur off camera to right).
Seeing where the Tigers were deployed and how slow they move, I thought the little one made a very good move to get these bazooka teams into a spot where they'd likely see action, and screened from infantry fighting by 2nd Platoon (off camera to right).
On the US far left, the FO pushes his jeep up into the woods atop the South Spur.
And holy guacamole, look what he (bottom center) sees! He immediately gets on the radio and calls in a fire mission!
Both 75mm pack howitzers go to work!
The Tigers are untouched, but all three squads of the German 2nd Platoon are suppressed!
Tiger 501 (just visible at far left) can't spot any targets, but quite surprisingly Tiger 502 spots the US FO atop the South Spur (top right) and its 88mm cannon roars...
But, luckily for the Americans, the shot is off target!
Wary of advancing without infantry support, the Tigers remain with their suppressed infantry. I was actually recommending to the boy to get the Tigers moving, knowing how slow they are, though I mus admit my counsel may not have been altogether pure, I was kind of looking forward to some bazooka vs Tiger cat-and-mouse- amongst the scrub and trees, but, to his credit, the boy didn't bite.
But the Germans maneuver aggressively on their left, pushing 3rd (in trees at top left) and 1st (top center right) Platoons up onto the South Spur.
I was super proud of him, the boy waited until he got his assault force completely in position and then made sure he had enough command initiative to do it all at once, then swooped!
The German 3rd Platoon (far right) opens fire on the US 3rd Platoon (far left), to no effect.
Going with one stand equals one squad, I only gave rifle squads one card's worth of shooting (MGs, mortars, and the pack howitzers all got four), so small arms fire was bound to be rather ineffectual, with the rifle squad's best service coming in the form of closing with the enemy to destroy them.
While their 1st Platoon (bottom left) begins engaging Colonel Gavin and 2nd Platoon (right)...
And even (Germans at bottom center and far left) firing on the US 1st Platoon on the South Spur (top right). Meanwhile, the German FO (small base at far left, between the two larger rifle stands) gets on the radio and calls up the mortar...
The rifle fire was all ineffective, pretty much to be expected, but the boy got two (understrength) platoons onto the northern objective, with good fields of fire, and got his FO into play. Pretty damn slick.
The German mortar team goes to work...
But their initial sheaf falls long, just to the south of the US 1st Platoon (far and bottom left).
Quite bravely, the German CO pushes up in the center (bottom left) and engages the US 1st Platoon on the South Spur (right, with the bazooka teams from the US 2nd and 3rd Platoons at top center).
I thought the boy had completely lost his mind, pushing his CO up like that, all alone, but then he completely lucked out and won the next initiative, so...
The German mortar team (bottom left) adjusts fire on the South Spur (top right, North Spur at top left) and begins dropping rounds...
And this time the 80mm HE rounds are directly on target, suppressing the US 1st Squad, 1st Platoon, and their bazooka team (bottom left, with 2nd Squad at top right and the German CO visible at top center).
The German CO sees the American paratroopers withering under the barrage and senses an incredible opportunity... Unlike the little one, who is super aggressive, the older boy is much more reserved, but we talked through his courses of action (based on the tactical situation and his amount of command initiative) and the risks/benefits involved, and he grasped it.
The German command group storms uphill (bottom left), into contact with the US 2nd Squad, 1st Platoon (1st Squad and the bazooka team suppressed at top right), as submachine guns rip and the dull thump of hand grenades reverberates from the hilltop!!!
If the boy could beat this US rifle squad, the other rifle squad and bazooka team were in the bag since they were already suppressed (or 'down,' in the rules parlance), which would pretty much completely wipe out the US left flank.
The Americans are eliminated in close combat...
And the German command group immediately pivots and closes with the US 1st Platoon's bazooka team (center, from far left)...
The US 1st Platoon's bazooka team is quickly dispatched, and the German command group closes with the US 1st Squad...
Quickly dispatching them (center), but running out of steam before they could close on the US Forward Observer (top left).
That was an absolutely huge swing, and the little one was really starting to panic, but we talked and he realized it wasn't over yet. But it was starting to feel an awful lot like last weekend's game...
The US FO quickly beats feet, falling back down the South Spur (top right), leaving the German CO in his dust (far left), calling for help the entire time!
Yeah, I let the little one zoom his jeep around the German CO to escape. The rules don't forbid it, and I rationalized that the German command group could still be recovering from their exertions in climbing the hill and knocking out three units in close combat...
And Gun #1 (bottom right) comes to the rescue, opening fire on the German CO (top left, with the US FO in the woods at center).
Not that he hit anything...
And on the US right, Gun #2 (bottom left) goes to work on the North Spur, targeting the German 3rd Platoon (top right, with the US 3rd Platoon on the slope at center top and the US 2nd Platoon on the slope in the woods at left top).
Not that he hit anything, either... The little one certainly wasn't having a good time with the cards today.
The German mortar team (bottom left) shifts fire, targeting the saddle between the two hills (behind the tower at top center)...
Having used his mortar team to soften up the US defenders on the South Spur, the boy looked to repeat the maneuver in support of his 1st Platoon on the North Spur...
The rounds fall on the US 2nd Platoon, suppressing its 1st Squad (red bead, with 2nd Squad above it and Colonel Gavin at far right).
And then the boy took a page from his little brother and got pretty damn aggressive...
The German commander again grasps the opportunity provided by this supporting fires and sends 1st Platoon's 1st Squad downslope, into close combat with the US 2nd Platoon's 2nd Squad (with the suppressed 1st Squad just below it and Colonel Gavin just off screen to right)!!!
The German panzergrenadiers quickly put 2nd Squad out of the fight and turn their guns on 1st Squad...
The Germans quickly dispatch the second American squad but, with Colonel Gavin hootin' and hollerin' and with "friendly" mortar rounds continuing to drop in intermittently...
But then he chickened out!!! The boy was super scared of Colonel Gavin's +2 rating (meaning that, in an opposed card draw, the Germans would get to pull 2 cards in close combat, but the American would get to pull three). Or maybe he didn't chicken out, maybe it actually was the smart move...
The German squad leader decides discretion is the better part of valor and beats feet back up the slope of the North Spur (left, from center, with FO at top left, US 3rd Platoon at top center, and Colonel Gavin at bottom right)!

As the German 1st Squad, 1st Platoon gets back up the hill (bottom left), their 2nd Squad, 3rd Platoon surges forward (far left) and fires on the US 3rd Platoon (top right), still hunkering down on the slopes of the North Spur.
The little one hasn't had much for command initiative (action points), and what he's had he's had to spend on reacting to the Germans' moves (we discussed the OODA loop), so these poor bastards are still stuck on the east slope of the North Spur...
With the situation rapidly deteriorating for the US paratroopers, Gun #1 (bottom left) fires over the head of Colonel Gavin's command group (far right), engaging the German 1st Platoon atop the North Spur (top right)...
The American artillerymen finally earn their pay...
Suppressing the German 1st Squad, 1st Platoon, and their FO.
As Gun #2 (bottom right) fires on the German 3rd Platoon (top center, with the US 3rd Platoon on the slope below them).
The guns have done their job, all German forces atop the North Spur have been suppressed!!!
Well, except for the German 1st Squad, 1st Platoon (just hidden by the trees at top left), the one that previously charged down hill, eliminated the US 2nd Platoon, and climbed back up. No matter, Colonel Gavin knows what must be done...
Colonel Gavin leads his command group up the south slope of the North Spur, but his exasperated troopers can't get to grips with the German 1st Squad, 1st Platoon, so they halt and open fire, suppressing the enemy rifle squad.
Back to the little one's command initiative problems: he just couldn't get enough points to do a double move and push Colonel Gavin into close combat (where he's have drawn three cards to the Germans' one, even though he did lose in that very same situation last week!), and if he won that he could have really cleaned the Germans off the North Slope and probably have broken them. This right here was the key phase of the entire game...
With the CO and his command group blazing away (far left), the US 2nd Squad, 3rd Platoon pushes ahead (right top, with their 1st Squad at bottom right), perhaps a bit too cautiously...
That's just my narrative, the little one wasn't too cautious, he just didn't have enough command points to actually push them onto the crest and start whacking guys in close combat, he absolutely wanted to but couldn't so he set them up where they'd be able to make it next turn, even if there were only a few command points, but it did leave him overextended and vulnerable. But we discussed the issue and the US forces were really running out of options...
While back on the German side, their commander finally gets his Tigers moving again, this time headed for the North Spur (top left), each with a rifle squad from 2nd Platoon escorting them (I forgot to mention, one of the 2nd Platoon's rifle squads broke and ran under the earlier barrage of the US 75mm pack howitzers).
And then disaster strikes for the Yanks...
The German mortar team goes to work again...
Dropping 80mm HE rounds all over Colonel Gavin and his men, suppressing the US command group!!!
Now this could have happened regardless, but to have it happen before Colonel Gavin was able to get into close combat really, really sucked for the little one...
As the German armored column continues to push east, the lead Tiger (left center) nearing the saddle between the North (top left) and South (right) Spurs.
The German commander is quite concerned with the two US bazooka teams in the saddle (in the woods, straight above the lead Tiger).
The older boy is riding high, getting tremendous amounts of command points and able to double move his Tigers and supporting infantry up to the saddle.
So he tasks his mortar team (bottom left) to take them (top center, with the lead Tiger just below and right of the road) under fire...
But the rounds fall long (far right, with the bazooka teams at bottom left, Colonel Gavin suppressed at far left, and 1st Squad, 3rd Platoon visible at top left)!
It's the end of the turn and the Germans check casualties: both rifle squads from their 1st Platoon (casualty figures at left and right) have broken and ran, but their FO (center) and both rifle squads from 3rd Platoon (just off camera to far left, with the US 3rd Platoon visible at top center/left) are good to go...
But the Americans must also check casualties, and for the second game in a row, Colonel Gavin goes down...
And that was just a kick in the crotch to the little guy...
While back at the saddle, Tiger 501 and its infantry escort push forward and fire on the US bazooka teams manning their ambush positions...
And the 88mm HE fire suppresses both of them!
As the rest of the German armored column catches up.
The German mortar team shifts fire once more...
Suppressing Gun #2.
Everything is going the older boy's way...
In full on desperation mode, Gun #1 (bottom left) fires on the German armored column (top center right)...
But only manages to suppress the lead rifle squad.
And it all comes down to this, having to close assault German troops atop the North Spur that have just rallied off their suppressions in a last, vain attempt to carry the day...
On the far right, the US 2nd Squad, 3rd Platoon valiantly charges up the face of the North Spur, directly into the waiting guns of the German 3rd Platoon...
And is duly defeated...
The poor little guy had absolutely no luck today... But don't worry, yesterday he went 2-3 with a double and a Grand Slam in a 16-1 victory in Little League Baseball ;)
The remaining US troops (the FO, Gun #1 (top center), two bazooka teams, and 1st Squad, 3rd Platoon, fall back, just as 6" shells from the USS Savanna and USS Boise began to careen overhead, saving the day for the US beach head at Gela...
And all that without the MG-42 team firing a shot! ;)
Wow, what a fight, I'm exhausted. Looking back on it, and with all my foreshadowing commentary, you are likely to get the impression that the result was a foregone conclusion, but I assure you that is not the case, it was actually a barn burner that had some luck involved, but was actually just played really, really well by my older son. Hell, initially, when the pack howitzers suppressed all three squads of the German 2nd Platoon, potentially separating them from the Tigers, it looked like it might be a walkover for the US, and things were tilting the Germans way but still could have gone either way all the until Colonel Gavin got whacked, and don't forget, that happened right after the pack howitzers suppressed pretty much everything atop the North Spur. So it was a close run thing until Gavin went down, and then ended with a 'Charge of the Light Brigade,' which was pretty fitting, and dramatic.
So I can't complain about the action at all. The rules worked much better without having to deal with reinforcements, but the fight still took two and a half hours, which is a bit of a challenge still for the youngsters (I did have to threaten the little one's life a couple times). I haven't discussed it with the boys yet, but I'm actually thinking about playing it again, with a different set of rules (something homegrown, super simple), in the hopes of getting the game time down to 60-90 minutes. I don't really like playing the same fight over and over again, but it has been fun, it's already set up, and it has proven to be a good test bed, I think. Sure, the Yanks have lost both times, but I don't feel like it's an unwinnable situation for them, just some bad luck and some skillful handling of the German forces.
So, if anyone has a cool, similarly-sized scenario we should try out, let me know and I might just give it a shot, rather than do a 'Biazza Ridge III.' But it needs to be mid- to late-war, I don't have early war stuff in 15mm (yet), hopefully something on the Eastern Front.
More to follow as we look to keep the gaming ball rolling.
V/R,
Jack


Loved it, thanks Jack. Might have to give this scenario a go myself when Baccus get around to releasing their US artillery...
ReplyDeleteAnd well done to your lad for the grand slam and the double - great game!
John,
DeleteThanks man, and I certainly look forward to your version/vision of it.
Yeah, it was a lot of fun. Just to clarify, it was a 'Little League' Grand Slam, i.e., not over the fence, but an 'inside the park'-type home run. Having said that, it was a line drive he ripped straight down third base line, and it tailed away into the corner. With older boys it probably would have been a triple, but their arms aren't as strong so he was able to beat the throw in to home. Lots of fun!
V/R,
Jack
Jack, I should have asked (and apologies if I missed the discussion of it) but what are you using for the hills underneath the mat? Your standalone hills or something else? Really liked the visuals for these last two games.
DeleteJohn,
DeleteNo problem. The mat is from War Sigil, a company here in the States, and I just use old towels rolled/piled up to create the terrain contours.
V/R,
Jack
That was a great game report, thanks. It seems the new scenario setup worked very well.
ReplyDeleteHiya Martin, thanks a bunch! And yes, cutting down the forces a little bit and starting with everything on the table seemed to work like a charm.
DeleteV/R,
Jack
Great game report. I also enjoyed your previous one, too. I am tempted to give these a go with my 10-year-old son. My concern always is the time factor. More than hour with him is hard because of his ADD.
ReplyDelete--Chris
Thanks, Chris! I recommend them for quick, close in games; there are a lot of ups and downs and swings, and the length of our game is down to flagging attention spans and maybe a little too much pre-game maneuver (the rules recommend a 4' x 4' table, we played on a 6' x 4' table).
DeleteIt think if you kept it on a smaller table (with 15mm - 28mm skirmish figures you could probably even get away with a 3' x 3' table) and around eight units per side, I bet you could keep it to an hour (once you're familiar with the rules).
V/R,
Jack
The table looks fantastic, you have artillery shell markers and the game swung back and forth. What more to ask for...hmmm...maybe for you to play a game :-) Although it was probably more fun umpiring this one!
ReplyDelete2.5 hours is a long time for sons to play. I think our two OHSW (and the key is in the title) took about an hour each. But on a much smaller table - 5'x3', playing down the long edge. I think we had about 12-14 figures each and 2 tanks. We also had a fair amount of terrain and triple moves ruled both games. Drawing cards actually does take a while as you tend to always be drawing more than one and comparing. You know you could always convert OHSW to dice :-) 4+ to hit a enemy, 5+ in soft cover, 6+ in hard cover (
or opposed rolls and need +1 to hit, +2 more in soft cover +3 in hard cover. Roll 2d6 for activation points. roll 1d6 for recover, 4+ OK, otherwise dead. Armour is opposed roll and add attacker gun value, subtract targer armour value. Joker is harder to do. Maybe two 6s rolled in a row (1/36 chance so close-ish to 1/27 for half a card deck) May go faster than cards.
Shaun,
DeleteThanks man, and it was a heckuva game, lots of fun. Triple moves, eh? I think we've only done that a couple times, always by the other boy when he's going on a close assault rampage to clean up the table of already suppressed ('downed') units.
And you're right, using cards does take some extra time (flipping multiples to resolve a combat, having to re-shuffle at the end of each turn), but it's tough, because it adds a lot of drama. Having said that, I'm not sure the juice is worth the squeeze, that is, the drama should be ON the table, not next to it as you're flipping cards. It's a tough call, because it is fun.
V/R,
Jack
I agree about the cards - they are so much fun to use, but do slow down the game. I think that is why my son enjoyed it so much. I would not get rid of the card if I played again. But how to reduce the time using cards still...I do not know. As you suggest, you may need to change what rules you use.
DeleteYup, the cards are fun, yup the cards slow things down. As usual, you're letting the team down, I really expected you to have this figured out by now. I need solutions, Travers, not mealy-mouthed nonsense, what the hell are we paying you for!!!??? ;)
DeleteIt's not looking good for playing a game this weekend, lots of baseball going on and I haven't planned anything out. We might be able to eke out some time, but without a good plan, it's all for naught. Not to mention, I don't really have time to tear down the table and set up a new one, so it kinda needs to be another North Africa/Med-type game.
Hope all is well man, and feel free to go ahead and blog some wargaming stuff, if the urge hits ya ;)
V/R,
Jack
Hello Jack
DeleteI have been focused on some solo RPGing for the last few months. I do have some rules for 6mm and 20mm WW2 ready to go and some historical scenarios to go with them. No large table for the 20mm on the horizon but as of last week i think I may have come up with a solution for 2'x2' that is not low level skirmish (possibly). Of course, I have been looking at Kaptiin Kobold's blog who i running a 5MiN campaign and want to do one of them instead!
"Excuses, excuses, none of this are actual blog posts.". Yeah I know :-)
On your rules front, there are plenty of choices for potentially faster games but you are really picky. Running squad bases instead of individual figures opens you up to a bunch of games. Off the top of my head: Fistful of Lead but may be too slow, as would be Flying Lead. UseMe WW2? Some corner of a Foreign Field (you have used them before)? FUBAR? LaserBlade (may be too simple). And don't forget Rapid Fire Reloaded -you know you want to. Pz8 WW2? Fields of Honor? Airfix Battles (may be too slow). 5MiN? :-)
Hiya Shaun,
Delete""Excuses, excuses, none of this are actual blog posts.". Yeah I know :-)"
You called it! ;) And Kaptain Kobold is running a 5MIN campaign??? Where is that at? I'd love to take a gander. Would certainly go with your 2' x 2' 20mm.
Don't tell anyone, but I really want to jump back into KG Klink, just I promised myself I would get some painting done (haven't done any painting the past two weeks). You know me, I ALWAYS have more painting to get done.
Regarding rules, yeah, I've played the vast majority of those, and you're right, I do want to try RFR, but I'd like to do it the way they intended, with singly-based figures. I'm not familiar with Fields of Honor though, maybe have to check that out.
V/R,
Jack
Hello Jack,
ReplyDeleteKK is up to game 3 at the Stronghold Rebuilt blog (link is to game 3):
http://hordesofthethings.blogspot.com/2022/03/a-target-of-opportunity.html
Fields of Honor was a set of rules that came out about 15 years ago. I was interested, even wrote a QRS (I will send it to you) but never played.
wargamevault.com/product/20047/Fields-of-Honor-Rules
You, not painted for 2 weeks? Shocked I tell you, shocked. And jumping back into KG Klink is completely understandable.
Shaun,
DeleteHow very interesting, I shall take a look at the good Kaptain's work! Thanks for sharing, I had no idea.
Yeah, I hadn't heard of Fields of Honor, I'll take a look.
Indeed, no painting in two weeks, I'm suffering withdrawals ;) It's not that, it's the fact that I have so many forces lying around, almost completed, and I just have to keep plowing through to get them down.
And yes, I'm jonesing to get back into KG Klink for Barbarossa. Back to 5Core Company Command on a 4' x 4' table, up close, down and dirty, brutal fights. The bloodletting on the Eastern Front is going to be ferocious! The issue is, KG Klink is all mine, that's my solo stuff, not letting the boys in there, so I have to balance it, and it's going to be very difficult as I can't get myself into the logistical nightmare of me playing solo games on a grass mat (with buildings suitable for Russia) and the boys playing games on a desert mat (with buildings suitable for the Med)...
V/R,
Jack
V/R,
Jack
You need to get some large map drawers so you can have multiple stuff setup. My ancients games are down to only needing one map drawer so now I have one 2'x2' mat free to use. I am so tempted to do a 5MiN campaign on it. *This* close. The only thing stopping me is I am not playing any games at all - even though I have the other mats setup to play. So committing to another one is madness!
DeleteShaun,
DeleteYeah, no kidding, map drawers would be cool. Quit being tempted and git your butt to work on that 5MIN campaign! And don't talk to me about madness, madness is the currency of our realm! ;)
V/R,
Jack