All,
Had some fun today, and man has it been a long time coming! Pulling the scenario from my buddy Steve (SOUND OFFICERS CALL!: A Biazza Ridge Scenario for Battlegroup - Ready for Your Playtesting!), and with a fresh set of rules (more on that later), the boys and I headed upstairs and got a game in. First time in over a year for me, though I guess I still haven't actually gotten a game in as I really just umpired for the boys, with the elder playing the Germans and the younger playing the Americans.
I changed Steve's scenario in two ways: first, I played on a 6' x 4' table rather than a 4' x 4' table, and then I eliminated the medic from each side's order of battle as 1) I don't have any German medics and 2) the rules I'm using don't have any mechanism for using medics.
So what did we do? It's July 11, 1943, on the island of Sicily, where American paratroopers are facing off against tanks and troops of the Hermann Goering Panzergrenadier Division. The paratroopers have landed inland to screen the beaches as infantry come ashore, and they're being put to the test at a place called Biazza Ridge as the Germans mount a counterattack, advancing towards Gela in order to push the Yanks back into the sea.
And yes, this is listed as "The Battle of Biazza Ridge I," because we're planning on there being a "The Battle of Biazza Ridge II."
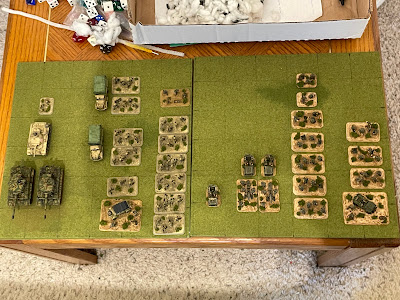
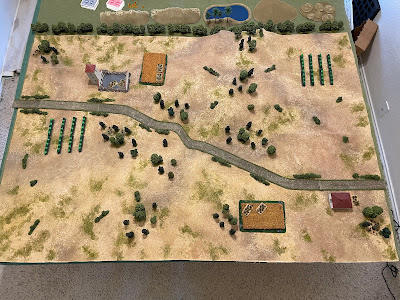
Overview, north is up, with the German baseline to the west (left) and US to the east (right). Biazza Ridge runs from south-southwest to north-northeast across the center of the table, with scattered fields, orchards, hedges, and olive trees scattered across landscape. There is a bombed-out church in the northwest (top left) and a stone farmhouse in the southeast (bottom right), which represents the only hard cover on the table.
The opposing forces, with US on the right and Germans on the left. Both sides will start with a small proportion of their overall force on the table, the remainder coming in as reinforcements on subsequent turns. And while the US force looks a bit paltry, in the end a Naval Gunfire Control Party is coming onto the table in order to direct the fire of offshore battleships and cruisers.
The US force. Starting on table, the Americans have only their commanding officer (Jumpin' Jim Gavin, rated very highly), a rifle team, an LMG team, and a combat engineer team. Reinforcements consist of two rifle teams, two LMG teams, a 60mm mortar team, a bazooka team, a Forward Observer (FO), two 75mm pack howitzers, and the Naval Gunfire Control Party.
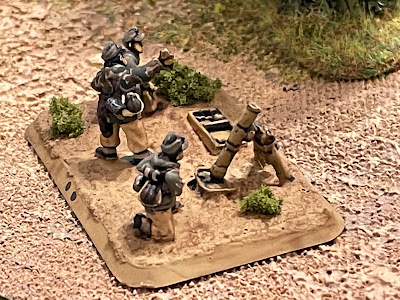
The Germans start out a little better, with three rifle teams, three LMG teams, and a 120mm mortar team on the table (I don't have a 120mm mortar team ready, so I used a Fallschirmjaeger 80mm mortar team, but treated as a 120mm mortar). As reinforcements they will receive their CO, Executive Officer (XO), another rifle and LMG team, an (actual) 80mm mortar team, a tripod-mounted MG-42 team (which I'll call an SFMG, and the last four listed come on in trucks), two Tiger I tanks, a Panzer III, and an FO.
Looking south to north at the American baseline.
Looking east to west from the American baseline.
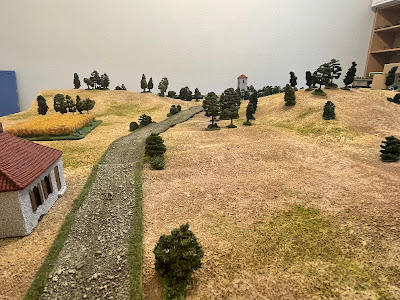
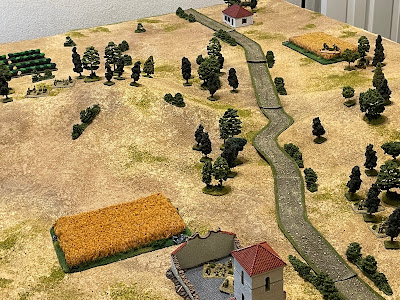
A ground level view, where you can see the contours of the ridge, with rises to the south (top left) and north (top right), with the road running through a saddle between them.
Looking north at the German baseline.
Looking west to east from the German baseline.
Another look at the elevation of Biazza Ridge (top left and far right), with the road running through the saddle at center top.
The initial dispositions, with Yanks at bottom center right and bottom right and the Germans at center top left and left. The US paratroopers have their 1st Squad (a rifle team and an LMG team) in the field at center bottom right and their CO and engineers near the building at bottom right. The Germans have their 120mm mortar team behind the woods at top left and their three rifle squads at center left/center left top.
Looking at the US starting positions, with 1st Squad in the field at far left, the engineer team behind the house at center right, and the CO in the woods behind it (far bottom right).
A look at Biazza Ridge (top left and top right) and the bombed-out church from behind General Gavin, with 1st Squad visible in the field at left top.
The German starting positions. Their 120mm mortar is behind the trees at top left, while 1st Squad is in the field at top right, 2nd Squad is in the bombed-out church, and third squad is in the trees just south of the road (right bottom).
Looking southeast from the bombed-out church, with the German 1st Squad at left, 2nd Squad at center, and 3rd Squad at far right.
And the game is afoot, we're off! We check for initiative...
And the Germans have it. They immediately push their 1st Squad up the north spur of Biazza Ridge (far left, on the slope, from the field at left bottom)...
And then up onto the crest (far left top), into a very nice position in the cover of some olive trees, with a commanding field of fire into the US side of the table (top right/far right).
The Yanks react by pushing their 1st Squad towards the south spur of Biazza Ridge, but they're Army so they're lagging and only the rifle team gets atop the ridge (top center right, from field at bottom left) while the LMG team is stuck in the trees below (left, with Germans visible at top right, on the other side of the ridge).
General Gavin moves up next to the stone farmhouse as the engineers move in and occupy it, both scared to move too much further with the German 1st Squad atop the north spur (off camera to top left), staring down on them.
The US engineers (in house at bottom left) even take the Germans on the north spur (top right) under fire...
But their Garands and carbines aren't of much use at this range against troops in cover, thus kicking off a stalemate in which the two foes (in house at top right and atop the north spur at far left) exchange ineffectual fire, neither side able to get the other to budge and with way too much open ground between them to attempt moving into close combat.
Further back in the German line, their 2nd Squad LMG team (bottom center, in bombed-out church) lays down fire on the American rifle team atop the south spur (top center right) as their own rifle team pushes up (between field and church, far left bottom).
The MG-42 fire is quite effective, pinning down the American paratroopers, so the German 3rd Squad (just visible in the trees at far right, above the church tower)...
Charges upslope and enters close combat with the US paratroopers! The olive trees serve to muffle the sounds of hand grenades, rapid fire bursts from submachine guns, and the clank and holler of men using improvised weapons in the melee. The Yank rifle team puts up a valiant fight but is quickly overwhelmed...
With one of his three combat units out of the fight and the Germans now completely in control of Biazza Ridge, General Gavin immediately dashes forward, joining up with the LMG team (bottom right), where they both unleash fire on the German 3rd Squad now atop the southern spur (top left). The fire is accurate and effective, pinning down both teams!
The German 120mm mortar team responds (yes, it's an 80mm mortar, like I said, I don't have any 120mm mortars painted up yet)...
The massive HE rounds fall nearest the US LMG team, pinning it, though General Gavin's command team is still in good shape (bottom right).
General Gavin, seeing his combat power being much less than the Germans and already being diminished, goes for broke! Leaving the LMG team pinned down (bottom right), he charges his men up the slope, cresting the south spur (bottom center left, with the pinned German 3rd Squad just above him), where he and his men open fire on the German 1st Squad, atop the northern spur (top center right, with the bombed-out church just off camera to far left). Just the sight of General Gavin and his men so close and firing their weapons causes the German 3rd Squad's rifle team to break and run!
General Gavin's fire (top center) is ineffective, just as the German 1st Squad's (bottom right) return fire is. The Germans know they don't have a great shot to their south, but they're doing everything they can to save 3rd Squad's LMG team from the marauding US commander.
General Gavin and his men reload (bottom left), preparing to assault the German 3rd Squad LMG team (far left bottom), as the US engineers (in house at far right) continue exchanging ineffective fire with the German 1st Squad atop the northern spur (top center).
General Gavin has made his decision, it's do or die time...
So he let's out a hearty "follow me!" and leads his men into close combat!!!
But the German LMG team, despite their comrades in the rifle team breaking and running, has rallied, and when the American command team comes into view it is met with a furious burst of MG-42 fire, dropping the gallant General...
The US LMG team below the south spur (bottom right) sees their General go down and fires helplessly uphill at the German LMG team...
Just as US reinforcements arrive, in the form of 2nd and 3rd Squads (rifle and LMG team, each) and the 60mm mortar team.
While on the German side, their Commander and XO comes on as well.
On the US left, the 1st Squad LMG team (bottom right) manages to pin down the German 3rd Squad LMG team atop the south spur (top left), but the US no longer has the strength forward to capitalize on the success, they've taken too many casualties and their reinforcements are all still back at the start line, with no commander to help organize them and push them forward...
Back at the stone farmhouse, 2nd Squad's LMG team moves in and sets up, laying down fire on the north spur (top left), allowing the engineers to push forward (center), ever so slowly...
And the US 60mm mortar team goes to work on the north spur...
But the first volley is long...
Immediately followed by the rest of the US reinforcements arriving, to include the two 75mm pack howitzers and the Naval Gunfire Control Party (bottom right).
The US 60mm mortar team again fires on the north spur...
But this time they're short (explosions at right, German 1st Squad in trees at far left).
And now the German 120mm mortar team goes to work...
On the US start line, which is crammed to the gills with fresh reinforcements, and it's an absolute slaughter! The Americans are caught in the open, with four units going down and three of them breaking and running, on top of having already lost an LMG team and their Commanding Officer. The brave paratroopers of the 82nd Airborne hear the revving of Tiger engines in the distance and, without their gallant commander, they decide they cannot hold and begin to fall back, a stunning defeat that leaves the path open to the beaches at Gela...
So wow, that was a helluva fight, and moved pretty quickly, clocking in at about two hours (some due to playing a new set of rules, some due to playing with two little boys with little attention spans). It was a real nail biter for the boys, both of them feeling like they were in a bad way pretty much all the way up to the end, even though I could see things were not looking good for the Yanks once General Gavin went down. I think Steve has a real gem of a scenario here, though I will say the scenario doesn't work perfectly for the rules I used (which is my fault).
So, I'm sure you're wondering what rules I used; I would have told you sooner, but I didn't want to spoil the surprise: we used "One Hour Skirmish Wargames (OHSW)," the 'fast play, dice-less rules for small unit actions from Napoleonics to Sci-Fi.' I hadn't really heard much of the rules, but then read Tin Man's recent batrep (Jozi's Tin Man: One Hour Skirmish Wargames Gangster Shootout (jozistinman.blogspot.com)) last week and decided to pick up the rules, which I think are pretty doggone clever. They're simple and quick (which is a must when playing with little boys, aged 12 and 7), and have some clever mechanics to mix things up and throw some stuff in the game. As mentioned, the game was a lot of fun, but the game/scenario didn't go as nicely as I would have liked it, which is purely down to the mechanics of OHSW; the biggest issue in the game was the feeding in of reinforcements, and this didn't work very well, in my humble opinion, because of the randomness of the phases and turns, and the randomness of the activation system. What ended up happening was that 75% of the game was played with just the initial forces we started the game with, and then the reinforcements came flooding onto the table, but neither boy could get anything done, either getting tiny amounts of activation points or getting an 'end turn' as soon as they'd started activating troops, which meant the reinforcements just sat there, then had more reinforcements land directly on top of them! The other issue was that I made the table too big for the rules; with the very limited activations the boys had once reinforcements did arrive they had way too much ground to cover in order to really get into the fight, which is to say, get into position to capitalize on the tactical situation. Ranged fire is overall pretty ineffective (a 120mm mortar team catching eight units out clustered out in the open notwithstanding), serving to pin down enemy forces, which you can then close assault into oblivion, which is just how I like it. But my point is, it was going to take a whole lot of game time to get all those recently arrived reinforcements from their start line into a position where they could be an effective part of the battle by closing with the enemy.
The boys felt it, too. They were both looking at the piles of troop on their baselines and wondering how they were going to get them up into action, feeling a bit of frustration. But don't fret, they still had a good time, and what the three of us spent all of our post-game chatter about was how much fun we had with the initial set up and fighting, prior to the reinforcements arrive. So I think two things: first, I think OHSW is a 'pizza box'-type of game. In my terminology, that's a small table with very little pre-battle maneuver, we're setting the forces up about one move from contact and whipping it on. Second, OHSW is probably the type of game that is better without reinforcements, that is, what you see is what you get, or what you start the game with is all you've got. OHSW is a game that plays with alternating activations (IGOUGO) called phases, but each turn can be as short as one unit from one side moving, to a seemingly endless number of activations for each side, depending on when a joker comes out (which ends the turn).* The unpredictability doesn't really bother me in terms of how the rules play, but it sure does wreak havoc with trying to time things up in a scenario, like the arrival of reinforcements or supporting fires. I'll even throw in one more: if you're going to bring troops on later in the game, make sure the table isn't too big, and maybe the troops are mechanized, so they can actually get into the fight.
*Here's what I mean: the two players pull cards to determine initiative, then the winner pulls a card to determine how many activations he has, which is a number between 1 and 13 (yeah, 13 activations in a single phase!). Then the other player goes, and it keeps going until a Joker is pulled. In the very first turn we got almost completely through both boys' decks of cards before a Joker was finally pulled, but then in later turns we had just started the first phase of a turn, a boy moves up his first unit and tries to fire... and pulls a Joker, immediately ending the turn! So in the first turn each boy had about four initiatives, activating about 5 units each time, and then you turn around and have a turn where only one boy gets to activate one unit before the turn ends.
So, the boys are happy, which means I'm happy, and we are definitely going to keep playing, and that playing will be with these same rules. We have resolved to give it another go, but with the scenario re-jiggered a bit. Here is my plan, in broad terms: shrink the table a little bit (I might keep it 5' x 4'), do away with reinforcements (or maybe just have a little bit for the Germans, coming on in halftracks or trucks), and change up the OOBs a bit.
In the overall scheme of things, here's how it the OOBs broke out in the original:
US
CO
3 x Rifle Squads (in six elements)
1 x Bazooka team
1 x 60mm mortar
2 x 75mm pack howitzers (with FO)
Off table Naval Gunfire (with FO on table)
German
CO and XO
4 x Rifle Squads (in eight elements)
1 x MG-42 sfMG
1 x 80mm mortar
1 x 120mm mortar (with FO)
2 x Tiger I
1 x Panzer III
I'm thinking to try this, with everything starting on the table:
US
CO
- 6 x Rifle Squads (one stand is a squad)
-3 Bazooka teams
-2 x 75mm pack howitzer (with FO)
German
CO
8 x Rifle Squads (maybe six deployed forward, two at baseline in trucks or halftracks?)
1 x MG-42 sfMG
1 x 80mm mortar (with FO)
2 x Tiger I
Well, hopefully you enjoyed the batrep, we certainly did, and we look forward giving it another go as soon as possible.
V/R,
Jack


Great game Jack, glad you finally got some toys on the table. I hear your pain with the (very) random activations. Setting stuff up on table sounds like a good solution.
ReplyDeleteThanks Martin, and they really were a lot of fun but for the reinforcements piece, and I’m hoping the initial setup will rectify that.
DeleteThe boys want to play tonight but it will probably have to wait until the weekend.
V/R,
Jack
Thanks for putting that up Jack, really enjoyed it, and it looks great. As you say, the rules seemed to work well for the movement and fighting and a bit awkwardly for the reinforcements. But there are lots of rules which struggle with getting reinforcements into the action in one way or another...if you had been playing solo as opposed to F2F, would the randomness of the activation and reinforcements bothered you as much?
ReplyDeleteHello John, my pleasure! Yeah, everything was going well but the reinforcements, which I think a lot of rules with nonlinear activation struggle with.
ReplyDeleteAnd that’s a great question; I think if I was playing face to face it would have still bothered me, from the aspect of a bunch of blown activations with reinforcements stacking up would seem like a waste of our time (time seems to be an omnipresent issue when not playing solo) and would be hard to explain from a narrative standpoint (I.e., whatever I said to justify it would probably just seem like making excuses for the rules to most folks), and if the activations are all going one way it can feel a bit unfair (nothing feels worse than when I’m rolling/pulling well against an opponent who’s rolling/pulling poorly, it feels like I’m cheating!).
But if I’m playing alone I can spend as much time as I like, and I can justify the narrative however I like (which I did a bit of here anyway, with the “…with no commander to organize them push them forward,” which suits me just fine).
Having said that, I don’t think I’ll be using these rules for my solo games. There’s no reason not to, just that I’m so entrenched already with 5Core and IABSM (and wanting to give Field of Battle WWII and Fistful of Lead a run out) that I’ve already got rules that scratch (most all of) my itches.
V/R,
Jack
it's my lucky day, Jack! you played my Biazza Ridge scenario and someone played my Hubbardton AWI scenario, too! *proud wargamer here*!
ReplyDeletehey what a neat idea to try OHSW with the team stands. did you fire a single team as an action, or did you guys differentiate the weapons in each team?
so, ironically, I made the table bigger but it started life as a 4' x 4' scenario but it was a murderous slaughter for battlegroup.
Anyways thanks for giving the scenario a spin, buddy. your toys and terrain look seriously good and this was a pleasure to read. I may play the scenario with a different rules set. I havent found *that* set yet...
Steve,
DeleteA proud wargaming moment indeed, and I appreciate the work you put into developing the scenario, it really helped me break my inertia and finally play a game. Just need to keep it going; like if someone would run a Firestorm Campaign on the Eastern Front, or Caen, or Tunisia or something ;)
Yes, OHSW worked out pretty well for the straight gaming parts, we really happy with it, which is why we're going to give it another go. So, we basically kept pretty closely to the rules, with each stand a single unit, just like a single figure would be. So the rifle teams (which are a half squad) got one card for shooting, the LMG teams (the other half of the squad) got two, a 'real' MG team (on a tripod) got three, light mortar (60mm mortar) got two, medium (80mm) got three, heavy (120mm) mortar got four.
I did change the anti-tank fire though; instead of using his points value, I just rated weapons and armor on a spectrum: Softskin/MG (1 card), Light Armor/AT (2), medium armor/AT (3), heavy armor/AT (4), and super heavy armor/AT (5). I rated the 75mm pack howitzers as light AT and the bazookas as medium (but only gave them a 10" range), rated the Pz III as light armor and light gun, rated the Tiger as heavy armor and heavy gun, with weapons getting +1 card and armor getting -1 card if they shooter got on the flank/rear. To me it streamlines things by keeping the firing mechanism the same as anti-personnel fire (a hit puts the vehicle down and you check for casualties as normal at the end of the turn).
I know what you mean about still looking for the right set. I like OHSW but I wouldn't use them if I was playing solo, that's just for the boys.
The boys wanted to play tonight, but it's no good on a school night, and we have baseball practice every night the rest of the week, so we'll look to give it another go this weekend.
V/R,
Jack
thanks for the OHSW explanation, Jack. I own them and really should try them out. for some unknown reason I've also been wanting to play some post-apocalyptic gaming with 15mm skirmish minis and was thinking of trying OHSW.
Deletelooking forward to more. are you still running your IABSM with the shooting bolted on from 5Core?
No sweat man, and I think they’d work out well for your post-apocalyptic stuff.
DeleteAnd yes, when I play IABSM I will continue to use 5Core combat, morale, and movement mechanics, I’m very happy with how it worked.
And quit dodging the campaign issue ;)
V/R,
Jack
Hello Jack,
ReplyDeleteI had not thought of using OHSW with stands. I guess the only ww2 stands I have are 6mm and I do like to get out the 20mm figures. I know what you mean about the game - my 13yo loved it and they are great for a dozen or so units/figures a side. The dynamic swing in the number of activations annoyed my friend but he was the only one annoyed.
Not only have you been painting for the last year, the terrain is great (although I miss the fact it was not a Martian, I mean urban game so we could check out the newest mat). By great I mean awesome. I am a big fan of putting stuff under the gaming mat four contours/hills etc. Genuinely curious - did you recycle your old carpet hills to be the underlay for the new hills?
p.s. umpiring a game does not count as playing a game. participation yes, playing no. I am still counting it as though you have not played in over a year :-)
Alright Shaun, here we go!
DeleteHadn’t thought of using OHSW with stands??? That’s because those with limited intellect frequently lack practical imagination! And umpiring a game doesn’t count!!!??? How very petty of you, Mr Travers. And don’t worry, Mars shall make an appearance soon enough.
The activation swings were no big deal to the boys and I, they only really noticed when one of them pulled an Ace or Deuce, and were laughing about it, but it all evened out.
And I still have the old carpet hills, but usually I’m piling old towels under the mat. I’m super happy with how the mat looked; other than the two “ground level” pics, were you able to discern the elevation?
V/R,
Jack
Yes, I was able to discern the elevation. Sometimes it is hard to do so when it is done with stuff under the gaming mat. But in your pictures it was fine.
DeleteAwesome, thanks buddy!
DeleteV/R,
Jack