All,
I've gotten a lot of painting, basing, and other stuff done this week for my Cuba Libre project, and I can't wait to start the invasion, but, alas, it's just not ready. I'm still waiting on some goodies in the mail. I also sprung for some Paper Terrain as all my current stuff is really only good for bombed out stuff. I do have another idea that I might try as well. In any case, Cuba Libre is not ready for the table and I was jonesing for a game, so I went back into Britton Publishers' "Operation Jupiter" book for another scenario.
The first scenario, Les Duanes Farm Complex, was a good one and is already up on the blog, but I wasn't that fond of the second scenario. One of the cool things about solo-gaming is that you get to do whatever
you want to do, so flipped around and settled on scenario 7. From the book:
II. Eterville: Ejected from their defensive positions around the Château, German infantry from 2/22 SS-Panzer Grenadiers withdrew towards the relative safety of their 1st Battalion in Eterville. While C-Company 5/Dorsets was still securing Château de Fontaine, at 0620 hours 4/Dorsets started to advance on Eterville.
7. Château de Eterville: Once in the village, the 4/Dorsets' plan is for the leading companies (A and B) to fight through Eterville quickly and reach their objective, the main road at the southern edge of the village. Detailed clearance is the task of the reserve companies, and these are to be followed at 0800 hours by 9/Cameronians who are to relieve 4/Dorsets and take over defense of the village.
Setting: Attacking on a two-company frontage, 4/Dorsets find that after breaking into the village A and B Companies start to diverge left and right, as the two rifle companies are drawn towards enemy strong points.
The German forces: top left is the German Plt Sgt with PzFaust and SMG, with the German Plt Leader below him (he also has a PzFaust and SMG). Below that is a German squad broken into two Fire Groups (FG1 and FG2), which both have an NCO, LMG team, PzFaust, and rifleman). On the right we have a Panther and a PzIVH that might look like a PzIIIJ, but is a PzIVH, I assure you ;)
The first half of the Brit forces: we have four M4 Shermans standing in for two Churchills and two Achilles (though I do have M-10s, I have no Churchills, so I decided to go with all Shermans). To their right is the Brit Platoon Leader (with rifleman), the Brit Plt Sgt (with rifleman), and a two-man PIAT team.
And two rifle sections, each broken into a Rifle Group and Bren Group. These will be referred to as 1RG and 1BG, and 2RG and 2BG, respectively.
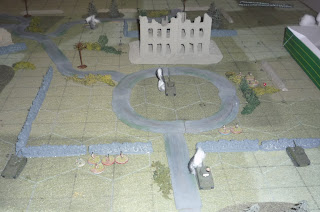
Overview of board, with Brit baseline at bottom and German baseline at top.
Initial dispositions. I put blinds out for the Germans (for hidden deployment purposes) then deployed my Brits. This is the Brit left, from left to right: 1RG, Plt Sgt, PIAT team, 1BG, and Tank 1 (T1).
Brit right, from left: T2, 2BG, PC, T3, 2RG, and T4.
After I deployed my Brits I flipped over the blinds and put the German forces on the table. This is the German left flank, with FG2 at top in second story of the building, and the German PC at bottom (this is looking from the German baseline).
Here is the German right. In foreground building is the German Plt Sgt, with Panther on left, PzIV on right, and FG1 in bushes at top between the two buildings. As this is a moderately large fight, I'm using element-based activation (as opposed to individually-based activation), and I'm starting the game with all cards in the deck. The Brits cannot engage the Germans until the Germans units are spotted, which will pretty much be the Germans firing or moving in the open. Time to get on with it...
Turn 1:
The Brit left, where nothing much occurred. 1RG and Plt Sgt are on left, with PIAT and 1BG in woods on right. You can also see T1 moved up to the wall at far right. On this side the Brits made good progress without overextending themselves, which is what I usually do...
On the right is where the action was. Everyone started in/behind the woods at bottom. 2RG moved up to the wall, followed by 2BG and the PC, but the Germans held their fire until T2 moved up through the gap in the wall, at which point the German FG2 on the second floor put a Panzerfaust into T2, knocking out its main gun (somehow the crew decided to stick it out, which was kind of a trend throughout the game). Simultaneously, FG2 hosed down 2BG with its LMG, getting a kill and a couple pins. The German PzIV decided (using my patented decision matrix) to leave its cover and dart to its left to help out on that side (you can just see it at top of photo to left of the 2-story bldg), while the Panther went on overwatch.
T1 moves up to the wall at far left, and fires one over the PzIV out into the French countryside, nothing but net. T4 moves up, but the Panther decides not to act, so T4 lights up FG2, getting a kill and a couple pins. Lastly, T2 (the one with the crew figure sticking out) moves up and trades fire with the Panther; T2 is damaged (half-move for rest of game), while the 75mm shell bounces off of the Panther's front armor, causing a pin.
The German left, where you can see FG2 starting to get beat up, having just knocked out T2's main gun with its PzFaust). On the bottom floor, the PC moved up but stayed out of sight in order to try a PzFaust ambush next turn, while the PzIV is hauling butt from right to left, hoping to go hull-down (behind the wall at bottom left) next turn.
German right, with Panther poking its snout at from behind the building, and Plt Sgt just to its right. The Plt Sgt is staying out of sight, again hoping to get in a PzFaust ambush next turn. At top right is FG1, who moved into the house to counter the advance of the Brits 1st Section.
Turn 2:
The Brit left, where 1RG (far left), the Plt Sgt (center), and the PIAT team (bottom right) all moved up with no problem, but 1BG (center right, above PIAT team) got pretty chewed up by FG1 (building at top left), and the German Plt Sgt who, not seeing any Brit tanks in his area, decided to move into the building (top right) and beat up on 1BG as well. The Plt Sgt hung back and rallied some of the pins off 1BG to help keep it in the game.
The Brit right, where the real fighting was going on. Straight out the chute T1 activated (far left Sherman, at wall), and made quite the shot to brew up the German PzIV (top center, see the smoke), followed by the Panther knocking the turret off T3 (bottom center), T4 (bottom right) putting a hit on the Panther that managed to knockout its main gun (crew stayed), capped off by the German PC moving up and using his PzFaust to knockout T2. FG2 (still in 2-story bldg) and 2BG (still at wall on left) trade fire, to good effect, while 2RG sprints up the right side. The Brit PC rallied a couple pins off 2BG then sprinted right towards 2RG (bushes at top right)
A close-up of the Brit right, where T2 is burning at top (hit by German PC), 2RG is at far right, and Brit PC is at bottom left.
The German left, where the PC is still in the building, having just KOed T2, while FG2 sprayed fire at 1BG then fell back after taking heavy casualties. The Pz IV is burning just off camera to the right.
The German right. Things are really sucking for them after losing the PzIV and the miraculous hit to knock out the Panther's main gun. German Plt Sgt is still in house at left and FG1 is still in house at right, beating up 1BG.
Turn 3:
On the Brit left, 1BG got really beat up by FG1 and the German Plt Sgt, reducing it to only the Bren gunner and the NCO. 1RG moved up and fired at FG1 but didn't get much done, though the PIAT team threw their two dice into the mix and got a kill, while the Plt Sgt remained in place to bring down the number of pins on 1BG. In a bold move, T1 moves up and puts a round into the ground floor of the building occupied by the German Plt Sgt (who still has a PzFaust); unfortunately the German Plt Sgt and his boys are on the second floor and survive unscathed.
On the right, the Brit PC moved over and rallied some pins off of 2RG, who promptly rushed the house, while 2BG moved up beside the KOed T2. T4 moved up and took a shot at the Panther, bouncing another round off its front armor, but getting another pin and forcing the toothless Panther to fall back to its right.
The German left, with new tenants (1RG) in their old apartment! The German PC sprayed wildly at 1RG and fell back to the wall, while the LMG team left over from FG2 hopped the wall and got into the house.
The German right, where the Plt Sgt (top left) is itching to bust T1 with his PzFaust. The Panther is hiding from the Shermans, unsure of what to do without its main gun, while FG1 (top right) is getting worn down by Brit fire.
Turn 4:
The Brit left, where T1 (far right) zoomed a 75mm round into the German Plt Sgt's building, killing one and getting a couple pins. The German Plt Sgt dusts himself off and pops the PzFaust on T1; when the smoke clears, the tank is still there, but its main gun is kaput (and the crew didn't bail!). T4 and 1BG then open up on the Plt Sgt, killing him. The remaining rifleman failed to activate then threw his hands up in surrender... 1RG takes FG1 under fire at close range, roughing them up pretty good, including killing their NCO. The remains of FG1 sprays fire in 1RG's general direction before sprinting to the rear. The hope is that they can get to a safe spot and rally off some of their pins, but with their NCO dead and the Plt Sgt dead, that's going to be a tall order. Morale gets no better on the right...

Where 2RG (bottom left) mowed down two of the three members of the German PC's group, including their Platoon Commander (sorry, I just realized I've been calling them Platoon Leaders but using the acronym PC). The remaining rifleman hopped the fence and joined up with the leaderless remnants of FG2 (they lost their NCO while still in the buildiing). The Brit PC and 2BG moved up into the building as well.
German right: The gun-less Panther, a couple guys left from FG1 (right), and the Plt Sgt's group gone.
The Germans are hanging on by a thread. They've had heavy casualties, a tank knocked out, their Panther neutered, but most importantly, every single leader (Plt Ldr, Plt Sgt, and both squad NCOs) is dead, which means they are not going to be able to rally off pins anywhere fast enough to keep their remaining guys in action, as well as the fact the numerous pins will keep their guys from activating and, with enough of them, will have their guys running for the hills.
Turn 5:
The straw the broke the camel's back. On the Brit left, the PIAT team hops the wall and smokes the Panther. The few remaining Germans have had it; weapons get dropped and arms go up...
Again, I tallied up the casualties:
Type: Brit German
KO Tank 2 2
Damaged Tank 1 0
KIA/WIA* 7 9
Captured* 0 6
*Does not include tank crews as I don't track them.
Well, hope you enjoyed it. I had a great time, and feel pretty fortunate regarding taking the objective with relatively light casualties. Knocking out the Panther's gun and knocking off all the German leadership made things a lot easier than it probably should have been. I'm really itching to do some campaign stuff; I love the idea of the fights feeding into each other, as opposed to just this one-off stuff. It's fun, but I like the fights to have meaning in an overall story line.
V/R,
Jack


No comments:
Post a Comment