All,
The Bridges
0630
18 December 1944
Kampfgruppe Peiper, a German SS Panzer formation, moved out as part of 'Wacht Am Rhein," AKA, "The Battle of the Bulge," in the evening of 16 December, reaching Losheim at approximately 2200. Fighting through traffic as they pushed west on the 'rollbahns,' Peiper grabbed a battalion of German Fallschirmjaeger sitting idly by the road (setting the stage for the iconic photo of the German paratroopers riding atop King Tigers), and, continuing their push west, the kampfgruppe overran a column of retreating American troops at approximately 0600 on 17 December. At approximately 0745 on 17 December the kampfgruppe, having finally defeated a token platoon of Americans that had held them up for hours, got on the move. They pushed north towards Bullingen and west towards Ligneuville, running into some issues due splitting their forces, making the questionable decision to have a company of Panthers push through some hilly, heavily forested terrain, and their artillery having a hard time finding the range. And while a both Panther companies and a Panzer Grenadier company suffered substantial casualties, the Germans were ultimately able to secure both villages and continue their push westwards. It is now 1630 on 18 December and the push to the Meuse continues. The Germans find themselves in severely constricted terrain, with rivers, urban areas, hills, and heavy forest every where the eye can see, not to mention a few companies of American infantry, and that pesky Tank Destroyer company from the previous fight. The Germans are approaching the villages of Stavelot, Trois Ponts, and La Gleize, looking to take them quickly in order to secure their bridges and continue their advance. The Americans facing KG Peiper are a motley mix of troops, weapons, and vehicles from 2nd, 28th, and 99th Infantry Divisions, various Cavalry Squadrons, and several Engineer groups.
So, what's going on here, you ask? Well, this is a mini-campaign, and an unplanned one, at that! This is to keep up my end of a bargain I made online; my buddy Thuseld, over on The Wargames Website, has been working on getting 6mm WWII forces together for awhile, just like me. He'd posted pics of his lovely troops and vehicles, lamenting that he wasn't sure when he'd ever get them on the table. I replied that I, too, had been working on getting 6mm WWII forces ready, and I, too, was unsure when they'd actually see the table. Then I made an off-hand comment that sealed my fate: I jokingly suggested he and I enter a pact, to ensure we got our 6mm WWII forces on the table ASAP. Well, he not only accepted, he played some games and posted them that very next weekend! So I'm already late, but late is better than never, so here I am, keeping up my end of the deal! My plan is to play a three-game mini-campaign, and it's not just serving to get my 6mm WWII stuff on the table. I'm also going to test out the Blitzkrieg Commander IV rules, and I'm also, for the first time ever, going to play some winter games. So here we go!
Wanting to play some winter games and having late war German and US/UK kit, I began searching the internet for scenarios. Twasn't long before I came across a free PDF from Battlefront, called "Peiper's Charge, Running the Gauntlet in the Ardennes, 16-25 December 1944." It's not perfect, but it's pretty damn useful, and it was perfect for what I was trying to do: three fights in the snow between late-war US and German kit. Sure it's built for Flames of War, revolving around platoon-sized units, but I just bumped each of those up to a company-sized unit, no problem. In any case, the PDF outlines a mini-campaign with the Germans attacking across the three maps, ending with the Americans counterattacking on the third map. Worked like a charm.

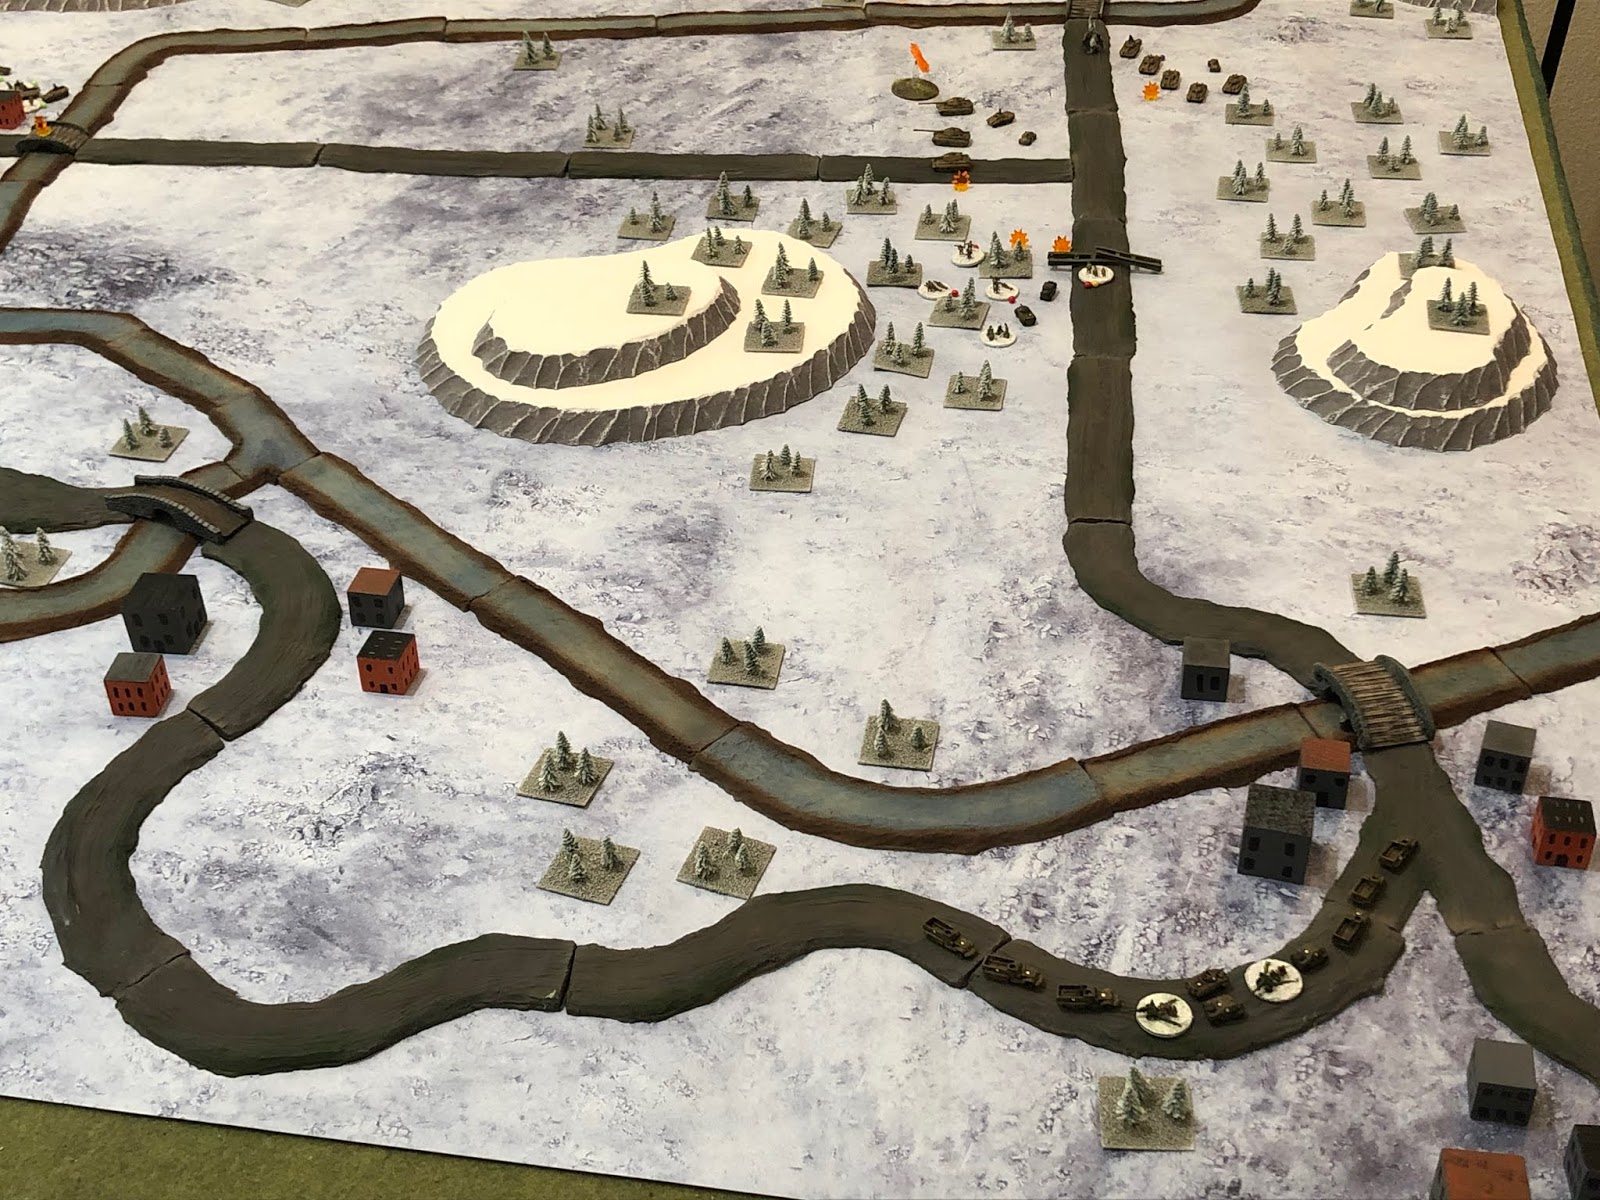
Overview, north is up. The Germans will attack from the southeast corner using mobile deployment rules (except one unit already on the table). There are serviceable roads running across the table, everything else is snow, though I knocked off the movement penalty (we played it in game 1, it was too much for our limited attention spans), but there are rivers seemingly everywhere, with a total of four bridges, and the river is not fordable. There are three villages: in the northeast (top center right) is Stavelot; in the northwest (top left) is La Gleize; and in the southwest (bottom left, though it's actually spread from left to bottom left in three little clumps of buildings, with some trees between them) is Trois Ponts. The hills, from top right, are: Hill 198, Hill 53 (bottom right), Hill 55 (bottom center), Hill 68 (center), and Hill 43 (top left). Please note that the village names are real (and in their correct, approximate locations), while the Hills are made up (the maps in the PDF don't show any elevation at all, but I know that can't be correct in the Ardennes).

The opposing forces, Americans up top and Germans on the bottom. This is done in 6mm, with all vehicles from Heroics and Ros, while the infantry and US anti-tank guns (ATGs) are from GHQ.
The US force: their CO is at far left (in a halftrack), all the M8 armored cars are HQs. The Americans have a rifle company with an HQ, four rifles, an MG, a mortar, and 76mm ATG with prime mover (should have probably been a 57mm ATG, but I need all the help I can get), an engineer company with an HQ, four rifles, an MG, a mortar, and a 90mm AA gun pulling anti-tank duty (with prime mover), an armored rifle company with an HQ, four rifles, an MG, a mortar, six M3 halftracks, and two 76mm ATGs with prime movers, and then we have our lone holdover, the Tank Destroyer Company that did so well last fight, consisting of a HQ and six M-10 Wolverines (or GMCs, whichever makes you happier). No arty or air support.

Ze Germans, with their commander at far left (in a Sdkfz 231 armored car), the Sdkfz 222 armored cars are their HQs. The Germans have two companies of Panzer Grenadiers (1st and 2nd), each with four rifles, an MG, and a mortar, and six Skdfz 251/D halftracks. The Germans then have a company of Panzer Mk V "Panthers," a company of Pz Mk IV (with long 75mm guns), a company of Pz Mk VI King Tigers, and a battery of four self-propelled 150mm howitzers.
I'm a bit different in that, when I play BKC, I prefer to have my arty on the table, rolling for them to act just like any other unit. This helps keep things simple, which makes life easier for me 1) when I'm playing solo, and 2) when I'm playing with my boy (he's 10).
Overview, this time with troops. The Germans don't start with any troops on the board, but will enter via the road at bottom right. The US forces are as follows: the Engineer Company is in Stavelot (top center), the Rifle Company is manning a roadblock on the road in the south, between Hills 55 (bottom center) and 68 (center), the Armored Rifle Company is loaded up in its halftracks, in reserve, just west of the northern end of Trois Ponts (far left), and the Tank Destroyer Company is in reserve, just north of La Gleize (top left).
The Rifle Company manning its roadblock between Hills 55 and 68.
The Engineers, dug into Stavelot.
The Armored Rifle Company, hanging out just west of the northern end of Trois Ponts.
The Tank Destroyer Company, hanging out just north of La Gleize. The American CO is there (on the road) as well.
Let's get ready to rummmmmmmmmmmmmmmmm-bulllllllll!
Turn 1, the German Panther Company comes storming onto the table. I could really be a punk and have them block the bridge if they don't pass another command roll, but I'll cut the boy some slack. A little ;)
But not too much: the 90mm AA gun in Stavelot (bottom right) spots the Panthers (top left) and takes a flank shot...
Seriously roughing up (three hits) and suppressing one of the German units, as the remainder of the company deploys on line.
The Panthers are still moving, and now the 76mm ATG at the roadblock takes them under fire.
But he only manages one hit, and the Panthers return fire...
Nearly knocking out a US rifle unit, suppressing it, too.
Pretty good looking troopies, eh? Those infantry are actually GHQ WWII US Marines. Maybe I'll them for Chosin someday ;)
But then there is confusion in the German ranks and the Panthers fall back (top right, from the explosion at far left)!!!
The boy rolled a blunder that made them fall back. I have no sympathy, he'd already passed four command rolls with them.
The Panzer IV company comes on and takes a right (right, from bottom right), heading overland towards Stavelot (top center).
And 2nd PzGren Co really kicks it in the ass, zooming past the Pz IVs (bottom right) and heading up Hll 198 (center right top, in the trees)!
And here come the heavies: the King Tiger Company pushes straight west, down the road (top left, from off camera to right).
And begin pounding the American roadblock with their 88mm cannons, but they don't get too much done (one hit, one save).
And as the King Tigers (center) are pounding the roadblock (far left), the 1st PzGren Co try to get moving, but they can't, until the German CO comes over and proceeds to open up a can o'whupass. Then they dash ahead (top left, from off camera to right), nearing Hill 68 with a quickness!
He's not causing any casualties, but he's sure as hell closing the distance...
1st PzGren pull up and kick out their crunchies...
But this draws some pretty effective reaction fire from the dogfaces at the roadblock (center bottom), roughing up a rifle unit (3 hits) and suppressing it.
The German mortar and MG units (bottom right) get into action and return fire, to no effect (2 hits, 2 saves).
And then the boy goes nuts...
I don't even know how many damn command rolls he's passed at this point, but he's killing me, and now he goes all in. He orders his three un-suppressed rifle units to charge the US MG unit!
Gun barrels are burnt out in the dark forest, muffled screams and cries in German and English are heard, hand grenades are lobbed, pistols are emptied, entrenching tools are swung... Ultimately the US MG unit is knocked out of the fight, though he put two hits on a German rifle unit, and suppressed it.
The German artillery arrives on the field of battle (center, from off the map at bottom right). They lay out their stakes, break out their ammo, crank the guns up...
Then fail their next command roll, ending the German turn.
I like how things are going so far, seems faster.
The US ATG at the roadblock ignores the King Tigers (far right), opting instead to take a flank shot on the German self-propelled guns (top right). They score two hits and a suppression...
But the King Tigers return fire, suppressing the US ATG and nearly knocking it out.
It's not going to last long anyway, with those damned German infantry (in the woods at top center) hanging around...
The roadblock mortar unit (bottom left) begins pounding 1st PzGren Co's rear echelon (top right), knocking out a rifle unit, then fires again and suppresses the German MG (1 hit, too).
It took a couple hits and suppressed him, but he was already suppressed and had to fall back more than 10cm, so KO. But now that I'm thinking about it, he shouldn't have been suppressed because the suppression should have fallen off when the German phase ended. I hate when I forget/screw up rules...
But now I decide that I gotta get crazy, too.
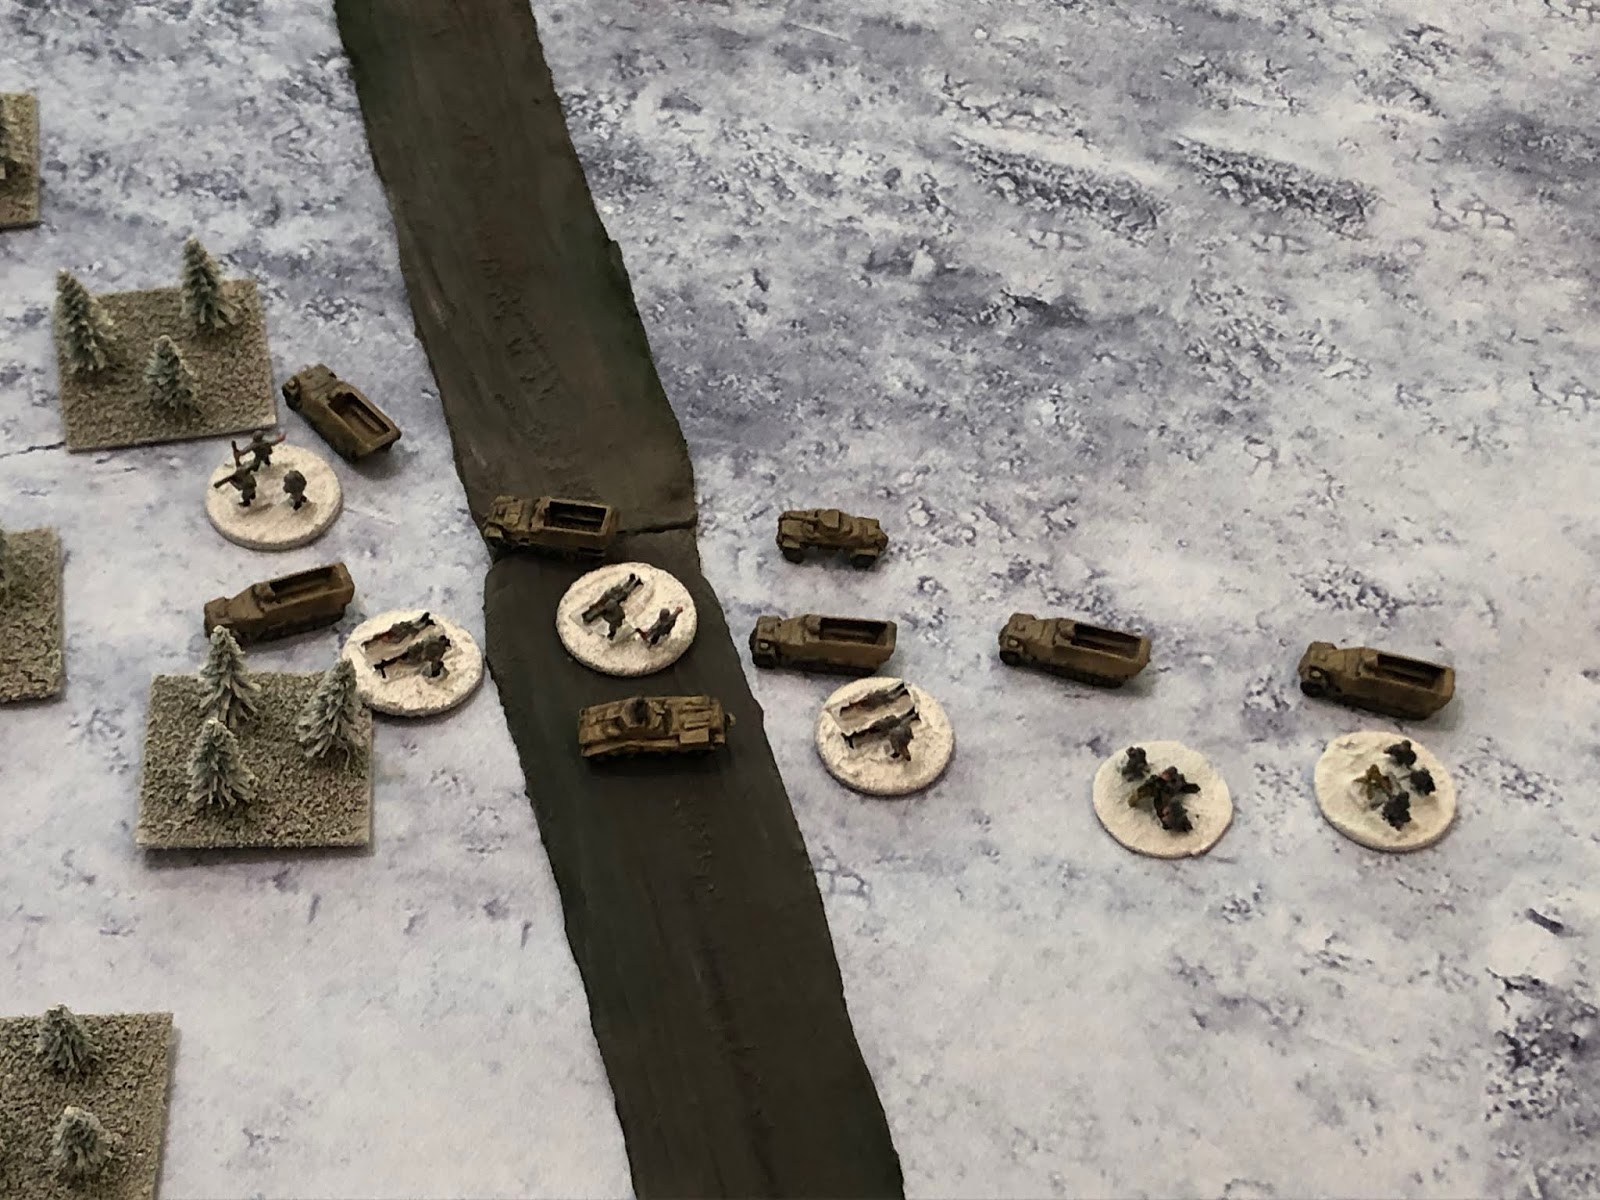
Trying to save my almost assuredly doomed ATG, and my almost assuredly doomed roadblock position, I gather up all the rifle units I can and hurl them across the road, into the woods (center, from left) to try and push the German infantry (top right) out of their lodgment. The German infantry see my boys coming and open fire...
And that German (left) react fire is nasty: they put three hits on a US rifle unit (bottom right) and suppress it, but the other two US units move on the Germans, now finding themselves in a 2 vs 3 fight, though one of the German rifle units (top left, with yellow and white beads) is suppressed.
The two lines of infantry clash in the deep snow, and it's nasty: the Americans score nine hits, so three hits per unit, and all three are suppressed, with the one that's already suppressed having to fall back more than 10cm and so he's KOed! The Germans score six hits, so three each, but don't score a single suppression on 6D6 (needing 5+)!
Again, I didn't take the suppression marker off like I was supposed to. And I was so proud of the results, didn't realize I was cheatin' until I'm writing the batrep...
Having lost the close assault, the remaining two German rifle units fall back (top center right, from center bottom left). The Americans plan to pursue...
But I roll a double action (snake-eyes), and so I say 'to hell with chasing'em, just shoot the bastards!" My two rifle units (bottom left) open fire on two remaining German rifle units...
Both German rifle units are knocked out, which is enough to cause the 1st PzGren Co to pass their breakpoint and run for the hills (top right, running back over the bridge, from bottom left, where their CO is still sitting)!!!
Heroes, every one! With a little help...
But let's not be confused about the situation, the roadblock forces are absolutely beat to hell, and the King Tigers are about to pound them into submission, of this I have no doubt...
*Each of those red beads is three hits, the yellow bead is two hits, the white bead means suppressed. So three rifle units have three out of six hits, the ATG has three out of four hits, one of the rifle units has five out of six hits, the MG unit is already out, and two of the rifle units and the ATG are suppressed. These guys are a hair away from breaking.
With his roadblock force (top right) on the verge of being overwhelmed, the US commander orders the Armored Rifle Company to move to the southern end of Trois Ponts (far right), occupy the town, establish defensive positions, and deny the enemy (off camera to top center left) the bridge. They don't get very far (bottom center, from bottom left).
And that would come back to bite them in the ass...
Meanwhile, the Engineers in Stavelot are becoming a bit concerned, what with a German artillery battery and Panzer IV company staring them down (both off camera to top right) and a PzGren Co moving up on their left flank (top center). The Engineers engage with their MG and mortars...
Knocking out a German halftrack, which disgorges its infantry, suppressed.
And then the 90mm AA gun (bottom left) opens fire on the Pz IV Co (top center, with German arty at top right and German PzGren at top left), but he doesn't get much accomplished (1 hit, suppressed).
The German tankers return fire, causing some casualties and suppressing the ATG unit!
Dammit!!!
Engineer rifle units open fire on the dismounted PzGren, knocking them out.
And as Stavelot (top right) is finding itself engaged and in danger of being flanked, the American CO orders his trusty Tank Destroyer Company forward (center, from far left), taking up positions in a stand of trees.
Where they (bottom center left) set about taking the German Pz IV Company (top center right) apart!
The Germans see a whopping four (FOUR!) of their Pz IV units knocked out (far right), causing the remaining two to run for the hills (bottom left)!!!
It was amazing, I rolled to fire, passed, then rolled again, got a double action, so two more rounds of fire, wiped the floor with them! In the event, I only needed two rounds of fire to do the Pz IVs in, so I still have one left...
So why not? The US Tank Destroyers (bottom left) shift fire, and engage the lone Panther (top right) that was left behind when he was suppressed and the others fell back...
Yeah, you knew where that was going, pretty much inevitable given how hot my dice have been.
They scored a total of 13 hits, and he was able to save 7. Valiant effort... Thus ends Turn 1.
Turn 2 begins with the German artillery (bottom right) pounding Stavelot (top left), though they only manage one round of fire. The US Engineer MG unit takes four hits and is suppressed.
The boy's having a rough time with the dice; keep in mind he just rolled 24 dice, hitting on 5+.
With their Pz IV Company hors de combat, the boy decides to push firepower right in support of 2nd PzGren Co (off camera to far right, closing in on Stavelot, which is off camera to top right). The King Tigers wheel right and advance (center, from left).
The roadblock ATG opens fire on the flanks of the King Tigers, at close (not point blank) range, but still the rounds bounce!!! But the King Tigers, under fire and in deep snow, bog down...
Four hits, four saves!
But the German Panther Company has got its marbles back, and charges up (center, from bottom right, with the King Tigers above them) to get back in the action. But then they stall out...
Man, he just can't pass his damn command rolls. One round of fire there from those Panthers would surely have seen the US roadblock force off. Just like one round of fire on Stavelot from the King Tigers would have done a lot to help their remaining panzer grenadiers (and their impending assault) out.
The boy can't wait, another super bold move! 2nd PzGren Co comes rushing down the slope of Hill 198 (far right you can see a burning halftrack) and rolls straight up tot he gates of Stavelot (left top center)!!!
The German infantrymen dismount, straight into close assault!!! Again bayonets cross in close quarters, vulgar, guttural shouts, grunting, and muffled explosions reverberating off the stone walls of the village...
The US MG unit and two rifle units are knocked out of the war, while the Americans really didn't do particularly well, managing only to put one hit on every German unit, except one rifle unit that took two hits and was suppressed.
Wow, a big turn of fortune with the dice, the Germans cleaned the floor with the Yanks in Stavelot. I guess the Engineers were taken aback by the boy's violence of action.
The Engineers quickly pack their stuff and run (left, from right), done for the day!
The US roadblock ATG gives up on the King Tigers and sights in on the approaching Panthers, but still doesn't get anything done (two hits, two saves).
I actually considered trying to have the US infantry (bottom left) charge the King Tigers (top left).
The Panthers immediately return fire, knocking out the US anti-tank gun.
An odd turn of events there: the US ATG gets two rounds of fire and can't get any hits, then the Panthers roll 15 dice, but only manage a single hit, but it knocks out the ATG because he only had one hit left to give.
The roadblock's mortar unit (bottom left) starts dropping 81mm HE rounds on the German SP arty (top right), but can't find the range (1 hit, 1 save).
What the hell is going on here???
The US CO is still screaming on the radio at the Armored Rifle Company to get their asses into Trois Ponts (bottom right) and into position before the roadblock breaks and the Germans come pouring through! They continue moving up the road, but apparently they're icy, or there's not enough air in the tires, or something, because they only just reach the village, unable to get in and get established.
The American CO (halftrack at bottom center) is getting nervous: the roadblock is going to crash at any moment, the Armored Rifle Company is not yet in Trois Ponts, and the Engineers just went streaming past on their way out of Stavelot (top center). Wary of the German panzer grenadiers pushing up on them, the CO orders the Tank Destroyer Company to refuse their flank, so they peel two M-10s left to keep an eye on the town.
While the remainder begin sending 76mm armor-piercing rounds out towards the encroaching King Tigers (top right)… And they do alright, beating one of the giant beats up (3 hits) and suppressing it!
One King Tiger is in position to return fire, and does, putting two hits on one of the M-10s.
The boy is in trouble: the way he advanced, the King Tigers are entering the fight piecemeal, so that one of them can't see, and one of them is suppressed, so only one gets to fire.
But the American tank destroyers are ruthless in their execution, loading and firing and loading and firing as fast as they possibly can (two more rounds of fire). Rounds are slamming into the German behemoths, and some bounce, but some are penetrating, too: the previously suppressed King Tiger is knocked out, and then another takes two hits and is suppressed!
This is the first time I wondered to myself if I should have beefed this company up to more than three vehicles. I mean, it seems kind of fair that they only have three vehicles, as King Tigers are pretty amazing in the game (and real life, too). Besides, I only have three King Tigers. But I could have thrown JagdPanthers, or 'regular' Tigers out there to beef them up. It hadn't really occurred to me until the US tank destroyers started ripping them limb from limb.
In any case, Turn 2 is now in the books, and the game is up for grabs.
Turn 3 begins with the German Panther Company facing off with the US roadblock, and it's time to pay the piper. The German HQ fails, but the CO picks it up, ordering them to attack. The 75mm high-velocity guns roar, blasting the GIs to hell.
As the Panthers push forward, going off road to close with the roadblock.
The American forces resignedly throw their hands in their air in surrender and are sent marching to the German rear. Not knowing there were but hours left in their lives...
And the German CO has got those Panthers around the roadblock (center bottom), back on the road, and screaming west (far left), on the very outskirts of Trois Ponts!!!!
The Germans spot the US Armored Rifle Company, still mounted and on the road, but they can't get a shot off!
The boy got them all the way up, then failed. Which was to be expected, I mean, that was a helluva action for the Panther Company. I've got a real bad feeling about this...
Now spotted, the German SP artillery (bottom right) begins sending 150mm HE rounds into Trois Ponts, onto the heads of the mounted American infantry...
So, here we go: the first halftrack takes two hits, the next one, the next two and is suppressed, the ATG takes two hits and is suppressed, the next three vehicles are missed altogether (or save their hits), and the last halftrack takes one hit.
That is the first time we've done that. Usually we count up hits and put them all towards one vehicle, but we tried it this way (assigning dice to multiple targets, then rolling 'to hit' and saves, then suppressions. It takes a bit longer, but I wanted to do it as I figured it would be in his best interest to not try and knock out a single vehicle or maybe two (which is what happened), instead try to hit as many vehicles as possible in the hopes of suppressing them so they couldn't do anything and would have to have their infantry remain mounted. He got a lot of hits (eight), but did very poorly with the suppression rolls.
The German 2nd PzGren Co, still in Stavelot (right), is looking to get back in its halftracks, then zoom up the right side (top), then get atop Hill 43 (top left), threatening the flank of the US Tank Destroyer Company (far left) and forcing them to fall back.
But they roll another blunder...
American artillery begins falling on Stavelot...
The blunder was 'nearest unit to enemy takes 4 attacks.'
The arty doesn't hit anything, but it does convince the panzer grenadiers to hurry their butts back into their tracks!
With one of his brothers knocked out (far right) and the other suppressed, the remaining King Tiger in action decides to move up, wending his way through the forest (far left)...
Where he (bottom left) opens fire on the US tank destroyers (top center right)...
And one of the M-10s brews up.
The tank destroyers return fire on the lone King Tiger, only managing to chalk up a single hit, but then it's enough to shake the crew up (they failed their next roll, ending the German phase).
With that, the US tank destroyers (for some reason, still not sure what it was, need to have a talk with that American commander) push east, towards Stavelot. I get that maybe they saw the German infantry mount up in their halftracks, but still, are you really going to charge tanks (much less open-topped tank destroyers) into an urban area, unsupported!?
Just kidding, here's what happened: the M-10s were rolling to fire on the King Tigers, the HQ failed. The CO picks up the reins, but he rolls a blunder, which cause the Wolverines to go charging out into the open, at Stavelot, exposing their flanks to the two King Tigers (the one that was suppressed is suppressed no longer)!
The King Tigers (sorry, you can only see one, bottom center) open fire on the hapless M-10s (top center)...
Another M-10 bursts into flames, and a hit is put on the next guy in line.
The US tank destroyers beat a hasty retreat, back to the treeline.
Where they, quite amazingly, are still able to get a round of fire in on the King Tiger!
Knocking him out!!!
Nine hits were scored, and he only saved three, needing only a 3+!!!
And sending the sole survivor packing!!!
But back in Trois Ponts, a disaster is unfurling...
The Armored Rifle Company in Trois Ponts is still not in position, still has its infantry mounted, is getting beat up by German artillery, and has Panthers (top right) knocking on the door. Their commander really needs to get the infantry out and the guns unlimbered, or at least take off back up the road, to the north (top left), but he's panicking too, and can't get anything done! And the US CO is up there with the US tank destroyers, way too far away to help!
I can't believe I just failed that roll. This should be curtains for the Yanks...
The German artillery (bottom center left) is receiving targeting information from the Panther Company CO, and they're licking their chops! They begin pumping out 150mm HE rounds again...
And the barrage is pure hell on earth, knocking out almost every single one of the Armored Rifle Company's vehicles, and one of the anti-tank guns. The infantry are forced to dismount, dazed and confused...
The Panthers begin rolling over the bridge at Trois Ponts...
And the armored infantry take to the hoof, getting out of Dodge!
@#$%ing Army...
Once again, the US Tank Destroyer Company is forced to fall back as they are the last remaining US unit in the fight.
The German panzer grenadiers push into La Gleize...
As the Panthers roll through Trois Ponts, another victory for the Germans! On to fight number three, the US counterattack, enough of this getting my butt kicked!
Man, another great fight, came right down to the very end again. If I could just have gotten the Armored Rifle Company out of their vehicles and into those buildings, just hang on for a turn until the tank destroyers could come down and beat those Panthers. But, 'twas not to be, and boy got me again, by the skin of his teeth. But the game still took almost four hours, and that's just too much. Earlier I wrote that it felt like the game was going faster, but, in the end, it wasn't, so I'm looking to figure out some ways to speed this bad boy up.
So also understand that I'm a bit unhappy that the games are taking so long, but that I don't really have that many units on the board and it's taking so long! The Germans had six units (three armor, two infantry, and one arty), and the American only had four (three rifle and one armor)! So (and I already floated this on the Pendraken forum), I'm wondering how this would work if I handled each unit as one stand, that essentially orders itself.
I'm already not really using HQs (just the CO), no -1 modifier for the units being more than 20cm away, and I let the HQ move with the unit when it moves, not wait until the end of the phase. So that should be easy, and then what I'm thinking is, I've been putting out tank 'companies' of six tanks, but when they roll, they're rolling per each vehicle, and when they hit, they're taking hits per vehicle. So an M-10 fires with 4 dice, and can take four hits, so for one round of fire I'm rolling 24 dice, then rolling saves against all those hits, and then when they get shot at, each vehicle takes 4 hits to knock out. So I'm thinking to treat the whole 'company' with the stats of a single stand, so that the whole 'company' fires with four dice, the whole company can only take four hits before being knocked out. And what I'd like to do is then bump up the number of units on the table, maybe get the attacker to nine units and the defender to five or six. And do all that and be faster ;)
In any case, KG Peiper is rolling towards Stoumont, and the defenders, while threadbare, just gotta hold on until the 82nd Airborne Division gets there.
V/R,
Jack


Another great report that did have some moments for both sides. Will be interesting to see if playing one unit as one "stand". My few games of BKC lasted a little over 2 hours but I think we only had 3-4 units per side, and vehicle units were only 3-4 vehicles max.
ReplyDeleteShaun,
ReplyDeleteThanks man, glad you liked it. I just finished the third game, played it where each 'group' was one unit, using a single vehicle/gun/infantry's stats. I played it with one hit falling off at the end of each turn, and I'm really happy with how it worked out. The Germans had three tank, two infantry, and one artillery units, while the Americans had three tank, four infantry, and one air unit. The US lost one tank and one rifle, the Germans all three armor, which caused them to break, ending the battle right at two hours.
The only problem is that now I'm considering re-basing my 6mm the way I had them before, with three vehicles per base...
V/R,
Jack
2 hours is a lot better. Glad the revision worked for you.
DeleteAnd rebasing...we all go there with thinking of rebasing. Some of us actually do so. I know I have at times so I have no words of wisdom for you :-)
Indeed, two hours was a lot more palatable!
DeleteAnd yes, I've played the re-basing game more times than I can count. I have no wisdom on this, nor anything else! ;)
V/R,
Jack