All,
The Brits carried out a hasty attack in Game1, and won the battle, but then lost ground to a German counterattack in Game2. In Game3 the Germans are trying to encircle the Brits. They have a large force, but it's split into three groups in three separate areas, while the Brits have a smaller force, but it is concentrated in the center of the field. The Brits must evacuate their forces off one of the map edges (I don't know which one yet, I'll be rolling for it after set up).
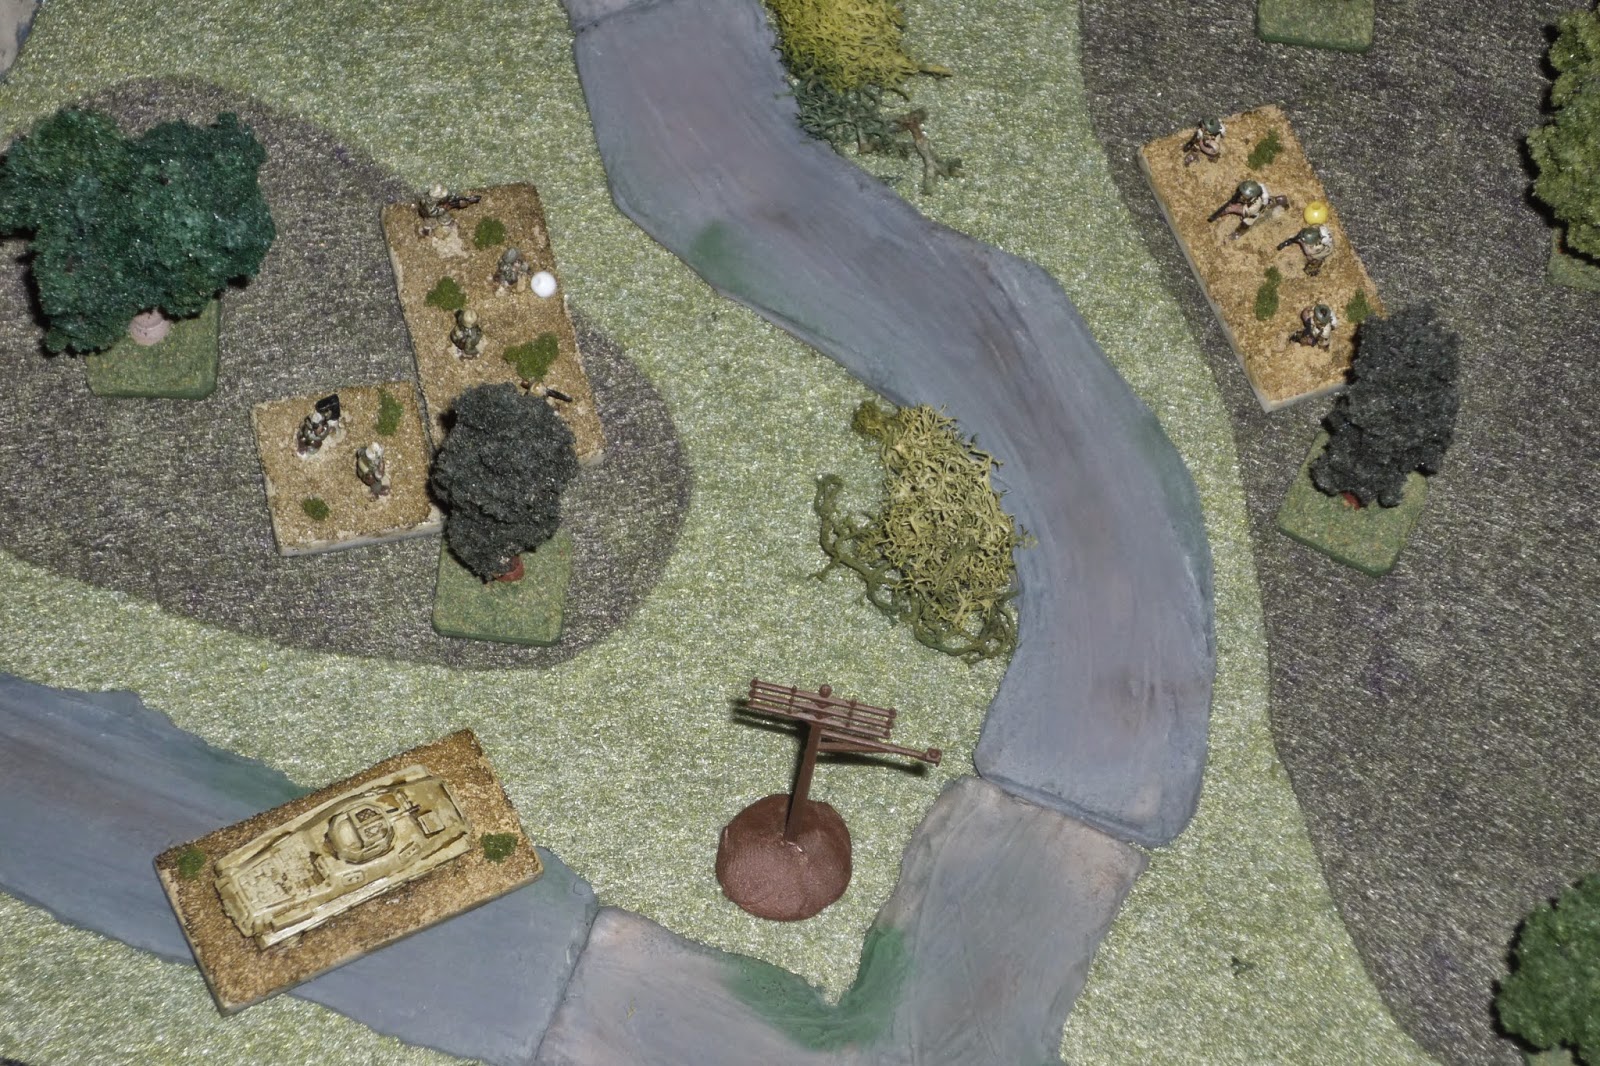
North is up, and there are no baselines as such. The Brits will start in the village at center.
The Brit force of CO, a 3" mortar, M10 tank destroyer, and five rifle squads.
The German force, with 9 rifle squads, a Sdkfz 234 armored car, a PaK-38 (with a prime mover, as I don't know which table edge the Brits will be evacuating off of and I wouldn't want them to get caught immobile on the wrong side of the table), and an MG-42. I will say that the Krauts got kinda screwed with the support rolls; if they'd gotten something bigger than an armored car (to take on the M10), they could have taken another MG or a mortar. But sometimes life bees like that...
Starting positions: the Germans have 3 rifle squads and the PaK-38 in the northeast (top right) corner, 3 rifle squads and the MG42 in the southeast (bottom right) corner, and the Sdkfz 234 and 3 rifle squads in the southwest (bottom left) corner.
I roll the dice, and, as luck would have it, the Brits must evacuate off the table via the road the German armored car is sitting on.
A look at the Brit starting positions. For those wondering, it's pure luck with regards to the vehicles (and other support) the two sides have. My scenarios have a number of supports, then you roll to see if they are 'infantry support' (i.e., MG, mortar, ATG, infantry AT) or 'mobile' support (armored car, light/med/hvy tank, tank destroyer, etc...). So the Germans got an ATG, an MG, and an armored car, while the Brits got a mortar and a tank destroyer.
The Germans in the northeast: 3 rifle teams and the PaK-38 ATG.
The Germans in the southeast: 3 rifle squads and the MG-42.
The Germans in the southwest: the CO, the armored car, and 3 rifle squads.
With Brit main position at top right and Germans at bottom left, the games starts with Cpl Allen and Cpl Bates leading their squads southwest towards the exit point.
In the southwest, the Germans counter with their CO leading Sgt Gohrman's squad into the treeline opposite Cpl Allen's squad, and Sgt Radchen advancing the armored car. Both fire on the Brit squad, to no effect.
The Brits get a crappy command roll, Firefight (everybody shoots, nobody moves; they needed the opposite). Cpl Allen's squad fires on the German squad, getting a knockdown, but the armored car returns fire, causing the Brits to flinch.
Then the Germans roll a @#$% firefight, and so no one moves again... The armored car fires again, but doesn't hit anything, and Cpl Allen's troops can't hurt the armored car, so the turn finishes.
First off, the Commanding Officer, Lt Page (dead center in trees) moves up to rally Cpl Allen's squad, but it fails and they flee, all the way back to their original position in the ville (top center, with red bead)... The M10 rumbles forward (can't fire medium gun on the move). Cpl Bates' 2nd Squad is just behind the CO, and the German rifle squad in the bottom left treeline is still in a 'knocked-down' status.
So Bates leads his men in a charge, and so Sgt Gohrman's German 7th Squad is out of the fight. The German CO, Captain Penzig, falls back out of danger (I could have had him help Gohrman's troops in close combat, but with them in 'knock-down' it was pretty much a foregone conclusion they would lose, and I didn't want the Germans to lose their CO with the overmatched rifle squad).
Then the Germans roll another @#$% firefight! The armored car turns its 20mm gun on the British M10 (which it can damage due to the M10's open top, or cause a morale result which forces the M10 to fall back), but the rounds bounce off harmlessly. The Brits calmly respond by firing a 76mm armor-piercing round straight through the German vehicle, brewing it up.
The Brit CO moves back (top center) and successfully rallies 1st Squad, while LCpl Crews leads his 3rd Squad and Cpl Kipper's mortar team forward (dead center, above M10).
In the southeast, Cpl Feldt leads the German 6th Squad ahead at the sprint, with Cpl Jontz' MG42 in trail (the Brits are off camera at bottom left).
The Brits roll a 'normal' command activation, but get a Random Event of "Accident," and so a kill die is rolled on a random unit. Well, the axe fell on LCpl Crews' 3rd Squad, and it received a knockdown (dead center with white bead)(i.e., moving through the woodline the squad triggered a landmine which wounded several men and set the squad into general confusion; "Nobody move, we're in a minefield!"). Lt Page immediately moved up to them and helped them recover ("Steady boys, we'll get through this. You two, pull out your bayonets and begin working back towards me.").
Cpl Allen's 1st Squad moved up next to the CO, mortar team, and 3rd Squad, while Cpl Davis led his 4th Squad out of the ville and into a position to cover the Brit left flank (far right).
Back to the southeast, two more German squads move up (far right), then fire on Cpl Davis' 4th Squad (top center left), and the Brit squad was put out of action!
In the southwest, the Brit mortar (top left) fired on the German infantry in the bottom left corner, but the rounds fall long and no one is hit, while the M10 moves east to counter the Germans advancing across the fields (top right). The M10 fires its coax MG, but hits nothing...
The Germans get a bit antsy; their force at the exit point is getting roughed up pretty well, and their ATG (in the northeast corner) hasn't even moved (really need a 'scurry' to get everyone moving, but keep rolling firefights), so they decide to do something rash. Having just eliminated the Brit 4th Squad, the M10 is now on the Brit left flank with no infantry support, and so two German squads sprint ahead looking to get into close combat and overrun the Brit tank destroyer. But the only one that could have made it ends up just short (a decent die roll when he needed a great one).
The Brits roll firefight: the M10 fires a 76mm HE round and eliminates Cpl Feldt's German 6th Squad (the one that was closest to the vehicle), and the squad's end is so gruesome it causes their comrades in Cpl Dirk's 4th Squad to retreat, running for their lives (top right with red bead)!
Back in the southwest, the 3" mortar fires again, causing Sgt Haas' German 8th Squad to flee the field of battle (eliminated), leaving Sgt Ingersoll's 9th Squad (far left, with their CO to his right) to exchange fire with Cpl Bates' 2nd Squad (center left), to no effect.
The Germans finally roll a scurry, and so their NE force finally gets moving south. That's the Brit 5th Squad at bottom left, still in the village.
In the SE, two squads rally while the MG and other squad move up (left, towards the M10 at far left).
In the SW corner, Sgt Ingersoll and his CO move into the building, overlooking the Brits trying to make good their escape.
The Brits react, with pretty much everyone moving southwest, though one rifle squad (Cpl Allen's 1st Squad) took up positions in the treeline (at center right) to cover their left flank (with German squad at far right).
With the Germans at the SW exit point taking up positions in the building, the M10 moves up and fires at them (far left, target off camera to left), but the Germans hold fast with no casualties. At center, Cpl Everson's 5th Squad joins Cpl Allen's 1st Squad in the treeline, then fires on the Germans in the field, getting a knockdown.
The Germans use a 'normal' roll to move up their ATG (top left) and advance one of the SE rifle squads (far right).
The CO, Lt Page, screams at Sgt Osborne in his M10 Wolverine, "Sah-gent, blast those @#$% Jerries out of that @#$% building!" The good Sergeant obliges, firing another 76mm HE round into the building (foreground), rocking it and causing the German squad and CO to fall back off the map (eliminated). The exit point is now clear of all enemy forces.
Meanwhile, Cpl Allen's 1st Squad (far left, lower of two Brit squads) takes a shot at the MG-42 in the field (bottom right), but the German machine gunners are un-phased.
The German ATG, under Cpl Leib, rushes forward and unlimbers (top left), while the Cpl Egan's German 5th Squad (top right, further left of the two) moves up and fires on the Brits in the treeline, to no effect.
Cpl Kipper faces his mortar tube (far left) about and takes the German ATG (top right) under fire. The prime mover is set ablaze, and the crew abandons the gun, hunkering in the ruins of the village (red bead).
While Cpl Everson's squad (far left) opens up, driving off the German 5th Squad (top, fall back and hunker).
Their blood up, Cpl Everson's boys charge the German 4th Squad and put them out of the fight, with the German 5th Squad, hunkered, watching the violence being visited upon their chums (top center).
Off camera, the German ATG crew tries to rally but fail... Then the German MG (bottom right) fire at Cpl Allen's 1st Squad (center left, with yellow bead), causing a 'flinch.' Lt Page moves to them and tries to rally them, but they're having none of it... So Sgt Osborne's Wolverine blasts the German MG, getting a knockdown, while Cpl Everson's squad advances on them.
Off camera, the German ATG crew rallies. This is followed by a German squad dashing ahead (far right) to protect their MG, firing at Cpl Everson's squad (center left) and forcing them to flee (I was *that* close to putting that MG out of the fight on the cheap!)...
Lt Page tries to rally Cpl Allen's squad again, and they flee, falling back to Cpl Everson's squad. The CO follows them (they were in the treeline at far right)...
The Woverine (far left) blasts the infantry at far right, and they flee back to cover.
Then Sgt Osborne pivots his vehicle right and heads west towards the exit point, pushing the destroyed German armored car out of the way. Meanwhile, Cpl Bates' 2nd Squad (far left) takes up point and exits the map (bottom left), scouting the way ahead for the main column (don't forget, this is a breakout scenario for the Brits!).
Lt Bates tries again to rally Cpl Allen's 1st Squad, and they fail again, fleeing once more! The CO chases after them (far left, with Cpl Everson's 5th Squad at bottom right and the German ATG at top right).
The Germans re-crew the ATG, but it's too late, the Wolverine has left their field of fire, on its way off the map; the mortar did a great job forcing the crew off the gun long enough for the M10 to shore up the left flank then depart. One of the German SE squads rallies successfully.
I just realized I allowed the Brit CO to try to rally their 1st Squad twice last turn. I guess it doesn't matter, they failed both times...
Lt Page manages to rally 1st Squad a little bit, up from hunker to flinch (for the record, they were on a flinch, then rolled hunker, hunker, flinch, or 6-6-1). LCpl Crews' 3rd Squad (dead center) sprints back to cover the ailing 1st and 5th Squads, then direct the fire of Cpl Kipper's 3" mortar, which again clears the Germans off their ATG!
The Germans roll a scurry, and so three squads from the NE corner rush ahead, but they're too late to affect the fight.
While the German SW force rallies/recovers itself.
Then the Brits roll a scurry, which is absolutely perfect for forces trying to escape an encirclement!
1st Squad (top left) tries to rally itself, but fails, but Lt Page is finally able to get them back to combat ready, while Cpl Everson's 5th Squad (far right) upgrades itself to a 'flinch' (ridiculous rolls; to recover/rally, all you need to do is roll a 2, 3, 4, or 5!).
Sgt Osborne's M10 leaves town, followed by Cpl Kipper's mortar team, and LCpl Crews' men (far left) sprint as far as they can towards the exit.
In reaction, the German ATG crew once again mans the gun, but there are no targets in sight...
Things get hairy for a moment; have I withdrawn too many troops too fast? From the SE, a German rifle squad (top right) and MG sprint forward, getting pretty close to Cple Everson's 5th Squad (top left).
Lt Page, the Brit CO, sprints to 5th Squad (dead center), and manages to rally them (1st Squad at far left, Germans at top, top right, and bottom right), exit point at bottom left).
The CO then leads Cpl Everson's squad in a sprint to the southwest (bottom left), catching up to LCpl Crews' 3rd Squad, with 1st Squad at far left.
The German MG42 takes up station in a building (bottom right; it can't move and fire in the same turn), while the German rifle squad (far right, in street) moves up and fires, getting a flinch on pl Everson's squad (far left, also in street).
Then the Brits roll scurry, and it's all over but the crying. Lt Page rallies 5th Squad, then leads them, 1st, and 3rd Squads off the field and to salvation.
This is what my son was doing while I was playing.
So, a resounding British victory! Lt Page will be decorated for leading his cut-off men through thick enemy forces to rejoin the battalion, suffering only very light casualties (1 rifle squad). It's true the Germans didn't suffer much for their troubles either (the armored car and two rifle squads, while two other rifle squads and their CO ran off the table), but they failed their mission to eliminate, or at least seriously injure, the isolated British troops.
A couple notes: first, I rolled up quite a few random events during the game, but didn't note them in the write-up when they didn't take affect in the game (i.e., one unit may ignore snap fire when moving into close combat, but no one moved into close combat that turn).
Second, I didn't do up a campaign roster for this series of fights, but I did make up a quick sheet of names, and when units get eliminated during the game I change the name and drop him a rank for the next game, kind of showing attrition. So, for the Brit 3rd Squad, in the first game they were led by Sgt Carter, and eliminated. In the second game they were led by Cpl Cooper, and eliminated. In the third game (this one) they were led by LCpl Crews, and they survived. The ranks, from top to bottom, are Sergeant, Corporal, Lance Corporal, and Private, so by the last game I suspect some squads will be led by Privates. Notice that the original Brit CO, Captain Penny, was cornered and surrendered in game 2, so the Brits are now led by Lieutenant (Leftenant?) Page.
Third, in retrospect, this probably looks like a pretty 'easy' game, what with the Brits only taking one squad as a loss, but the back and forth firefights (with lots of negative morale effects for both sides) combined with trying to make my exit and worrying about the NE force catching up really made for a dramatic game, even if the casualties don't show it.
Hope you had as good a time as I did, two more write-ups to go!
V/R,
Jack


No comments:
Post a Comment