Sunday, June 29, 2025

Bolt Action Test Game #2

All,

Greetings, hope all is well!  Just a quick update on what the boys and I have been getting up to.  We played a game, but I shouldn’t really call this a battle report; there’s not much much in the way of a narrative, or a real scenario, or a plan… hell, there’s not even many photos!  What we did have was lots of learning and lots of fun, which is a great thing to report, and should lead to some actual batreps.

Last time we played on a 3’ x 3’ table using a skirmish version of Warlord’s “Bolt Action” rules, whereas this time we used a modified (simplified, by me) version of Bolt Action version 3.  The simplified piece consists of a few things I changed to speed things up and/or season to my tastes, but the guts of the game are still there: random activation via dice draw, orders straight out of the book (well, mostly; we allow sustained fire MGs to engage multiple targets on Ambush), movement simplified a bit but largely in line with the book, anti-personnel fire pretty close to the book (I really don’t like the “roll for damage” step so I got rid of it and changed things to take troop quality into account in the “roll to hit,” added a “target obscured” DRM, and kept cover saves), I changed up anti-tank fire to simplify it (but actually made it almost impossible to kill tanks), and order and morale tests straight out of the book (except I messed them up with regards to casualties for the morale test, made them too easy to pass).  I don’t really pay any attention to force construction/structure/points rules, I give a numerical advantage to the attacker and go with what I believe is plausible (maybe leaning a little towards Hollywood in order to make sure it’s interesting for the boys, particularly in terms of AFVs).

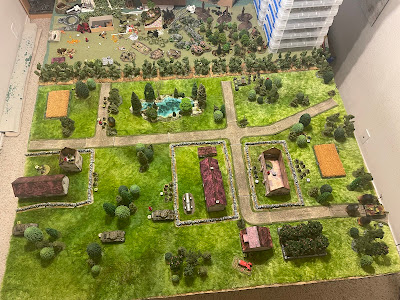
The table, again somewhere in Normandy.  Let’s say it’s June 8, 1944, on the eastern edge of the Allied bridgehead.  Ground forces have linked up with British 6th Airborne Division, which is now attacking south against 21st Panzer Division.  North is left, buildings and stone walls are hard cover, fields and trees are soft cover, attacker comes from the left and mission is the village at the crossroads (center-right), a super simple “attack-defend” scenario.

You can see I’ve “opened” up the table a bit, hope it looks more like a conventional Bolt Action/Battlegroup/Chain of Command-type table this time.  Last time it really felt like I had too much terrain on the table, really more suited for skirmish gaming rather than reinforced-platoon level gaming (at least in my humble opinion).

Looking south from the British end of the table.

Looking north from the German end of the table.

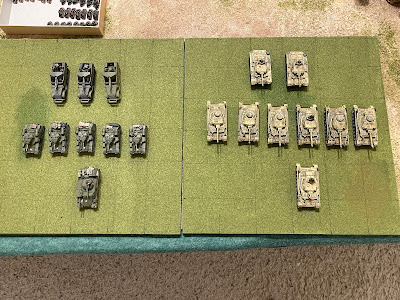
The British assault force:
-a three-man command element 
-4 x eight-man rifle sections
-a two-man PIAT team
-a Vickers MG team (three men)
-a 3” mortar team (three men + two-man FO team)
-2 x Sherman and 1 x Firefly tanks

I made the Brits, played by my younger son (who played Germans in the last fight), keep two rifle sections and all three tanks off-table to begin the game, coming on when an appropriate dice was pulled and they past an availability check (4+ on Turn 1, 3+ on Turn 2, 2+ on all turns thereafter).  There were a lot more failures to come on than I predicted, which led to quite a bit of laughter (at least by me)!

Despite “opening” up the table, I was still worried that it was too much forces for too little table, was worried it was going to look like a Napoleonic attack going in with troops shoulder to shoulder, so I only used 8-man squads/sections (also because I wanted to see what 8-man companies in Rapid Fire Reloaded would look like). 

In the event, I was quite happy with the troop density, I thought it looked ‘right’ and never had the feeling that stuff was crowded or too close together.  

You won’t see it because I was clever enough to not take any photos of it, but at one point we had opposing AFVs about six inches from each other.  This is not because of the rules or the size of the troops/table, it’s because I screwed up on the anti-tank shooting stats and made tanks nearly impervious to fire, so the boys were having to push their vehicles to point-blank range in order to have a chance to penetrate.  I realized my mistake after the initial exchange between a Sherman, a Firefly, and one of the Stugs where several hits were scored but none were knocked out, and then when a Panzerfaust got a top-down hit on the Firefly and still didn’t knock it out!!!  I told the boys we could fix it and move forward, but that all three tanks in the fight should be knocked out, or we could just leave them still in the game and keep playing the way we were and fix it for the next game.  They couldn’t stop arguing about how THEIR tank wouldn’t have been knocked out in the initial exchange so I just left them on the table with the current (screwed up) rules and will fix it next time.

The German defenders, played by my older son:
-a three-man command element 
-3 x eight-man rifle squads (each has 2 x panzerfausts)
-a two-man panzerschreck team 
-a three-man sMG-42 team 
-a Pak-40 ATG with three-man crew 
-2 x Stug-IIIH 

The Germans were required to keep one rifle squad and the two Stugs off-table to begin the game.

The British starting positions: there are two rifle sections (bottom left and center right too, just visible between the two buildings) a PIAT team (behind trees at top right), the command element and mortar team in the courtyard, and the Vickers MG team and FO in the two-story building.

Pretty standard setup by the youngster, except for throwing the PIAT team out all by their lonesome on the right flank.  It would pay dividends, however!

The German setup.  The older boy has a rifle squad in the street, between the buildings (bottom left), intent on dashing into the left hand building as soon as he can.  The panzerschreck team is centrally located behind the wall behind them, with the MG-42 team at the wall above them.  The command element is at bottom right, while the other rifle squad is in the trees at top right, across the road, while the ATG is in the clump of trees just below them, right where the road bends.

I think the ATG placement was probably in the only spot it really could be with a long field of fire, but I’m not really sure about the rest of his deployment.  The rifle squads aren’t really in position to support each other, the MG has a very limited field of fire, the command element isn’t really in a position to support anyone, and the front rifle squad is about to charge into a position (albeit in hard cover) where he’ll be taking on all the Brits by himself, and while the panzerschreck team is centrally located, he should probably have realized his ATG would lock down that side of the table so the Brits would push their tanks up the other, more congested, side, perfect for panzerschrecks and panzerfausts.

We discussed his setup; he didn’t appreciate how much trouble those stone walls were going to cause him (in terms of trying to reinforce or withdraw), and he overestimated how much line of sight would be blocked (a difference between one man moving between trees and an 8-man squad moving through some trees).  A problem most folks have (I think) is understanding that you don’t have to have troops everywhere, you own the ground you occupy PLUS that which you can occupy by fire (so he didn’t have to have troops on the right side, he just needed troops that could interdict enemy movement by fire).  We also talked about the ‘reverse-slope’ defense concept, I.e., he didn’t need to get someone into that front building where he was exposed to the enemy’s long lines of sight and overwhelming firepower, he could have sat back and made them come to him, channelizing themselves and presenting piecemeal.

End of the first turn: the Brits got two tanks on (Firefly at center, Sherman below and to the left) while the Germans got one Stug on (far right bottom). The Sherman and Stug have clanged rounds off each other, and the PIAT team is dashing ahead (straight down from the Firefly).  The older boy pushed a squad into the front building, but then he realized it would put him LOS of the entire 6th Airborne Division he decided to hold them back in the shadows, out of LOS, while the panzerschreck team hopped the wall behind them.

The Sherman (top left) and Stug (bottom right) continue trading ineffective shots as the German reserve squad comes on and dashes up behind the rear building (center) and the MG team hops a wall and moves up to the next wall (at the intersection).  Meanwhile, the panzerschreck team (center top left, just visible on the other side of the wall next to the far building), prepares to dash through the gap between the building and chicken coop, looking to smoke the Firefly…

But as the German panzerschreck team dashes forward (between buildings at top left) they are spotted by the Vickers MG team (in building at bottom center right), which promptly opens up and mows them down!

The German rifle squad in the near building (top center) moves up to the windows on the second floor and fire both panzerfausts at the Firefly lurking below (center top).  The panzerfausts score one hit on the Firefly’s top armor and… fails to penetrate because I’m a dummy and misunderstood the AT firing process…

End of Turn 2: the Brits have been punishing the German rifle squad in the near building (center) and MG-42 team (at crossroads), while the Sherman and Firefly have settled into a comfortable rhythm of exchanging ineffectual fire with the Stug.  The remaining Sherman and Stug have failed their second consecutive reserve availability roll, much to my amusement.

End of Turn 3: the last Sherman has come on (far left bottom), adding to the ineffectual anti-tank fire, while the other Stug, needing anything but a ‘1,’ fails to come on again. The German rifle squad in the near building has been knocked out, their command element has fallen back, and the Brits finally get their riflemen moving in the center and on their left (top left).

The Brits continue pushing forward, putting pressure on the Germans.  Frustrated at his inability to knock out the Stug (off camera up the road to top right), the youngster leaves a Sherman and the Firefly to continue trading shots with the Stug while the other Sherman dashes forward (just above trees at far right) to pour cannon and machine gun fire into the German units in the rear building (top right).  

The other Stug fails its fourth reserve availability roll, rolling a ‘1’ for the second consecutive turn.

The youngster pushes the PIAT team up to the orchard (far left), trying to get a point-blank shot on the Stug (far right).  The older boy pushes a squad across the road to counter the PIAT team (center bottom), as the British mortar pounds the MG-42 team and Pak-40 ATG (center right, between wall and field).

The youngster is getting bold, pushing a section forward to lay into the German command element (casualties on the German side were much lower than should have been because we forgot the ‘point-blank range’ dice roll modifier).

The German rifle squad at the orchard (top right) moves up to eliminate the PIAT team (at the bottom right corner of the orchard, above the tractor), but they only manage to kill the assistant gunner and put a pin on him!  A Sherman moves over (bottom left) and returns fire, taking out a few exposed riflemen.

The German Stug (top right) moves up the road, looking to get a point-blank shot on the nearest Sherman (center left bottom, just above the trees, between the buildings)…

Which allows the surviving PIAT gunner to slam a HEAT round into the Stug’s side armor, knocking it out!

The second Stug had finally entered the fight on the German right, where it promptly shot up some British para riflemen, but the Brits finished off the German MG team and ATG crew right before this, so when the first Stug brewed up it broke the German morale, ending the game.

So, despite my colossally stupid mistake on the AT procedure, we had a ton of fun, lots of laughs, plenty of drama, plenty of whining about bad dice rolling, and we figured a whole bunch of stuff out in terms of tactics, gameplay, and rounding the rules into form for us.  Specifically:

1) Fix the AT procedure so the shooter rolls a D6 (adding gun pen) but the target does not (roll D6 and add armor, just use armor).

2) Infantry targets will not count as obscured when AFV main guns, field guns, or infantry AT weapons target them in hard cover (building, wall, bunker, etc…).

3) Order/Morale tests will be at -3 for units that have suffered 50% casualties.

4) Add a third body to Bazooka/PIAT/Panzerschreck and Flamethrower teams to add resilience under fire.

5) Tree lines do not block LOS but obscure target (-1 DRM to Hit), copses/stands/clumps of trees block LOS, use base under to define border.

So sorry, not much there in terms of a normal battle report, I’ll look to get back to that as we get the rules ironed out.  Now I need a good mini-campaign to run; still not sure what they’re called or how exactly to describe it, but you start at a central geographical location and move back and forth in a linear method based on who won and lost the previous battle.  KISS Rommel did it like this:

Start at Tobruk, move left or right based on winner of previous battle report.

Track: Tunisia - El Agheila - Benghazi - Gazala - Tobruk - Mersa Metra - El Alamein - Alexandria - Cairo

I’d like to work mini-campaigns that have maybe five locations, and are much more tactical than that, I.e., you could probably do a five-step mini-campaign just for Gazala, Tobruk, or El Alamein, right? Or Stonne, or Dunkirk, Sicily (either the British track or American track), Salerno, Anzio, Caen, St Lo, various Market Garden locations, the Bulge, probably a million of them on the East Front, right?  Anyone have any ideas?

Anyway, thanks for taking a look, I appreciate it.

V/R,

Jack 

Sunday, June 8, 2025

Bolt Action Firefight Game 1

All,

I can't even remember the last time I was able to say this, but... dice have been rolled, and a winner has been declared!  I set up the table Friday night; a 28mm table, for the first time ever and, quite frankly, I was a bit daunted.  Everything is pretty damned big.  I found myself thinking about unit density and frontages and how the heck do you do this without looking like a parade ground, and just kept adding more and more terrain to it, then thinking I want to add more but I need to buy/make more but maybe it's too much...  Lots of fretting how to go about doing this.  Rather than looking through rules and getting everything ready, I found myself sitting on the internet, looking at other people's Bolt Action tables, trying to make out if I was doing this right.  Not sure what all my trepidation was about, can't really explain it, just had a horrible feeling that everything was not right.  Even had a moment of panic, thinking "I'll just sell all this crap off, go back to 10mm" (which I'm still not convinced isn't the best idea, but anyways).

Saturday some unforeseen stuff popped up with the kids, so not really much time to ponder and fix the issue, or even to get ready for Sunday afternoon, which was the planned D-Day for finally getting a game in.  Sunday afternoon rolled around and I still hadn't gotten anything ready, was still sitting on the internet looking at Bolt Action, Battlegroup, and Chain of Command tables and scenarios, trying to figure out how to do this.  My intent was to umpire a game between my two sons (ages 15 and 10) using Bolt Action, at either platoon-reinforced level (as per usual with Bolt Action) or at company level (slightly modified).  I just wasn't feeling it, until I came across a skirmish version, called "Bolt Action Firefight!", which apparently started as a fan-driven thing but has now been embraced by Warlord Games, where they host the rules and various supplements on their website.

It was perfect; quick and easy, breezy, no headaches, no more overthinking, just throw a couple of squads on the table and let the boys go at it.  And it worked, a tremendous amount of fun was had by all, they quickly got the hang of it (well, not quickly, but they are knuckleheads, like their father), with an excess of trash talking.  We shall definitely do it again, but don't worry, it's not the destination, just a step on the path of getting up to platoon- or company level.

So, in honor of the 81st anniversary of D-Day, 6 June 1944, we played out a game set in Normandy, seeing my older boy running a squad of British Airborne troops running into a squad of German Landser run by my younger son.

I had set up the full 6' x 4' table on Friday but now, just running a squad vs squad action, I cut it down to a little corner of the table; too small, as it turned out.  What you're looking at is about 3' x 3', but in the event, the left-hand side of little swamp/pond at right top turned out to be the right boundary, so the actual fighting space was only about 32" x 22".  

The opposing forces, Germans at top and British on the bottom, with some casualty figures laid out on the right.  The squads are laid out to be about as even as they possibly could.  

The Germans have a squad leader with MP-40, an MG-42, two men with Stg-44s, one man with a G43, and five men with Mausers.  I gave the bolt action rifles one firing dice each, the G43 two, the Stg-44 and MP-40 three, and the MG-42 five.

Bolt Action Firefight is set up as a man-to man skirmish game, where each man (as opposed to each squad/weapon crew) has an orders dice in the bag, which you draw out and activate a man from the side represented by the pulled dice.  It's also got a cool mechanic for automatic weapons that allows you to use full firing dice on your first target, then shift to additional targets and keep rolling, losing a firing dice for each additional target.

First look at my German casualty figures.

The British have a section leader with Sten Gun, a trooper with Bren Gun, three more troopers with Sten Guns, and five troopers with Lee-Enfields.  I gave the bolt action rifles 1 firing dice each, the Sten Guns three dice, and the Bren gun four.

First look at my British Airborne casualty figures, so you finally get to see what my Red Devils would have looked like if I painted them with Contrast paints.  I think they look pretty cool.

Initial set up, with Brits at bottom right and Germans at top center/left.

Opposite view, Germans at bottom center/right, Brits at top left.

Too small a table, with too much open ground (between the buildings, no covered route to get at the enemy) to facilitate any real maneuver by the boys.  My fault...

And please forgive me, this isn't a real battle report; this was a learning game to get the boys into it and start figuring things out, so I didn't take hardly any photos, and there's not really a narrative.

At the end of the first turn, you can see each side has a man down, the Germans have a few pin markers (left center).  And you can see how this is shaping up, both sides scrambling to the wall and shooting it out.  The older boy, running the British, tried to maneuver a team of three guys (far right, in one of the fields) but, as you'll see, it didn't really amount to much.

Turn 2 saw the Germans unleash a helluva fusillade on the Brits, dropping the Bren gunner and his assistant, but a rifleman dashed forward, scooped up the gun, and returned fire...

Returning the favor on the German MG-42 team!

The end of Turn 2; bodies are stacking up at the wall.  The younger boy, running the Germans, makes no attempt at maneuver, it's just get to the wall pour fire into the enemy.  The older boy, running the Brits, is trying; he's got a submachine gunner up to the upper building and his Section Leader into a building (right center), and his three-man team is still pushing to the left flank (just off camera to far right).

I've done a good job; both boys are laser focused on keeping their machine gun in action.  I joked that they're not familiar with the tenets of Maneuver Warfare: we don't reinforce failure ;)

The Germans have the British main position in a crossfire and are just mowing the Red Devils down, but the Brits just keeping passing their Morale Tests.

As a matter of fact, only one Morale or Orders Test was failed the whole game.

When one of the British submachine gunners (bottom center, with Section Leader in building, above him) hopped the wall and opened fire on the German MG position...

The ensuing casualties forced the Germans to take a Morale Test, which they promptly failed!

I must admit, the youngster was feeling a bit hard done by after knocking so many Brits out of the fight and still losing the game 'on a technicality,' as he keeps putting it, and it's not helped by the older boy continuing to talk trash to him, but ultimately they both had a great time and want to do it again.

Some thoughts:

-Need a little bit bigger table with more cover to facilitate more maneuver

-I figured out that I screwed up the Orders Tests and Morale Tests, making them too easy to pass, so I'll fix that.

-I was thinking that the game was pretty bloody, that it was probably too easy to take out guys in hard cover, but now I'm not so sure.  We're talking about twenty guys blazing away at each other with modern, high-velocity weapons at point-blank range.  People are going to go down.

-The game took almost two hours!  I had planned on playing a series of three fights, but we only played one because (I moped around until late, not getting things ready, and) it took so long.  Some of it was due to it being our first game, where even I didn't fully understand the rules, and some of it was the boys overthinking things, measuring things five different ways, etc...  I love the fact they were examining things in depth, so I don't want to push them too much, but I was pushing the idea that this is a fast-paced firefight, so we've got to keep things moving.  I'm honestly wondering if I need a punch-clock, and if you don't get your move in on time you forfeit that activation.  It could be fun ;)

Lots of fun, and we can't wait to get back to it.  Now that baseball season is over, we might even get in a weeknight game.

V/R,
Jack

Tuesday, March 21, 2023

Hell on Wheels, 'Blade Force' Fight #10

All,

1030 Local Time
26 November 1942
Near Chouigoui, French Tunisia

At dawn the tanks of 10th Panzer Division crashed into Blade Force's rear, back at Chouigoui Pass.  Colonel Watters' 1st Battalion, 1st Armored Regiment, bore the brunt of the assault.  Equipped solely with M3 Stuarts, the American tankers did not fare well, as one might expect (according to 29-year old 2nd Lieutenant Freeland A. Daubin, a platoon leader in A Company, 1st Battalion, 1st Armored Regiment, he "...discovered why his unit's 37mm weapons had performed so poorly even at point-blank range.  In the chaos if its first operation, his battalion had been issued training ammunition instead of the newer armor-piercing rounds, which were still sitting int he supply depots of Algiers.").  Nevertheless, TF Reisman was tasked to send any available tanks and tank destroyers back to Chouigoui Pass in order to stem the flow of panzers from the north.  

Captain Avery, the Tank Company commander, immediately grabbed up the tanks he had to hand and began pushing back to the west, towards Chouigoui Pass.  The column briefly became disoriented, so that it actually passed the German column and ended up approaching it from the southeast;* the Germans saw the fledgling American armored force coming and dispatched a small detachment to handle it.

This is a fictional engagement, but it still should have happened with Americans in the east and Germans in the west, but I forgot about that when I set the table up and so I had to make up that part about Captain Avery becoming disoriented and having to turn around, thus attacking from the southeast, sorry ;)

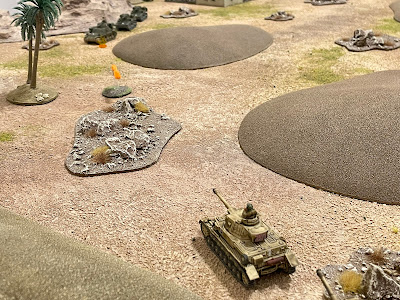
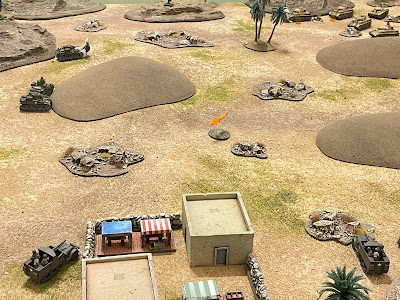
Overview, north is up.  There is a walled farm at bottom left (St Joseph's Farm, other elements of Blade Force had fought a battle here yesterday); other than that, the battlefield is framed by rocky escarpments and, broken only by sand dunes (which are impassable to vehicles) and rocky ground.  

This is a straight up tank fight, no infantry or support weapons (well, some US halftracks used as tank destroyers), and no real finesse, just gonna duke it out at point-blank range.  Every now and again I like to do this, but two issues: 1) I really need to do it on a bigger table, 4' x 4' does not cut it (for me) in 15mm, and 2) this is the one area where I feel 5Core Company Command doesn't shine, it just doesn't feel right to me for fast-paced armored actions.  But I think I have a solution, courtesy of my good buddy Shaun.  He and I were discussing the rules and even though we were discussing different facets, he brought up a different mechanism and it hit me that it would (probably) be perfect for tank-on-tank fights: rather than using the regular "Five Men in Normandy"-style activation, I should try the "Five Men at Kursk"-style activation.

Alas, Shaun and I's conversation occurred after I'd already played this, but I've resolved to play out at least one more tank-on-tank fight in North Africa (Kasserine, maybe El Guettar?  Maybe both?  Yeah, probably both!) on at least a 5' x 4' table, maybe even full 6' x 4', and to use 5MAK-style activation.

**Briefly, for those wondering:
-5MIN: when it's your turn, roll 1D6.  If it's a 1, everyone gets to move, without drawing reaction fire, but they're not allowed to shoot.  If it's a 2-5, count your total number of stands, divide it by three, and activate that many stands (with some provisions for 'group moves).  If it's a 6, everyone that's able to fire (good order or pinned and has an enemy unit in line of sight) gets to shoot, but after it's all over, every enemy unit that's able to fire gets to take a shot.

-5MAK: when it's your turn, count up your total number of stands and roll that many D6.  Assign each D6 to a stand and carry it out, in order of your preference.  1s mean that stand gets to move without drawing reaction fire, 2-5 means that stand gets to move and fire, but is subject to react fire, and a 6 means that stand gets to fire (with a bonus, if I recall correctly, and without being subject to return fire, also if I remember correctly, but I'm not sure, it may allow for return fire).

The opposing forces, with Americans on the left and Germans on the right.

The vaunted Yanks, looking to blunt the spearhead of 10th Panzer Division's thrust from the north, behind Tebourba and Blade Force's advance to the east (at Djedeida and then Tuni), and here we see the combat debut of the US Tank Company Commander and his Executive Officer!
Commander: Captain Avery (in the M3 Grant, because I don't have enough M3 Stuarts and didn't want to use an M5 Stuart, which wouldn't really be an issue but I'd previously stated the two M3 Grant Platoons* were strung out across Algeria and still hadn't reached the battle area; I guess that just meant the Grant platoons, not the CO's vehicle)
Stuarts:
-1st Lieutenant Seay, filling in since both Stuart platoon leaders are out of action (Lt Figures is WIA and Lt Hastings is KIA, with no replacements as of yet)
-Sgt Gibson
-Sgt Daigle
-Sgt Simpson
-Sgt Parella

M3 GMCs (halftracks mounting 75mm guns)
-2nd Lt Swayne
-Sgt "Cut-throat" Cuthbert (who won the Silver Star in his last fight, for knocking out three French tanks with three shots!)
-Sgt Johnson

*For your reference, the Tank Company has twenty-two tanks, with one each for the Company Commander and Executive Officer (which I figured would both be M3 Stuarts, but apparently one M3 Grant and one M3 Stuart), then two five-tank M3 Stuart Platoons and two five-tank M3 Grant Platoons.  I plan on keeping the Grant/Stuart split through Sicily (yes, I know it should be Shermans for Sicily, but I want to keep my Grants for as long as I can!), but will change to one M5 Stuart Platoon and 3 M4 Sherman Platoons (the CO and XO will have Shermans, too) for Salerno and stay like that for the rest of the war.

The Germans:
-Commander (in a Panzer IVD. with short 75mm)
-6 Panzer IVGs (with long 75mm)
-2 Panzer IIIJs (with long 50mm)

Overview, now with troops.  The US force is broken into three separate elements: three Stuarts at far left, three M3 GMCs at the Walled Farm (bottom left), and the Grant and two Stuarts at bottom center left (just right of the Walled Farm), while the Germans have broken into two different elements, both at top right, but with their right-hand column looking to shoot straight west (left) and their left-hand element looking to shoot straight south (down), looking to conduct a double envelopment of the US force.

The US left-hand element is led by Lt Seay and he has Sergeants Gibson and Parella with him, while the US right-hand element is led by Captain Avery and he has Sergeants Simpson and Daigle with him.  The three M3 GMC tank destroyers intend on holding down the center, with a pretty decent field of fire running north-northeast from the Walled Farm, bisecting the table.

I'm really not happy with how this looks; the last thing I want is for my opposing tanks to end up nose-to nose, practically in melee combat, the tank commanders firing their pistols at each other... 

A closer look at the US setup, from west to east, with Lt Seay's group at left, the M3 GMCs at right, and Captain Avery's group just above them.

And a closeup of the two German groups.

The US wins initiative (the one time I didn't want to), and now it's time to fight!

Captain Avery leads his tanks forward on the US right.

Where a Panzer IV (long) spots him and fires...

But apparently the opposing gunners were caught out, because not only did the German round miss, so did the American's return fire!

On the US left, Lt Seay orders Sgts Gibson and Parella to hold back as he instructs his driver to ease them out cautiously for a look...

Again a German tank (bottom right) spots them (top center) and fires!

The 75mm AP round misses, but is close enough to suppress Lt Seay's crew, as Sgt Gibson orders his driver to advance at speed, pulling up next to Lt Seay's vehicle.

But it has simply drawn the attention of the next panzer in line (bottom right), which promptly fires on the two American light tanks (top center).

Sgt Gibson's Stuart (top right) is hit and immobilized, as Lt Seay screams at his driver to reverse out of the line of fire (center, from top right, with Sgt Parella looking on from far left)!!!

And then that familiar buzz of aircraft engines wafts across the valley; as many times as Task Force Reisman has already been hit by the deadly Stukas, the American tank commanders instinctively break out in a cold sweat, looking skyward, hoping beyond hope to see P-40 Warhawks, or even the new, split-tailed P-38 Lightnings...

Dammit!!!

The Stukas identify Captain Avery's column and tip over into their dives...

No US tanks are destroyed, but the bombing run is ferocious nonetheless, immobilizing Captain Avery's M3 Grant (top right), suppressing Sgt Simpson's Stuart (red bead at left), and pinning Sgt Daigle's Stuart (yellow bead at center)!!!

On top of that, the Germans rolled a 'Scurry,' which means they get to move up unmolested by the Americans, getting their guns into the firing line without having to pay for it...

Predictably, the German left-hand column pushes south (left, from bottom left, and we're looking from northeast to southwest in this photo) and the right-hand column pushes east (center bottom, from bottom center, a bit more cautiously than their left-hand comrades.

While on the US left, Sgt Parella pushes his Stuart up (bottom center, from bottom left) to help the XO out, but they're only able to rally 'up' to pinned.

While in the US center, Sgt Cuthbert and the other tank destroyers are supposed to be holding their positions at the Walled Farm, ready to engage, but he can't help himself.  He sees what the German dive bombers did to Captain Avery's column, so old Cut-throat pushes his vehicle over (center, from bottom center) to help out, helping to rally Sgt Simpson's Stuart.

But now the US rolls up a 'normal' activation and a random event, which turns out to be 'A Hero Emerges.'  I roll up randomly to see which unit it is...

And it turns out to be the US CO, Captain Avery!  So, Captain Avery quickly shakes off the deleterious effects of the German bombs and rallies his crew back into action, then orders them to engage the German panzers!

Due to him being a hero AND the plethora of bunched up targets, I gave him a bunch (way too many?) dice to roll, 4K 3S, and he didn't disappoint!  Technically speaking, that's two 'Kills' and two 'Immobilized.'  I figure that's too much, so I drop the two red 1s...

Captain Avery's tank (top left) quickly knocks out two of the Panzer IVs!!!

And then, from the west (bottom left), Sgt Parella's Stuart engages the same German formation (top right, with Captain Avery's tanks just off camera to far right, and the Walled Farm just visible at bottom right)...

The 37mm AP rounds catch the lead Panzer IV (bottom left) in the flank, brewing it up!

And then Sgt Cuthbert (bottom center, at the tail of Captain Avery's formation) gets in on the act, the first US vehicle to engage the German right-hand column (top center/left, the right-hand column at top right, with three tanks already burning!)...

A Panzer IV is hit and immobilized, and its crew bales out!

As Sgt Johnson (bottom left, with Lt Seay's formation at top left) sights in and fires on the German right-hand column (top right)...

The 75mm AP round misses and skips off a nearby rockpile (bottom right) and a panzer returns fire, also missing, but missing close enough to pin Sgt Johnson (top left) and his crew.

Back with the left-hand German column, the new lead panzer (left bottom) sights in and fires on Captain Avery's M3 Grant (top center)...

I gave the German 3K 1S to fire on the big as a barn and immobilized Grant, and still they completely missed!  Captain Avery is living some kinda charmed life right now.

The round zips past Captain Avery's head (bottom left) as he slews the turret and orders his gunner to return fire (yeah, have to use the 37mm, can't bring the 75mm gun into action due to being immobilized)...

The 37mm AP shot, fired at less than 200 yards, immobilizes the German tank and the crew bales out!

With things about as stymied as they can get on their left (bottom left), the Germans push up on the right (center/right)...

The lead Panzer IV circles around a nearby dune (bottom right) and fires on Sgt Johnson's tank destroyer (top left), suppressing the American halftrack.

As another panzer pushes up (center, from far right) and opens up on Sgt Gibson's Stuart (top left) at point-blank range...

The American tank crew bales out, carrying their wounded commander, Sgt Gibson.

Sgt Cuthbert (center right, at left end of Captain Avery's column) again fires on the German right-hand column (top left)...

He hits another German tank, immobilizing it, but the crew stays in the fight (despite being suppressed)!

Then Sgt Cuthbert pushes his halftrack up to the next vehicle in the column, Sgt Daigle's, trying to get them into the fight.

Sgt Daigle's crew successfully rallies, then he and Sgt Simpson push the tanks forward (center right, from bottom left).

While back on the US left, Lt Seay (yellow bead) finally manages to rally his crew, but Sgt Parella (below him) is feeling a bit antsy...

So he pushes his Stuart up next to Sgt Gibson's abandoned vehicle (center top, from bottom left).

But a German Panzer III (bottom center) spots him (top center)...

And promptly knocks Sgt Parella's tank out!

Swirling smoke and dust, flames from burning tanks, there is suddenly a lull that turns the battlefield into a very quiet place...

**The Germans rolled another Scurry. 

The immobilized Panzer IV (right, who's crew stayed in it) rallies, as the three other operational tanks move up, getting very aggressive (particularly the German tank at left, moving in on Captain Avery's formation).

Sgt Daigle spots the advancing panzer (far left) and orders his driver to reverse (far right, from center)!

As Lt Swayne finally pushes his halftrack up to where it might actually be able to get in the fight (right bottom, from left bottom, with Sgt Johnson's suppressed halftrack at far left).

A Panzer III (bottom right) spots Lt Swayne's halftrack (top left) and fires, suppressing the Lieutenant and his crew!

As Lt Seay pushes his Stuart forward (bottom center, from left), around the dune, lining up a shot on the rear deck of a Panzer IV (top right).  "Fire!"

But somehow Lt Seay's (top left) round has gone astray, completely missing the German tank (bottom right), which promptly faces about and engages the diminutive M3 Stuart...

Knocking out Lt Seay's tank (bottom center, with Sgt Parella's burning tank and Sgt Gibson's abandoned tank at center top)!!!

With the German tank (top left) theoretically distracted, Sgt Simpson decided now was the time to push up (center)!!!

But the veteran German panzer commander has seen a thing or two in his time and did not ignore his exposed flank; he calmly orders his driver to again face the threat as he slews the turret and orders his gunner to fire...

Captain Avery (far left) looks on helplessly from his immobilized M3 Grant as Sgt Simpson's Stuart is demolished!  

The Captain has seen enough...

He sends the signal to withdraw out over the net, drops a couple thermite grenades in his tank, and abandons ship...

Then joins the rest of his men in beating feet!

They don't make it far in the direction of southeast before they spot more Germans; "what the hell, where is everybody?"  Captain Avery jumps in Lt Swayne's halftrack and gets on the battalion net, trying to figure out what's going on and what to do.  It's a bit confused, but one thing has become abundantly clear: the Germans have advanced around Blade Force to the west, circling to cut it off, and Blade Force is actually assisting those efforts by falling back east towards Tebourba, rather than south, out of the bag, towards Medjez el Bab!!!

Turns out the idea of falling back to Tebourba was sort of valiant, that is, quite a bit of British infantry was still over there and it was good they weren't left high and dry by the armor, but it was also a bit naive; high command still hadn't really grasped how strong the German push from the north was, and that it was soon to be joined by a strong push from the east.  Hadn't grasped to the point that they were still ordering attacks to the east, against Djedeida...

Well, despite it being too close because it was on too small of a table, that was still pretty damn fun!  Even with losing!  Turned out to be a pretty close thing, and definitely a tale of two halves: the Americans were kicking butt in the first half, annihilating the German left-hand column), only to be dominated by the German right-hand column in the second half.  But it wasn't pre-ordained, didn't have to be that way: Lt Seay, Sgt Simpson, and Sgt Johnson all had shots that could have turned the tide, saved the day, but missed (damn, particularly Lt Seay's shot on the exposed rear of a Panzer IV facing Captain Avery's column).  Coulda, woulda, shoulda...

Let's get to some stats:

-the US had 10 men killed, wounded, or missing

-the US had four M3 Stuarts and one M3 Grant destroyed

-the Germans had 10 men killed, wounded, or missing

-The Germans had four Pz IVGs and one Pz IIIJ destroyed

Characters:

-Captain Avery, Tank Company Commander, was awarded the Silver Star for his combat leadership leading the counterattack at Chouigoui Pass, staying in his immobilized tank to rally his men and destroy three enemy tanks.

-Sergeant Cuthbert, Tank Destroyer Commander, Tank Destroyer Platoon, was recognized for his steady and calm demeanor and professionalism whilst knocking out an enemy tank with his M3 Gun Motor Carriage, his fourth tank kill of the war.

-Sergeant Parella, Tank Commander, 1st Tank Platoon, was recognized for his steady and calm demeanor and professionalism whilst knocking out an enemy tank with his M3 Stuart, and awarded the Purple Heart for being wounded by enemy tank fire.  Luckily, Sgt Parella's injuries were slight and he may return to duty in approximately two weeks' time.

-1st Lt Seay, Executive Officer, Tank Company, was awarded the Purple Heart for being wounded by enemy tank fire.  Luckily, Lt Seay's injuries were slight and he was immediately able to return to duty.

-Sgt Simpson, Tank Commander, 1st Tank Platoon, was awarded the Purple Heart for being wounded by enemy tank fire.  Luckily, Sgt Simpson's injuries were slight and he was immediately able to return to duty.

-Sgt Gibson, Tank Commander, 1st Tank Platoon, was awarded the Purple Heart for being wounded by enemy tank fire.  Unfortunately, Sgt Gibson's injuries were so severe as to require evacuation to the United States and medical retirement.

So Blade Force as a whole has been rather roughly handled by the enemy (and it's only going to get worse), and that's true for the advanced element of Task Force Reisman as well.  The Task Force crossed over into Tunisia with its Tank Company CO, XO, and two full platoons of M3 Stuarts, for a total of one M3 Grant and eleven M3 Stuarts.  Major Reisman winced when he looked at the morning report and saw he could now only put three M3 Stuarts into action.  Eight M3 Stuarts and the lone M3 Grant had been put out of action, and with it both platoon leaders and four other tank commanders.

So despite Blade Force suffering heavy casualties and being virtually surrounded by a seasoned opponent, high command was still intent on continuing the race for Tunis.  The Germans seemed content to sit tight and let the situation develop, carrying out only light, probing attacks, as Blade Force licked its wounds and reorganized, preparing for the big push, eastwards to Djedeida, which also allowed the British to push more armor further west, back to Chouigoui, in the form of the 17/21st Hussar Regiment.  Two days later and it was time to answer the bell, as the 5th Northamptonshires were stepping off in the attack, with elements of TF Reisman conducting a supporting attack on their left...

Coming right up!

V/R,
Jack

Bolt Action Test Game #2

All, Greetings, hope all is well!  Just a quick update on what the boys and I have been getting up to.  We played a game, but I shouldn’t re...