All,
For the next few days, Dog Company sat in blocking positions waiting for German/Italian counterattacks that never came. During this period the company was reorganized, with 2nd Platoon being disbanded to provide replacements for 1st and 3rd Platoons.
Lt Shepherd and SSgt Ford rearranged the platoon, promoting several members of the platoon and rearranging the men to accommodate the new members from 2nd Platoon. Shepherd and Ford were intent on keeping the .30 cal. MMG, and thus didn't report the Wpns Plt gun being in their possession.
-Sgt Gamble, 2nd Platoon's acting Plt Sgt, was made the Lt's RTO as Shepherd was tired of carrying it himself.
-Ignacio (bazooka gunner) was promoted to Corporal.
-Cpl Locke (1B) became a Tier II leader.
-Fox (1B) was promoted to Corporal.
-Cpl Keepers was made 2nd Squad SL.
-Welcomed Sgt Bettis from 2nd Plt to become 1st Squad's SL.
The platoon is back at full strength, plus having a .30 cal MMG in 2nd Squad's 2B (their BAR was moved to 2A). The platoon is ready for whatever may come...
V/R,
Jack
Sunday, October 20, 2013
All Americans, Part 9 (Sicily 23 July 43)
All,
Immediately following their victory, Shepherd and Ford huddled. They knew what had to be done; reorganize quickly, then push forward and pinch left to make a flank assault on the German position that had 2nd Platoon pinned. The Platoon received no outside support or reinforcements; the only addition beyond normal was that all the Wpns Plt men servicing the .30 cal. MMG were out of action, so it was given to a couple riflemen in 2nd Squad's rifle team (2A) to man. Sgt Reyes was again angered by this; this meant he would essentially cease being a squad leader and simply be a weapons team leader.
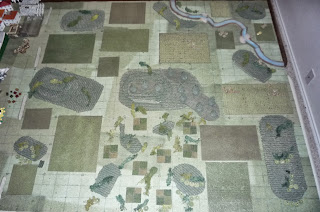
 The situation was that 2nd Platoon was attacking up the road, but has been pinned down several hundred yards south (off table at bottom) of the German positions at/near the crossroads. 1st Platoon, having won its fight on the far right flank, will now enter on the right flank (top right of photo) to reduce the main German resistance at the crossroads, as well as a two-tube section of 80mm mortars (at top center).
2nd Plt is off table and is represented by one card that fires as a MMG each turn, occupying the attention of the German forces in the building, who must continue to concentrate fire at 2nd Plt.
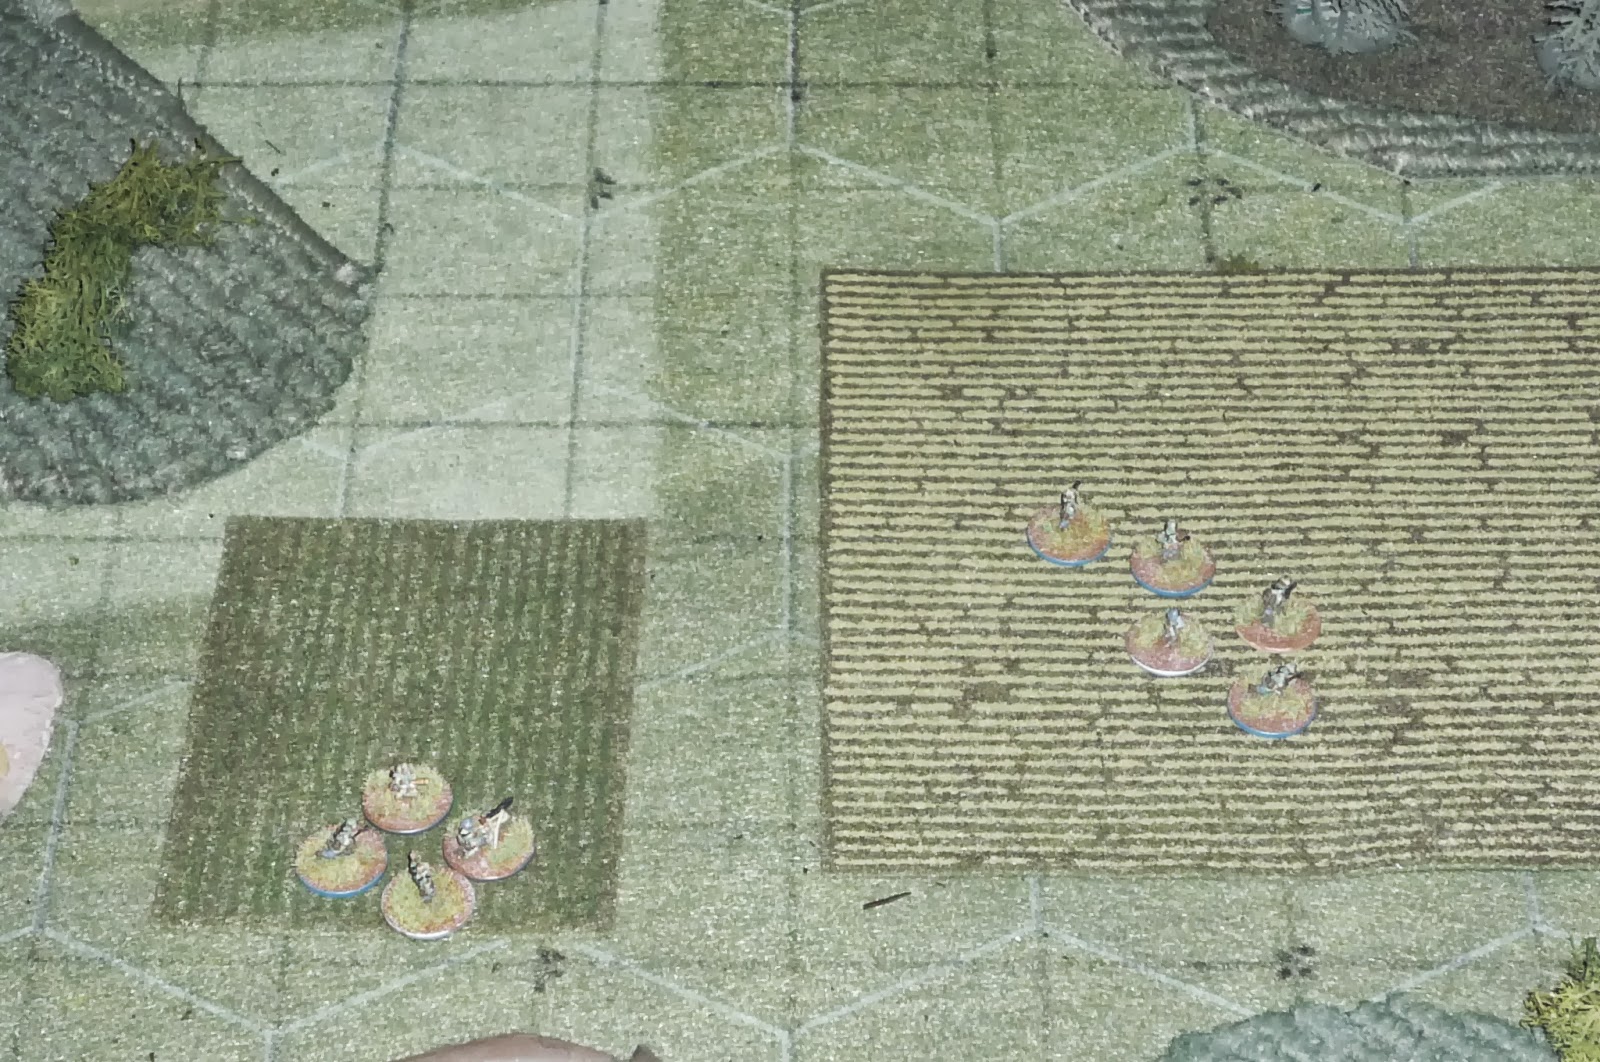
 1st Platoon: the Lt is leading 3A, along with Ignacio's bazooka, at far left. Next up is Cpl Locke's BAR team (1B), then SSgt Ford with 2nd Squad's BAR team (2B). Ford and 2B will be going for the 80mm mortars, to catch them before they realize what's happening and withdraw. At far right is Sgt Reyes and two other men, manning the .30 cal. MMG.
 The German main position: on the top floor is a fire group (1FG), on the bottom floor is a tripod-mounted MG-42 (HMG, and it will be responsible for maintaining fire on 2nd Plt). Just outside is a 50mm mortar team, while behind the wall at bottom left is an assault group (1AG).
 German position, this time showing the 80mm mortars at bottom right. 1st Platoon is just off camera at left.
Turn 1:
 The fight started with a US activation, and so Sgt Reyes' MMG went into action against the German 1AG (behind the wall). Shepherd was crouching in the woods, ready to lead 3A into overrunning the German rifle team, as they should be pretty chewed up as the MMG would catch them 1) unawares and 2) totally in the open. The MMG barked out a long burst (seven dice), that did nothing but alert the Germans to their presence (0 hits!!!). Shepherd shot a disgusted look at Reyes; either he hadn't spent any (of the admittedly limited) time, or had given no/bad direction. But, in Shepherd's mind, this failure was clearly of Reyes' doing.
Shepherd led his group forward and fired on 1AG, getting a kill and 3 shock. When 1AG failed its activation roll, the three survivors promptly surrendered (0 FM pts). The 50mm mortar crew heard the commotion, turned, and fired their rifles at the Lt/3A, to no effect. 1FG, on the top floor, did the same, getting only 1 shock, while the German HMG and 2nd Plt exchanged fire. The German Platoon Commander, on the 2nd floor, fired his pistol at 3A, to no effect. Ford led 2B in a sprint across the field towards the mortars, which continued to fire on 2nd Plt.
Turn 2:
 This started with 1FG, still on the 2nd floor of the building, firing on the Lt's group, 3A, getting two shock and putting Sgt Glenn out of the fight! Reyes then got the gun into action, firing on 1FG and killing its NCO (0 FM) and getting two shock. But then the German 50mm mortar, unable to fire at 3A as it was too close, decided to drop some rounds on Reyes MMG team, killing him (-3 FM) and getting a shock on the team! So very quickly the Platoon lost its two remaining squad leaders...
 Shepherd rallied 3A and moved them forward (behind wall), firing on 1FG, getting 2 kills and a shock, which the German PC moved over and pulled. But then Locke's 1B fired on them, killing the two remaining men and the German Platoon Commander (-5 FM). The German HMG continued to fire on 2nd Plt, with 2nd Plt returning serve (a kill and a couple shock so far).
 Ford kept moving 2B towards the unaware German mortars.
Turn 3:
 Right off the bat I rolled up a random event, which saw one of the non-player characters go heroic. So PFC Alston (moved over from 2A to 3A when the Lt gave the MMG to Reyes) hopped the wall, killed one of the German 50mm mortar crew, and captured the other. Then, when the Lt moved 3A up to engage the German HMG on the ground floor (which surprisingly decided to fight instead of surrender), Alston got in on this, too. In the ensuing close combat, the German HMG team was eliminated (-1 FM), while 3A lost a man and got two shock. Shepherd quickly fired a flare to let 2nd Plt know to shift fire.
 On the right, Ford and 2B hopped the wall and then dropped three of the German mortar men, and the last surrendered, ending the fight.
1st Platoon once again carried the day, with minimal casualties, though two squad leaders were hit. The company consolidated on this position, and set about reorganizing itself in preparation to begin moving east on the long march to Messina.
The Germans lost:
14 WIA/KIA
5 POW
2 80mm mortar tubes captured
Our casualties:
Sgt Hurley Reyes (2nd Squad) *Negative Morale Event (casualties) (2/3); Shot in head, Purple Heart (3); Submitted for Bronze Star (5); Positive Morale Event (personal and unit performance, friendship with Sgt Hume) (6/7); Negative Morale Event, downgraded to Level I leader (death of Hume) (7/8); KIA (9)
Sgt Glenn *Repl from E Co, 2nd Bn (3/4); Ran in the face of the enemy (4); Transferred from 2nd Squad to 3rd Squad (4/5); Submitted for Distinguished Service Cross (5); shot in neck, Purple Heart (6); shot in arm, Purple Heart (9);
PFC Uniform (3rd Squad) *Submitted for Bronze Star (4): shot in jaw, Purple Heart (6); Promoted to PFC by Lt (6/7); KIA (9)
Awards recommendations:
-PFC Alston (2nd Squad), submitted for Bronze Star for taking his own initiative, under heavy fire, to eliminate a German mortar position taking fellow members of 2nd Squad under intense, accurate fire, then charging key elements of a German machine gun position pinning 2nd Platoon in exposed positions.
Captain Linus and the remainder of Dog Company moved into blocking positions to isolate Marsala as other element of the 82nd Airborne Division set about the grim task of clearing the Germans and Italians from that city.
V/R,
Jack
Immediately following their victory, Shepherd and Ford huddled. They knew what had to be done; reorganize quickly, then push forward and pinch left to make a flank assault on the German position that had 2nd Platoon pinned. The Platoon received no outside support or reinforcements; the only addition beyond normal was that all the Wpns Plt men servicing the .30 cal. MMG were out of action, so it was given to a couple riflemen in 2nd Squad's rifle team (2A) to man. Sgt Reyes was again angered by this; this meant he would essentially cease being a squad leader and simply be a weapons team leader.

2nd Plt is off table and is represented by one card that fires as a MMG each turn, occupying the attention of the German forces in the building, who must continue to concentrate fire at 2nd Plt.


Turn 1:

Shepherd led his group forward and fired on 1AG, getting a kill and 3 shock. When 1AG failed its activation roll, the three survivors promptly surrendered (0 FM pts). The 50mm mortar crew heard the commotion, turned, and fired their rifles at the Lt/3A, to no effect. 1FG, on the top floor, did the same, getting only 1 shock, while the German HMG and 2nd Plt exchanged fire. The German Platoon Commander, on the 2nd floor, fired his pistol at 3A, to no effect. Ford led 2B in a sprint across the field towards the mortars, which continued to fire on 2nd Plt.
Turn 2:


Turn 3:


1st Platoon once again carried the day, with minimal casualties, though two squad leaders were hit. The company consolidated on this position, and set about reorganizing itself in preparation to begin moving east on the long march to Messina.
The Germans lost:
14 WIA/KIA
5 POW
2 80mm mortar tubes captured
Our casualties:
Sgt Hurley Reyes (2nd Squad) *Negative Morale Event (casualties) (2/3); Shot in head, Purple Heart (3); Submitted for Bronze Star (5); Positive Morale Event (personal and unit performance, friendship with Sgt Hume) (6/7); Negative Morale Event, downgraded to Level I leader (death of Hume) (7/8); KIA (9)
Sgt Glenn *Repl from E Co, 2nd Bn (3/4); Ran in the face of the enemy (4); Transferred from 2nd Squad to 3rd Squad (4/5); Submitted for Distinguished Service Cross (5); shot in neck, Purple Heart (6); shot in arm, Purple Heart (9);
PFC Uniform (3rd Squad) *Submitted for Bronze Star (4): shot in jaw, Purple Heart (6); Promoted to PFC by Lt (6/7); KIA (9)
Awards recommendations:
-PFC Alston (2nd Squad), submitted for Bronze Star for taking his own initiative, under heavy fire, to eliminate a German mortar position taking fellow members of 2nd Squad under intense, accurate fire, then charging key elements of a German machine gun position pinning 2nd Platoon in exposed positions.
Captain Linus and the remainder of Dog Company moved into blocking positions to isolate Marsala as other element of the 82nd Airborne Division set about the grim task of clearing the Germans and Italians from that city.
V/R,
Jack
All Americans, Part 8 (Sicily 23 July 43)
All,
 While 1st Platoon's scouts had spotted a tripod mounted MG-42 atop a hill to their front, the Lt oversaw the emplacement of the .30 cal MMG, then split the platoon in two, leading half to the left while SSgt Ford led the other half to the right. Everyone had orders to hold fire until the last possible moment. White chips are German Type A blinds (potential enemy positions).
 US left: bottom center is the two-man bazooka team led by Sgt Carlyle (left) and the two-man MMG team led by Sgt Lapidus of Wpns Plt (right). Ahead of them on the left is 2nd Squad's BAR team led by Cpl Keepers, while the Lieutenant, tired of (what he sees as) Sgt Reyes' lack of motivation, takes control of 2nd Squad's rifle team himself. All the green beads mean the teams have gone tactical, i.e., are making best use of the terrain, and thus are harder to spot and shoot.
 On the right, the Plt Sgt (SSgt Ford, dead center), is leading 1st Squad's BAR team (left), led by Cpl Locke, and 3rd Squad's rifle team (right), led by Sgt Glenn.
 Atop the hill in center is a German MG-42 (HMG) on a tripod. These are the only Germans that are starting on the table, all others are on blinds that will be rolled up once the HMG team spots the American paras advancing. This position is the US objective, while holding it is the German objective.
 Turn 1 and 2 amounted to the bazooka and the MMG sitting tight, while the Lt led 2A up to the wall ahead, halted them, then 2B started on their way up to the wall;
 and the Plt Sgt led 1B and 3A into the woods on the right. At this point, US forces were spotted and all the German forces were placed on the table. The Germans in the center are AG2, and are the only Germans are on their weak left flank.
 The German right: top left is a German assault group (AG1), while their accompanying fire group (1FG) is immediately to their right (behind some bushes on the hill), just below the HMG at top right. At bottom right is another fire group, 2FG, who's accompanying assault group (AG2) was shown in the preceding pic opposite SSgt Ford, 1B, and 3A.
Turn 3:
 On the left, the Lt and 2A hopped the wall moved forward, while 2B rushed up to the wall and opened up on 1FG on the hill, getting only one shock. 1AG, on the far left, decided to sprint right to the German held hill. 2FG, at ground level in the center, opened up on 3A, getting a couple shock.
 Then a ferocious machine gun duel ensued. The US MMG fired on 1FG (on the hill below the HMG), getting an amazing 2 kills and 3 shock. But 1FG managed to activate and unleash a torrent of fire, getting three kills, which knocked out Sgt Carlyle (our now famous bazooka gunner), Sgt Lapidus (the MMG team leader), and the MG a-gunner. The bazooka assistant gunner then moved over and took control of the MMG, returning fire at 1FG, getting another kill and another shock. The paras lost 2 FM points.
 On the right, 3A, now on the left, 1B (on right), and the Plt Sgt all fired on 2AG, getting 3 kills and 6 shock, including their NCO (-3 FM), while they and the HMG returned fire but only managed a couple shock. The German Plt Sgt, with 2AG, managed to rally a few shock off of them.
Turn 4:
 The MMG again cut loose on 1FG, killing the NCO (-2 FM), and causing the gunner to flee (another -1 FM). The Lt and 2A rushed to the wall (at center left) and opened up an enfilade fire on 2FG (behind bushes at center right), and 2B opened up on 2FG also, but the whole mess didn't kill anyone, but managed 5 shock. Atop the hill, 1AG now sees the Lt and 2A, and decides to sprint back to their original positions.
 On the right, the Germans activate first, and the remainder of 2AG and the German Plt Sgt decide to make a run for it (top center, behind knoll). Then I rolled up a random event, which called for a non-player character to do something stupid... SSgt Ford heard a 'follow me, men!' and thought, 'what the hell is going on?' Cpl Locke decided he was not going to let those Germans get away, and so he got 1B to its feet and took off in hot pursuit (top right, on knoll). Ford was not happy in the least, knowing that 2AG running was already a victory, and the BAR team's firepower was necessary to cover 3A advancing on the HMG position. Instead, the German 2FG somehow manages to activate and gets a bunch of shock on 3A. Ford pulls shock, but 3A fails its activation roll. Locke will be scolded for his zealousness...
Turn 5

I got another couple fights in this morning, and here's the first one. 1st Platoon was pretty beat up, but the Lt reorganized and prepped for the assault in the morning. The platoon was up and at it, moving into their jump-off positions at 0330, and launching their assault at sunrise. However, the Germans had recently vacated their positions, so the Dog Company was able to rack up a cheap victory. However, Capt Linus ordered the company forward, with 2nd Platoon straddling the road, 1st Platoon off the road to the right, and 3rd Platoon in reserve, and soon Germans were spotted. Lt Shepherd, having become a big fan of infiltration tactics, i.e., getting as close to the enemy as possible prior to the onset of shooting, was a bit perturbed to see 2nd Platoon opening up on the Germans at a range of about 600 yards.


Turn 3:


Turn 4:


Turn 5

But Locke would be exonerated, and actually carry the day. US activated first, and Locke led his team into close combat with the German Plt Sgt and 2AG, who promptly surrendered, costing the German forces 3 FM points, breaking them. Another victory for the platoon, though there was still work to be done.
The Germans lost:
6 WIA/KIA
8 POW
Our casualties:
Sgt Boone Carlyle (HQ Element) I *Submitted for Bronze Star (1); Submitted for Bronze Star (3); Promoted to Sgt by Comp Cmdr (3/4); Submitted for Distinguished Service Cross (5); WIA, evacuated, Purple Heart (8);
Pvt Noonan (3rd Squad) *Repl (6/7); shot in neck, Purple Heart (7); WIA, evacuated, Purple Heart (8);
PFC Ertz (3rd Squad) *Repl (3/4); Transferred from 1st Squad (5/6); shot in groin, locally evacuated and treated, return 18 July 43, Purple Heart (6); Promoted to PFC by Lt (6/7); shot in calf, locally evacuated and treated, return 26 July 43, Purple Heart (8);
Sgt Frank Lapidus (Wpns Plt/MMG) *(2); (3); (5); (6); shot in shoulder, Purple Heart (7); KIA (8)
Pvt Clue (Wpns Plt/MMG) *Shot in hip, Purple Heart (5); (6); (7); shot in shoulder, Purple Heart (8);
Awards Recommendations:
-PFC Ignacio submitted for the Bronze Star for performing life-saving medical care on Sgt Carlyle under intense enemy fire, then manning the platoon's machine gun as the sole survivor of a four-man team and delivering timely and accurate fire which destroyed an enemy light machine gun emplacement.
-2nd Lt Shepherd and SSgt Ford went round and round about this; on the one hand, Cpl Locke led a pursuit and then close combat with an enemy team that resulted in (due to the drop in enemy force morale) of the reduction of the entire enemy position. However, he did so without orders and with a total disregard for the safety of his own men and the tactical situation of the platoon. Had the German platoon not broken, it's likely the platoon would have found itself overextended, out of position, and defeated piecemeal by the remaining enemy forces. As such, the platoon's leadership simply could not support rewarding Cpl Locke's reckless, though valorous behavior. Cpl Locke stated he understood when counselled by the PC and Plt Sgt; only time will tell if he truly accepted this reasoning.
In any case, those conversations took place later that evening, as immediately there was business to tend to. There are more enemy forces nearby, giving 2nd Platoon a rough time. The loss of Sergeants Carlyle and Lapidus (though a Wpns Plt attachment, he had spent quite a bit of time here in Sicily in support of the platoon and was widely respected) was a large blow to the men's psyche, but there's work to do.
On a side note regarding the Platoon Forward system, you'll note that the platoon has taken a lot of casualties but is still succeeding in its missions. The reason for this is that Plt Fwd bases the enemy forces proportionately to your own forces, meaning its most likely you will be given just enough enemy forces that you can handle, though (through dice-rolling) it's possible every now and again to come up against too many or too few. I think it works like a champ (nobody wants a string of walkovers or a string of butt-whoopin's, I think).
V/R,
Jack
Monday, October 14, 2013
All Americans, Part 7 (Sicily 22 July 43)
All,
The next phase of the battle sees the 82nd Airborne moving west along the coastal road towards Marsala, largely against inferior opposition, while the German frontline units pull back towards Messina at the northeast tip of the island. 1st Platoon is being brought back into the line to face off against flagging German and Italian opposition. Up next for the platoon: Card H, "Screen." Engineers will be off-board checking a substantial portion of road to determine if it can support an armored column, while 1st Platoon screens them from enemy action. The platoon is at full strength and will have battalion 81mm mortars, an M-3 Stuart, and Sgt Lapidus' MMG in support, covering Sgt Austen's engineers. Also, the Lt has put it off a couple fights already, but his college chum, 1Lt Nickelson, has been begging to accompany Shepherd on a mission, and this seems to be as good as any. (That's what I get for writing up the intro last night but playing this afternoon; I forgot about the 81s and about bringing the Lt's buddy...)
 Over view of the table, US at bottom. A fairly open map (lotsa fields), with substantial hills at center left and center, rough ground at bottom center. You can see the Germans at top right.
 US left, with 1B up top, 1A down below, and the M-3 Stuart.
 US center, from left to right: bazooka team, Lt and RTO, 3B (top), and 3A (bottom).
 US right, top to bottom: MMG team, 2B, and 2A.
 Another shot of the US right, with Germans across from them. At top left is German 1AG, top center is 1HMG, center is FG, immediately to its right is 2AG, immediately above that (behind bushes) is 2HMG, above that is a Sdkfz 222 Armored Car and a Pz Mk III (long 50mm).
 German left: top left is 2AG, top right is FG, and bottom center is 2HMG.
 German right, from left: 1HMG and 1AG.
 Pz Mk III and Sdkfz 222.
 The entire German force. They are trying to break through to the US engineers (off-board on the US baseline). 1st Platoon will roll 1D6 at the end of each turn and must hold until a cumulative count of 20.
Turn 1:
 US left: Not much German action, so 1st Squad and the Stuart all moved up. You can see some Germans at top right, where the A/C moved quickly in this direction, and 1AG sprinted up the hill into the trees.
 Center: The MMG team fired at the German FG (center, in the field), getting a kill and 3shock. The 2 German HMGs started piling shock on 3B and the MMG team, and so the PC and Plt Sgt spent their activations rallying the men. 3A and the bazooka team moved up on the left, while 2B, who couldn't get a shot off around the MMG team and 2A on the right, moved up into the field at center. Surprisingly the German 2AG climbed the rise at far right, putting them face to face with the MMG and 2A, while the PzIII crossed the ford and moved forward.
 View of German left.
The engineer roll was a score of 1...
Turn 2:
 US Left: The Stuart went on OW, and shortly thereafter the German AC rounded the corner and got blown up. 1B (on left) and 1A both moved up, with 1A trading fire with 1AG atop the hill, and 1A coming out the worse for it with a man down.
 On the US right, the bazooka team joined 3A in the treeline, while the Germans concentrated their tank and HMG fire there, trying to protect their FG caught out in the field. You can see 3A and the bazooka team racking up some bodies and shock.
 On the far right, 2A and 1MMG combined to mow down the German 2AG, but in the field to left, the Germans got a couple hits and a couple shock on 2B (the Lt is there trying to rally them).
Engineer roll is 5, up to 6.
Turn 3:
 On left, Stuart and 1st Squad put a couple kills and some shock on 1AG.
 On the right, 2A and the MMG on far right are mostly ineffective, while Plt Sgt moves to 2B and the PC and his RTO sprint left to join 3A and the bazooka team. However, the Panzer and three MG42s all take the area under fire, and the Lt and his RTO both fall in a hail of bullets (top left)!!! The bazooka team bounces a rocket off the front glacis of the PzIII, damaging its sights.
 Lastly, 3B (just off camera at top right) gets a very lucky hit on 2HMG (bottom left) and puts the gun out of action. The red bead shows the Panzer's damaged sight.
Turn 4: Sgt Carlyle is pissed, and stands full upright amid the hail of incoming machine gun rounds, and calmly send a rocket straight into the PzIII, blowing the turret off. "That's for the Lieutenant..."
This broke the German Force Morale (I didn't relate it in the narrative, but the US paras had a real talent in this fight of knocking off German NCOs, taking big whacks at their Force Morale). Five Germans immediately surrendered, while the rest fell back off the table.
**Now, I broke the German force, but, as this was a screening mission with time still left on the clock, I figured it wasn't right to end the fight here, so I rolled up some German reinforcements and kept at it**
SSgt Ford quickly policed up the platoon, reorganizing and evacuating the wounded. He knew it was only a matter of time before more Germans showed up... And here they come.
 US left: again, 1B up top, 1A at bottom, and Stuart on right.
 US center, with bazooka team at left, 3A at top center, and 3B at bottom right. Plt Sgt is at bottom right as well.
 US right: MMG team at top, consolidated 2nd Squad at bottom.
 And our adversaries, coming in at top center right: A Sdkfz 222 Armored Car, a Sdkfz 251/9 L24 (short 75mm), two Sdkfz 251s, each carrying a rifle squad, and a PC in the kubelwagen.
Turn 4:
 US Left: The Sdkfz 251/9 and a halftrack 1 (HT1) with 1st Squad move right. 1A sprints ahead, while 1B and the Stuart sit tight. In the center, the bazooka team and 3A moved up.
 On the right, the MMG team opened up on the A/C, immobilizing it (though the crew stayed in the fight). The German HT2 moved up and disgorged the German 2nd Squad, while the German PC moved up in his kubelwagen. US 2nd Squad got a kill and a couple shock on 2FG.
 The center, with bazooka team and Plt Sgt at bottom center and 3A atop the hill in center. You can see the immobilized AC at top right, as well as the German HT2 and 2nd Squad.
Turn 5:
 US Left: The Stuart went on overwatch, and along came the German Sdkfz 251/9, which promptly got blown up. 1B sprinted up next to 1A, but this allowed the German HT1 to dismount its 1st Squad. The next card was alos German, and so 1FG scaled the hill and found 1A milling about in the open; 1FG promptly puts 1 kill and 2 shock on 1A, putting down Sgt Hume! 1A then failed its activation roll. 3A (top right) moves left and fires on 1AG catching them in the open. They lost two men before taking cover behind the destroyed AC (from the early part of the battle). The bazooka team is just below 3A on far right; Carlyle put a rocket into the side of HT1, destroying it.
 In the center, the German PC dismounts to rally his forces. 2FG (in the field next to PC) got a kill on the US MMG team, dropping them to 2 men. You can see the AC burning, because...
 The MMG (far right) opened up on the AC again, this time firing a whole belt into it before it caught fire. 2AG and 3B square off on each other at far left, both sides somehow firing ineffectually...
The German FM is now at 1, and the magical number of '20' has been broached, so the engineers are finished. Rather than simply 'call' the game, I decided to play it out as the two sides were locked in close combat.
Turn 6:
 On the left, the Stuart put 3 shock on 1FG, but it managed to activate and mowed the whole damned team down! 1B and the bazooka team (far right center) returned fire to no real effect. 3A (top right) and the Plt Sgt (bottom right) both engaged 1AG, getting only 1 kill. As good as the Plt Sgt is as a leader and in close combat, he sucks when shooting (3 dice at close range as I play him as having a Thompson)!!!
 2FG and the US MMG exchange fire, with 2FG losing another man, and the MMG team losing one also, dropping it to one man!
 2nd Squad (bottom right) opened a torrent of fire on 2AG (top right), killing three of them. The BAR gunner from 3B looked at his two comrades and decided to go for it! In the ensuing close combat, the German team was eliminated and the BAR man was also put down. This caused the German Force Morale to break. To be honest with you, I was really not happy with my decision to continue on with the game; I had two earlier decision points in which I could have ended the game; the moment the original German forces FM broke, and then when the engineer roll was finished. But I decided to press on, and it cost me heavy casualties, including my beloved Sgt Hume, the leader of 1st Squad. The mission was accomplished, the engineers found a route to support the tanks from 2nd Armored Division in the thrust towards Marsala, but it sure cost the platoon. C'est la guerre...
The Germans lost:
40 WIA/KIA
7 POW
1 Pz MkIII destroyed
2 Sdkfz 222s destroyed
1 Sdkfz 251/9 destroyed
1 Sdkfz 251/1 destroyed
Our Casualties:


Turn 1:


The engineer roll was a score of 1...
Turn 2:


Engineer roll is 5, up to 6.
Turn 3:


Turn 4: Sgt Carlyle is pissed, and stands full upright amid the hail of incoming machine gun rounds, and calmly send a rocket straight into the PzIII, blowing the turret off. "That's for the Lieutenant..."
This broke the German Force Morale (I didn't relate it in the narrative, but the US paras had a real talent in this fight of knocking off German NCOs, taking big whacks at their Force Morale). Five Germans immediately surrendered, while the rest fell back off the table.
**Now, I broke the German force, but, as this was a screening mission with time still left on the clock, I figured it wasn't right to end the fight here, so I rolled up some German reinforcements and kept at it**
SSgt Ford quickly policed up the platoon, reorganizing and evacuating the wounded. He knew it was only a matter of time before more Germans showed up... And here they come.


Turn 4:


Turn 5:


The German FM is now at 1, and the magical number of '20' has been broached, so the engineers are finished. Rather than simply 'call' the game, I decided to play it out as the two sides were locked in close combat.
Turn 6:


The Germans lost:
40 WIA/KIA
7 POW
1 Pz MkIII destroyed
2 Sdkfz 222s destroyed
1 Sdkfz 251/9 destroyed
1 Sdkfz 251/1 destroyed
Our Casualties:
2Lt Jack Shephard (PC) *Submitted for Bronze Star (3); Submitted for Bronze Star (5); shot in arm, Purple Heart (7);
Pvt Alcee (HQ Element) *Repl (3/4); WIA, evacuated, Purple Heart (7)
Sgt Desmond Hume (1st Squad SL) *Shot in foot, Purple Heart (1); Shot in bicep, Purple Heart (4); 1st Sgt of Wpns Co has a positive view (4/5); KIA (7)
Cpl Baker (1st Squad) *Shot in forearm, Purple Heart (1); Promoted to Cpl by Lt (6/7); KIA (7)
Pvt Dodge (1st Squad) *Repl (6/7); WIA, evacuated, Purple Heart (7)
Pvt Calhoun (1st Squad) *Repl (6/7); WIA, locally evacuated, return 26 July 43, Purple Heart (7);
Pvt Edge (1st Squad) *Repl (6/7); shot in jaw, Purple Heart (7);
PFC Farr (2nd Squad) *Repl (3/4); Shot in shoulder, Purple Heart (4); Shot in foot, Purple Heart (5); Promoted to PFC by Lt (6/7); WIA, evacuated, Purple Heart (7);
Pvt Johnson (2nd Squad) *Repl (3/4); Shot in thigh, Purple Heart (5); WIA, locally evacuated, return 26 July 43, Purple Heart (7);
PFC India (2nd Squad) *Shot in calf, Purple Heart (2); Transferred from 1st Squad (4/5); Promoted to PFC by Lt (6/7); shot in thigh, Purple Heart (7);
Pvt Jackson (2nd Squad) *Repl (6/7): shot in hand, Purple Heart (7);
Pvt Mickelson (3rd Squad) *Repl (6/7); WIA, evacuated (7);
Pvt Noonan (3rd Squad) *Repl (6/7); shot in neck, Purple Heart (7);
Cpl Charley Pace (3rd Squad) *Shot in torso, locally evacuated and treated, return 14 July 43, Purple Heart (2); shot in calf, locally evacuated, return 24 July 43, Purple Heart (7);
Pvt Oliver (3rd Squad) *Repl (6/7); WIA, evacuated, Purple Heart (7);
PFC Herby (3rd Squad) *Repl (2/3); shot in groin, locally evacuated and treated, return 14 July 43, Purple Heart (3); Promoted to PFC by Lt (6/7); KIA (7)
Cpl Frank Lapidus (Wpns Plt/MMG) *(2); (3); (5); (6); shot in shoulder, Purple Heart (7);
Pvt Apple (Wpns Plt/MMG) *(2); (3); (5); (6); WIA, evacuated, (7);
Pvt Ronson (Wpns Plt/MMG) *Repl (6/7); KIA (7)
To be honest, the platoon is a bit distraught; the last fight was pretty traumatic. First, the platoon was facing pretty overwhelming odds regarding two waves of German infantry backed by armor. Then seeing Lieutenant go down (though he's okay now). Then the death of their most popular squad leader. Some of the men are starting to wonder if Sgt Hurley is going to make it; he's clearly depressed again following the death of his good friend. The platoon is missing a full rifle squad, and everyone's worried; if the Krauts will put up that kind of a fight on just the road to Marsala, what the hell is waiting for them in Marsala? And everyone saw Captain Linus call a huddle with Lt Shepherd and SSgt Ford; no replacements, and the platoon will be moving up to its jump-off positions early in the morning...
V/R,
Jack
Subscribe to:
Posts (Atom)
Hell on Wheels, 'Blade Force' Fight #10
All, 1030 Local Time 26 November 1942 Near Chouigoui, French Tunisia At dawn the tanks of 10th Panzer Division crashed into Blade Force'...

-
 All, 1030 Local Time 26 November 1942 Near Chouigoui, French Tunisia At dawn the tanks of 10th Panzer Division crashed into Blade Force'...
 -
 All, 1630 Local Time 25 November 1942 Near Chouigoui, French Tunisia Following Blade Force's successful advance to, and capture of, Chou...
 -
 All, I am back! I haven't posted a batrep in ages; I've played a few games with different rules, but they all left me cold, aggrav...