All,
It's now 1300 on 2 April 1943, land the squad is still manning its observation post southwest of the village of Al-Egheila. Earlier they'd spotted a German panzer and informed the command post, which called up friendly tanks. It seemed kind of strange, but the men of the squad saw a single M4 Sherman roll into town, and then a hell of a ruckus kicked up. It sounded like a shedload of 75mm shells were tossed back and forth, with plenty of dust and smoke kicked up. Every now and again the GIs could spot a tank maneuvering too and fro, though they weren't really sure if it was theirs or the other side's. After about ten minutes it got quiet again, and then about ten minutes after that an even larger conflagration broke out further north. The men couldn't really see anything, but the constant roll of thunder left no doubt some serious death and destruction was happening amongst the steel beasts.
Again it got quiet, and not too long after the platoon runner, CPL Birden, showed up at the OP and told SGT Cherry that the Lieutenant wanted him to send a patrol out to see what happened to the US tank on the south end of town. SGT Cherry told CPL Hackett to take a handful of men in and take a look; everyone was pretty sure the missing tank was probably knocked out, but they wanted to make sure, and see if any survivors out there needed help.
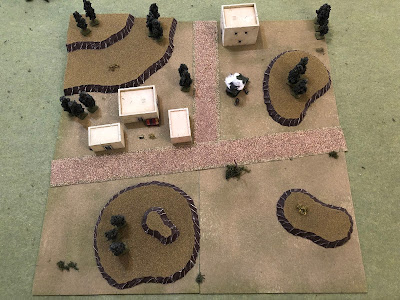
Overview, north is up. This is the southern end of the Arab village of Al-Egheila, with a scattering of trees and buildings, a few hillocks, a hardball road, and Lt Barker's burning Sherman at center top.
I played the first few skirmishes with Five Men in Normandy, but now I've returned to my favorite, Five Men at Kursk, and the games were a blast (got four in this past weekend). I'm playing in 15mm with Battlefront/Flames of War troops, Warzone hills, Wargamer's Terrain roads and rivers, and Crescent Root buildings.
Lt Barker's burning Sherman, the objective of the patrol. It's a late war model from Plastic Soldier Company, I couldn't find my early war model :(
The opposing forces, with doughboys on the left and Afrika Korps on the right.
The US troops, led by CPL Hackett (bottom right) and his Thompson SMG. The rest of the men all have M-1 Garands.
The Germans are a ragtag, stay-behind force, consisting of a Corporal with MP-40, an MG-42 and assistant, and a rifleman with Mauser 98K.
Overview, this time with forces. The US patrol has entered from the southwest (bottom left), while the Germans are spread across the top half.
The Americans, from left: PVT Saxon, CPL Hackett, PVT Jones, PVT McGovern, PVT Graham, and CPL Petry (meritoriously promoted after both of the first two fights, and awarded the Bronze Star).
Looking at the northwest (top left) corner of the board, the German MG team is at left (gunner at bottom left, assistant gunner at top left) and their Corporal is at top right.
Looking at the northeast (top right) corner of the board, we've got the German Corporal at bottom left and the rifleman at top right, with the burning Sherman at center. Time to fight!
The action begins with CPL Petry leading Graham and McGovern up on the right to establish a base of fire, should things get interesting.
The men (bottom center) scan the area, but don't see anything (the German rifleman is at top right, but they don't see him and he hasn't spotted them yet, either, and the German CPL is behind the building at top center).
With CPL Petry and his guys keeping an eye out (far right), CPL Hackett moves into the street (top center left...
But the German Corporal (bottom center right) has spotted him and cuts loose with his MP-40.
The rounds zip by his head and kick up gravel from the road, but CPL Hackett hangs tough (bottom center), levels his Tommy Gun, and returns fire, dropping the enemy NCO!
Saxon and Jones moves up past CPL Hackett, but they don't spot the German machine gunner behind the wood at top left.
But the wily German sees them (off camera to bottom center), so he quietly motions his assistant and they fall back (top left).
And set their gun up.
Alerted by the gunfire that killed his leader, the German rifleman on the far right (German left) flank creeps up a wooded knoll and takes up position (bottom left, with CPL Petry's group at top left and CPL Hackett's at top center. The German MG team is just off camera to top right).
Graham moves over to get a better view (third soldier from the bottom, second is McGovern and first is CPL Petry)...
And that's when the right-flank German (bottom right) decides to open fire.
The round misses, causing Graham to flinch, but CPL Petry spotted the source of the gunfire and he and McGovern return fire, pinning the German rifleman.
On the left, Saxon (center left) picks his way forward cautiously, while Jones (center) and CPL Hackett (far right) enter the building compound.
But the right flank German rifleman spots CPL Hackett and fires...
The enemy fire knocks CPL Hackett down (white bead) and pins Jones (yellow bead).
CPL Petry and McGovern again lay fire into the far right copse of trees, this time suppressing the enemy rifleman (top right).
But back on the (American) left, the German MG team (bottom left) has spotted Saxon needling through the trees and opens fire, but the plucky 17-year old from Georgia is unfazed.
Jones manages to self rally, despite staring at his Corporal lying in the road.CPL Petry and McGovern (bottom right) continue laying down fire as Graham dashes into the street (top center, with Jones at top left) to assist CPL Hackett.
Back on the left, crazy-ass Saxon (bottom center) has decided to stand tall and shoot it out with the enemy machine gun team. He raises his Garand and begins snapping rounds off as fast as he can, even though he hasn't actually seen the bad guys.
Ever longing to be the hero, the kid steps out of the trees, looking to charge up the hill.
The German MG (bottom left) barks again...
Saxon is suppressed (red bead). Unable to believe his luck at not being hit, he crawls below the shelf from the hill, seeking dead ground. The German assistant gunner, fearful of a grenade attack on their position, moves down (center left) to finish off the foolish American.
On the right flank, the German rifleman manages to rally himself.
Back in the center, Graham drags CPL Hackett to cover and checks him, but he's hurt and out of the fight, as Jones looks on.
CPL Petry and McGovern (bottom center) continue sending lead into the German rifleman's vicinity (top right, with Graham, Jones, and the injured CPL Hackett at top left), pinning him again.
Which allows CPL Petry to dash right (center right, with McGovern at bottom center) and try to flank him (top left).
Back on the left, Saxon rallies himself back into the fight (red bead at top left), calling out for help. Jones (bottom right) here's his buddy's call...
So he pulls himself up onto the roof to get a better look.
Where the German MG (bottom left) sees him (top center)...
And promptly fills him full of holes.
The German gunner turns back on Saxon (top right) as his assistant readies a hand grenade (blue bead).
As the assistant pops up to throw, Saxon raises up and fires...
But he misses, and the potato masher lands right next to his foot!
Saxon kicks the grenade and rolls over as it explodes harmlessly!
Back on the right, the German rifleman (bottom right), though pinned, has spotted CPL Petry's mad dash (top left) and opens fire, cycling the bolt as quickly as he can.
But McGovern's (bottom left) covering fire is enough to throw off the German's (top right, with CPL Petry at far right) aim, so Petry is able to make it to cover.
Where he (bottom left) quickly turns and fires, putting the enemy rifleman out of the fight!
With CPL Hackett (bottom right) and Jones (top left) both down and a German MG team off somewhere to his left, Graham moves up between the buildings to get a look (top center, from bottom center).
He peeks around the corner (bottom left) and spots the enemy assistant gunner out in the open. He quickly raises his rifle and fires.
Dropping the bad guy (bottom right). The German machine gunner (top left) sees this...
And decides to throw in the towel: "Kamerad! Nicht scheissen (or something like that)!"
"Well, I think we found the missing Sherman. Let's mark for Graves Registration, then grab CPL Hackett and Jones and get the hell back to the OP!"
The patrol accomplished its mission, killing three enemy soldiers and capturing one while verifying the location of the Sherman and the disposition of its crew, but at quite a cost. CPL Hackett was hit bad enough to miss a couple weeks, and Jones, riddled with bullets from the MG-42, ended up losing a leg and being sent home to recover and return to his jazz band in Louisiana.
They patrol returned to SGT Cherry at the OP, and then the squad was called to rejoin the platoon. Shortly thereafter the platoon was tasked to go and clean out the north end of Al-Egheila, and SGT Cherry's squad was tasked with leading the way in.
V/R,
Jack


Great game report- thanks for sharing. You came up with a great idea for a scenario that could be used in a variety of setting- I may adapt it myself it that's ok?
ReplyDeleteCheers,
Pete.
Pete,
DeleteThanks man, and of course, adapt away! ;)
V/R,
Jack
Another excellent report. How do the spotting rules work in this? I was quite interested in how it impacts on the early bit of the game. And also, are you using in-game mechanics for the Germans, or doing "best move" solo play? For example, how were the German machine gun team's actions (the grenade and the surrender) handled?
ReplyDeleteJohn,
DeleteSpotting rules are simple: based on the 'quality' of the attempt you roll 1, 2, or 3 dice, spotting on 1s or 6s (everything in 5Core is 1s and 6s).
The assistant gunner busting out the grenade was just a 'best move' thing (Cpl Saxon had gone to ground and was out of LOS, but the Germans obviously knew he was there, though often times I'll come up with 'most likely course of action,' 'most dangerous course of action,' and something off the wall (as you read about in plenty of actions, the guy was in a great position but decided to fall back, or move up to get a better view), weight them, and roll a D10 to see what he decides to do.
The surrender was just me calling the game from, hopefully, a common sense standpoint. That is, this is North Africa, relatively early in the war, that machine gunner wasn't going to fight to the death once all his buddies were dead.
V/R,
Jack