Sunday, May 20, 2018

Blood & Guts, Tunisia, Fight #5

All,

It's now 1300 on 2 April 1943, land the squad is still manning its observation post southwest of the village of Al-Egheila.  Earlier they'd spotted a German panzer and informed the command post, which called up friendly tanks.  It seemed kind of strange, but the men of the squad saw a single M4 Sherman roll into town, and then a hell of a ruckus kicked up.  It sounded like a shedload of 75mm shells were tossed back and forth, with plenty of dust and smoke kicked up.  Every now and again the GIs could spot a tank maneuvering too and fro, though they weren't really sure if it was theirs or the other side's.  After about ten minutes it got quiet again, and then about ten minutes after that an even larger conflagration broke out further north.  The men couldn't really see anything, but the constant roll of thunder left no doubt some serious death and destruction was happening amongst the steel beasts.

Again it got quiet, and not too long after the platoon runner, CPL Birden, showed up at the OP and told SGT Cherry that the Lieutenant wanted him to send a patrol out to see what happened to the US tank on the south end of town.  SGT Cherry told CPL Hackett to take a handful of men in and take a look; everyone was pretty sure the missing tank was probably knocked out, but they wanted to make sure, and see if any survivors out there needed help.
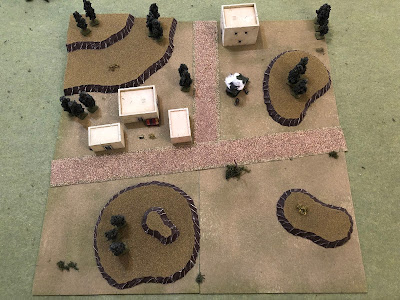
Overview, north is up.  This is the southern end of the Arab village of Al-Egheila, with a scattering of trees and buildings, a few hillocks, a hardball road, and Lt Barker's burning Sherman at center top.

I played the first few skirmishes with Five Men in Normandy, but now I've returned to my favorite, Five Men at Kursk, and the games were a blast (got four in this past weekend).  I'm playing in 15mm with Battlefront/Flames of War troops, Warzone hills, Wargamer's Terrain roads and rivers, and Crescent Root buildings.

Lt Barker's burning Sherman, the objective of the patrol.  It's a late war model from Plastic Soldier Company, I couldn't find my early war model :(

The opposing forces, with doughboys on the left and Afrika Korps on the right.

The US troops, led by CPL Hackett (bottom right) and his Thompson SMG.  The rest of the men all have M-1 Garands.

The Germans are a ragtag, stay-behind force, consisting of a Corporal with MP-40, an MG-42 and assistant, and a rifleman with Mauser 98K.

Overview, this time with forces.  The US patrol has entered from the southwest (bottom left), while the Germans are spread across the top half.

The Americans, from left: PVT Saxon, CPL Hackett, PVT Jones, PVT McGovern, PVT Graham, and CPL Petry (meritoriously promoted after both of the first two fights, and awarded the Bronze Star).

Looking at the northwest (top left) corner of the board, the German MG team is at left (gunner at bottom left, assistant gunner at top left) and their Corporal is at top right.

Looking at the northeast (top right) corner of the board, we've got the German Corporal at bottom left and the rifleman at top right, with the burning Sherman at center.  Time to fight!

The action begins with CPL Petry leading Graham and McGovern up on the right to establish a base of fire, should things get interesting.

The men (bottom center) scan the area, but don't see anything (the German rifleman is at top right, but they don't see him and he hasn't spotted them yet, either, and the German CPL is behind the building at top center).

With CPL Petry and his guys keeping an eye out (far right), CPL Hackett moves into the street (top center left...

But the German Corporal (bottom center right) has spotted him and cuts loose with his MP-40.

The rounds zip by his head and kick up gravel from the road, but CPL Hackett hangs tough (bottom center), levels his Tommy Gun, and returns fire, dropping the enemy NCO!

Saxon and Jones moves up past CPL Hackett, but they don't spot the German machine gunner behind the wood at top left.

But the wily German sees them (off camera to bottom center), so he quietly motions his assistant and they fall back (top left).

And set their gun up.

Alerted by the gunfire that killed his leader, the German rifleman on the far right (German left) flank creeps up a wooded knoll and takes up position (bottom left, with CPL Petry's group at top left and CPL Hackett's at top center.  The German MG team is just off camera to top right).

Graham moves over to get a better view (third soldier from the bottom, second is McGovern and first is CPL Petry)...

And that's when the right-flank German (bottom right) decides to open fire.

The round misses, causing Graham to flinch, but CPL Petry spotted the source of the gunfire and he and McGovern return fire, pinning the German rifleman.

On the left, Saxon (center left) picks his way forward cautiously, while Jones (center) and CPL Hackett (far right) enter the building compound.

But the right flank German rifleman spots CPL Hackett and fires...

The enemy fire knocks CPL Hackett down (white bead) and pins Jones (yellow bead).

CPL Petry and McGovern again lay fire into the far right copse of trees, this time suppressing the enemy rifleman (top right).

But back on the (American) left, the German MG team (bottom left) has spotted Saxon needling through the trees and opens fire, but the plucky 17-year old from Georgia is unfazed.

Jones manages to self rally, despite staring at his Corporal lying in the road.

CPL Petry and McGovern (bottom right) continue laying down fire as Graham dashes into the street (top center, with Jones at top left) to assist CPL Hackett.

Back on the left, crazy-ass Saxon (bottom center) has decided to stand tall and shoot it out with the enemy machine gun team.  He raises his Garand and begins snapping rounds off as fast as he can, even though he hasn't actually seen the bad guys.

Ever longing to be the hero, the kid steps out of the trees, looking to charge up the hill.

The German MG (bottom left) barks again...

Saxon is suppressed (red bead).  Unable to believe his luck at not being hit, he crawls below the shelf from the hill, seeking dead ground.  The German assistant gunner, fearful of a grenade attack on their position, moves down (center left) to finish off the foolish American.

On the right flank, the German rifleman manages to rally himself.

Back in the center, Graham drags CPL Hackett to cover and checks him, but he's hurt and out of the fight, as Jones looks on.

CPL Petry and McGovern (bottom center) continue sending lead into the German rifleman's vicinity (top right, with Graham, Jones, and the injured CPL Hackett at top left), pinning him again.

Which allows CPL Petry to dash right (center right, with McGovern at bottom center) and try to flank him (top left).

Back on the left, Saxon rallies himself back into the fight (red bead at top left), calling out for help.  Jones (bottom right) here's his buddy's call...

So he pulls himself up onto the roof to get a better look.

Where the German MG (bottom left) sees him (top center)...

And promptly fills him full of holes.

The German gunner turns back on Saxon (top right) as his assistant readies a hand grenade (blue bead).

As the assistant pops up to throw, Saxon raises up and fires...

But he misses, and the potato masher lands right next to his foot!

Saxon kicks the grenade and rolls over as it explodes harmlessly!

Back on the right, the German rifleman (bottom right), though pinned, has spotted CPL Petry's mad dash (top left) and opens fire, cycling the bolt as quickly as he can.

But McGovern's (bottom left) covering fire is enough to throw off the German's (top right, with CPL Petry at far right) aim, so Petry is able to make it to cover.

Where he (bottom left) quickly turns and fires, putting the enemy rifleman out of the fight!

With CPL Hackett (bottom right) and Jones (top left) both down and a German MG team off somewhere to his left, Graham moves up between the buildings to get a look (top center, from bottom center).

He peeks around the corner (bottom left) and spots the enemy assistant gunner out in the open.  He quickly raises his rifle and fires.

Dropping the bad guy (bottom right).  The German machine gunner (top left) sees this...

And decides to throw in the towel: "Kamerad! Nicht scheissen (or something like that)!"

"Well, I think we found the missing Sherman.  Let's mark for Graves Registration, then grab CPL Hackett and Jones and get the hell back to the OP!"

The patrol accomplished its mission, killing three enemy soldiers and capturing one while verifying the location of the Sherman and the disposition of its crew, but at quite a cost.  CPL Hackett was hit bad enough to miss a couple weeks, and Jones, riddled with bullets from the MG-42, ended up losing a leg and being sent home to recover and return to his jazz band in Louisiana.

They patrol returned to SGT Cherry at the OP, and then the squad was called to rejoin the platoon.  Shortly thereafter the platoon was tasked to go and clean out the north end of Al-Egheila, and SGT Cherry's squad was tasked with leading the way in.

V/R,
Jack

Saturday, May 19, 2018

Blood & Guts, Tunisia, Fight #3

All,

It's now 1100 on 2 April 1943, two days after the squad's last firefight.  The American column continued pushing northeast, when once again the lead elements spotted movement up ahead in a (presumed) enemy-held village.  Sgt Cherry's squad got the call: they rushed forward, climbing a ridge to the southwest of the village, then took up an observation post approximately 900 yards from the center of town.  Squinting through his field glasses, sweat stinging his eyes, Sgt Cherry glassed the village slowly from west to east.  Twenty minutes passed with only shadows and blurs suggesting problems, until finally his eye was drawn to a desert-colored patch of unnaturally straight lines.  He lowered the binoculars, wiped his eyes, gave them a few seconds to re-focus, before again raising the glasses.  "There you are," he muttered to himself.  "Cpl Petry, run back to the Lootenant and tell him the Germans have a tank on the east end of the village."

Cpl Petry took off and reported back to his platoon leader: the next two hours were filled with runners furiously moving back and forth, responding to questions from their superior officers: how many tanks were there?  What kind of tank was it?  Where exactly is the tank?  Which direction is the tank facing?  Are there any tanks to the southeast?  The north?  The northeast?  How about he southwest?

By 1330 the constant shuttle of runners had drawn attention to Sgt Cherry's position; a machine gun opened up from the village, keeping the Americans' heads down, and the German tank pivoted and began slowly rolling towards their observation post.  Sgt Cherry and his squad quickly beat feet back to the platoon, a mile to their rear, where an American tank platoon of five brand-spanking new M4 Shermans had arrived.

It was April 1943 and the Americans still had much to learn about the ways of war: the American tank platoon commander, 2nd Lt Barker, was wracked by nerves and indecision.  Should I move my platoon forward aggressively?  What if it's a trap?  Should I flank?  What if we run into a minefield?  He made his decision, turning to his Platoon Sergeant: "Sergeant Smith, you are in command of the platoon.  I am taking my vehicle forward in order to determine the enemy's true strength and dispositions."  "Sir, I don't know if that's such a great idea."  "Tut, tut, Sergeant, I'll be right back.  And if I'm not, give them hell!"

And with that, Lt Barker hopped aboard his tank, plugged into the intercom, and ordered his driver forward.

Overview, north is up.  The village of Al Egheila (fictional, of course) is strewn across the map, with various hills, knolls, and escarpments.  The ground is dry and rocky with a hardball road running east and west, with an off-shoot heading north.  Sgt Cherry's squad/Observation Post is off camera to bottom center left.  Lt Barker's vehicle is at bottom left, the sole German vehicle at top right.

This is our first game of Too Fat Lardies' new "What a Tanker."  I'm handling the Sherman and the Boy General is handling the Panzer 4.  We started with just one tank per side so we could get a handle on how the rules work.

Lt Barker's M-4 Sherman, moving up the road.  His tank platoon had arrived in Morocco in M-3 Grants, but somehow when limited amounts of M-4 Shermans began showing up, his company was one of the first to receive them.

Cpl Stichle's Panzer 4.  A veteran of the campaigns in Poland and France, the canny tank commander has spotted movement to the southwest and is cautiously nosing forward to determine the threat.

Both sides are expecting trouble, so both commanders maneuver their vehicles forward and then off the road to their right (US at bottom left, just right of the building, German at top center right, just right of the hill).

Both sides seek the high ground in order to maximize observation and lanes of fire.  The American (bottom center left) gets up on the first level of a nearby hill, but can't really see anything to the northeast due to the second level of the hill, while the German has moved atop the hill at center top and cunningly pulled into the cover and concealment of some nearby scrub, making him more difficult to see and hit.

Looking west (bottom) to east (top), Lt Barker rolls his vehicle forward of the second contour (bottom right), but the German has already dropped down into the lee of the hill (far left).

Looking south (bottom) to north (top), the greenhorn American Lieutenant acts a bit too aggressively.  He pushes his tank down the embankment and up to a nearby Arab building (left), as the German Corporal nudges his vehicle forward (top center).

"Target, 100 meters, armor piercing!"  "Up!" "Fire!"  The German's long 75mm gun roars and Cpl Stichle watches the tracer as the round strikes the front glacis of the Sherman and ricochets off!  "Reverse!"

The German vehicle pulls back and reloads (center top left) as Lt Barker's gunner and loader point and chuckle about the wet spot that just appeared on the Lieutenant's pants (bottom right).  "Driver, up!"

The American tank rolls forward to point-blank range, lurches to a halt, and fires!

The 75mm round misses, throwing up a massive shower of dust and smoke.  The American crew is working like a well-oiled machine: they quickly reload and fire again!

This time the round strike the front hull of the German panzer, but it fails to penetrate!  The German crew is shook up and their driver backs them up.

Just then Cpl Stichle regains his senses: the crew reloads and he orders the driver forward again.  They reacquire the American and the gunner mashes the trigger... "Misfire!!!" (snake eyes)  The German crew frantically works to dislodge the 75mm round lodged in the barrel.

The American Lieutenant is confident; his gunner has already struck the enemy tank twice, and he can clearly see that something is wrong with the Kraut tank.  His driver rolls forward slowly as the loader slams a fresh round in the chamber and again the Sherman's gun roars...

But it's a third non-penetrating hit, serving only to further shake up the German crew (losing more command dice).  Somehow, despite the barrage of fire they've been subjected to, Cpl Stichle is able to get his crew to clear the tube, reload, reacquire, aim, and fire again, but again they bounce a round off the Sherman's front armor!!!

Lt Barker moves his tank left, and the Sherman bounces a fourth shot off the armor of the Panzer IV.

And the Germans return the favor.  The round doesn't penetrate but severely disorients the Yank crew (-2 command dice).

Another shot by the Sherman and another hit...

But again it's non-penetrating and the German backs out.  This was key as the American had another shot to take, but lost aim when the German was forced to back out.

The German commander, Cpl Stichle, has been incredibly adept at keeping his crew rallied and in the fight (the boy has rolled an incredible amount of 6s, allowing him plenty of aim/reload//shoot, but also 'buying back' lost command dice).  The German commander pushes his tank forward, flanking the American!

The German opens fire at less than 50 yards, and their aim is true...

But still the round does not penetrate!  Having said that, the American crew is a shambles (down to only two command dice after sustaining this hit).

Lt Barker desperately screams at his driver to make all speed towards the cover of a nearby hill.

But the American crew is too discombobulated and barely makes it halfway, while the veteran German commander easily swings his tank around directly behind the stricken Sherman.

The panzer's 75mm gun roars...

And Lt Barker's tank is destroyed in a catastrophic explosion that send the turret fifty feet into the air, before coming to rest with a massive 'thud' next to the hull.  There's no way anyone could have survived that mess...

Cpl Stichle, victorious but a bit shaken after experiencing five enemy rounds bounce off his tank, turns back east to make his report on the American probe and rejoin his platoon.

"Dammit," exclaimed SSG Smith, the Tank Plt's Platoon Sergeant, about half a mile to the west, "the Lootenat's tank just dropped off the net, I can't raise them."  "Sarge, you heard all that shootin', I bet they bought it."  "Shut up Bosley!  Listen up boys, here's what we're gonna do.  The Lootenat went straight in, but we're gonna hook around to the left and see what we can see.  I got the lead, everybody follow me."  With that, the four remaining tanks of the platoon pivoted and headed off to the northeast, skirting Al Egheila and setting the stage for the next tank fight, though along the way Snow's tank developed some sort of mechanical issue.  SSG Smith wasn't sure what the deal is; SGT Snow has seemed a bit pensive about heading into combat, hopefully this was a mechanical issue and not a 'mechanical issue.'

Anyway, that was a good bit of fun and we feel like we have a good understanding of the rules, just need to play some more games.  I love the activation system, very much like Chain of Command, lots of fun and lots of friction.  My only issue with the game was the lack of lethality: the American fired six times at (what I would gauge to be) 100 yards or less, scoring five hits, but didn't penetrate even once, costing the German tank two 'back-ups' and the temporary loss of a quite a few command dice (that the boy was great about buying back).  The German fired five times at 100 yards or less, scoring four non-penetrating hits, with one of them being a flank shot, and only killed the American tank with it's fifth shot, a shot on its rear armor.

I suppose that brings up my only other gripe: if you hit an enemy tank but don't penetrate, you may force the target to fall back.  Despite the fact the target moved straight back and is still in your line of sight, you now have lost your 'aim' and thus may not be able to fire again (this happened to me in the game), even though you just slammed a round into him and he only moved about fifteen yards, still in your field of vision and within fifteen degrees of your last shot.  I might house-rule that.

Anyway, the poor, overly-aggressive Lieutenant is gone, SSG Smith has taken over leadership of my attached tank platoon, with his first fight coming right up.

V/R,
Jack

15mm Platoon-Level Test Game #4

All, The Platoon Sergeant, Staff Sergeant Saunders, gathered the squad leaders to brief them, running the mission since Lt Hanley was still ...