
The Americans are as follows:
Overall Commander: Captain Henry, Armored Reconnaissance Company CO
Tank Platoon: 2nd Lt Hastings, 2nd Tank Platoon Leader
Sgt Gibson, Vehicle 4, 1st Tank Plt
Scout Car Platoon: Sgt Foster, Vehicle 2, Arm Car Plt (but he and his crew are on foot because his vehicle was immobilized during the previous battle, and when the Americans began to retreat, they were forced to destroy it rather than allow it to fall into enemy hands)
Tank Destroyer: Sgt Kidd, Tank Destroyer Plt (feeling very demoralized after the last fight, particularly given the fact the CO, Captain Henry, told him the best thing he could do to make up for his 'cowardly actions' in the last fight was to 'die in battle' in this fight)
1st Armored Recon Plt: 2nd Lt Woodson (led the repulsed attack on The Meatgrinder in the last battle, looking forward to an opportunity to redeem/prove himself)
Sgt Bienemy, 1st Squad, 1st Arm Rec Plt
Sgt Anderson, 2nd Squad, 1st Arm Rec Plt
Sgt Carrington, 3rd Squad, 1st Arm Rec Plt
Sgt Harrison, Machine Gun Squad, 1st Arm Rec Plt
Sgt Zgnonina, Mortar Squad, 1st Arm Rec Plt
2nd Armored Recon Plt: 2nd Lt Royals
Sgt Castle, 1st Squad, 2nd Arm Rec Plt
Sgt Hendrickson, 2nd Squad, 2nd Arm Rec Plt
Sgt Ravotti, 3rd Squad, 2nd Arm Rec Plt
Sgt Buckner, Machine Gun Squad, 2nd Arm Rec Plt
Sgt Mims, Mortar Squad, 2nd Arm Rec Plt
Engineer Platoon: Sgt Humphries, 1st Squad, Engineer Plt

The French force. Of note is the fact these men are from a Colonial (Moroccan) Battalion, so they are a actually defending their homeland and thus are a bit more invested than their conventional, European brethren. The French force consists of:
-A Commander
-His Executive Officer (XO)
-Two rifle platoons, consisting of three rifle squads, each
-An armored platoon consisting of one R35 Renault tank (the armored car was knocked out in the last fight)
-An artillery platoon consisting of two 75mm howitzers
-A weapons platoon consisting of a Platoon Leader, two Hotchkiss machine gun squads, and an 81mm mortar squad
Overview, now with troops. The French have their 1st Rifle Platoon dug-into 'Murderville' (center top), accompanied by the overall French commander, with their Weapons Platoon (mortar and MG) dug-in right behind them, just across the Wadi Sebou (right top), and the other MG dug-in atop Hill 34. The French 2nd Rifle Platoon is dug-in on The Meatgrinder (far right), where it is accompanied by one of the 75mm guns. The other 75mm gun is dug-in just behind Hill 34 (top right), and it is accompanied by the armored vehicles (R35 tank), which is hidden between the buildings east of the Wadi Sebou (top right). It should be noted that, unlike in the last fight, where the French occupied 'reverse-slope' type of positions, the Americans are now aware of their presence, so they have decided to move some of their weapons forward in order to have wider field of fire.
For their part, the Americans can be seen coming in from their baseline, with advance elements of the force clustered around the crossroads (left bottom) and approaching Purple Heart Hill (left top), with the 1st Armored Recon Platoon still mounted and taking the right-hand fork, on its way The Meatgrinder, while the 2nd Armored Recon Platoon has dismounted and is just passing Purple Heart Hill on its way to Murderville.
A look at the American left, where 2nd Armored Recon Platoon's heavy weapons (Sgt Buckner's MG team and Sgt Mims' mortar team) are set up atop Purple Heart Hill, in order to support Lt Royals' dismounted thrust into Murderville (top right), which is accompanied by Sgt Humphries' Engineer Squad. Shivers run up Sgt Kidd's spine as he is ordered to take his tank destroyer, accompanied by Sgt Foster's Scout Car crew (which is on foot), to the left of Purple Heart Hill, over next to Sgt Parker's knocked out tank (left), exactly where he started the last fight...
The CO, Captain Henry (left, on the road, just below Lt Royals' 2nd Armored Recon Plt), looks on as Lt Woodson's 1st Armored Recon Platoon, led by Lt Hastings and Sgt Gibson's M3 Stuarts, pushes towards the Meatgrinder (off camera to far right). Lt Woodson has had Sgt Harrison (MG) and Sgt Zgnonina (60mm mortar) dismount their weapons (center left) to support the attack.
The French 1st Platoon, dug-into Murderville, with their CO. You can see their Weapons Platoon dug-in across the river (top right).
A look at The Meatgrinder, defended by the dug-in 2nd Rifle Platoon, with its 75mm gun advanced a bit on the northern flank (top left) and the XO (center top), and now supported by the R35 tank (far right).
The French in the northeast, east of the river (Wadi Sebou), where a machine gun and the 81mm mortar team dug-in at bottom/far left, another machine gun dug-in atop Hill 34 (top center), and their 75mm dug-in on the road (right). The Laffly armored car is still burning at bottom right.
Time to fight!
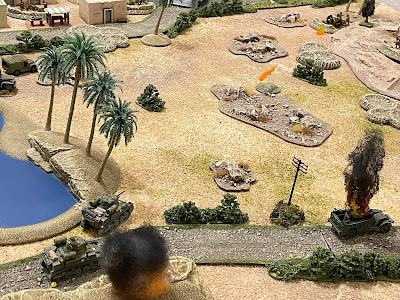
The fight begins with the French 75 at The Meatgrinder (bottom right) spotting Lt Woodson's tank-led column (top left) advancing up the hardball road and opening fire, pinning Lt Hastings' vehicle!
While the other 75, below Hill 34 (bottom right, with Murderville and Purple Heart Hill visible at top left, opens fire on Sgt Kidd's tank destroyer (top center left)...
The 75mm HE round hits well off target (bottom center), and Sgt Kidd's crew (bottom right) immediately returns fire, pinning the French crew.
As the French MG atop Hill 34 (bottom right) rakes Purple Heart Hill (top left, just beyond Murderville), pinning Sgt Buckner's MG team.
The French 81mm mortar team (bottom right) goes to work, targeting Lt Royals' platoon (top left)...
Sgt Castle's 1st Squad takes the brunt of the enemy mortar fire, knocking them out of the fight!
As the other French MG (bottom right) takes their own shot at Sgt Kidd's tank destroyer (top center)...
But they (top right) miss, too, and again Sgt Kidd's crew returns fire, pinning the French MG team.
*And then the craziest thing happened, and you won't believe me, but it's true. Fate had it in for old Sgt Kidd: the US rolled up a random event, and it was "Panic, a random unit is suppressed and falls back." I rolled a D12, and it landed on...

Sgt Kidd's tank destroyer, which immediately went suppressed and fell back behind Purple Heart Hill (far right, from center)...
So, in terms of the story, the tank destroyer's crew was calmly and efficiently going about their deadly business, but suddenly their distraught vehicle commander just broke: "Driver, reverse out, back behind Purple Heart Hill!" "What Sarge? Now? We're doing fine!" "Dammit, we're drawing too much fire, I said get us the hell outta here, NOW!" The tank destroyer crew was watching the anxiety over yesterday's fight, the constant fear of death, and the weight of command just break down their Sergeant, and it was terrifying. He'd been there rock, had made great decisions, kept them safe when all hell was breaking loose around them, and now here he was, unable to lead them, and now they were only too happy to cower behind Purple Heart Hill...
On the American right, Sgt Gibson pushed his M3 Stuart up to cover Lt Hastings' tank (bottom left), allowing them to rally, before firing on the French 75 on The Meatgrinder (top right).
But Sgt Gibson's (top right) 37mm HE round misses, and the French 75mm gun crew (bottom left) returns fire...
Immobilizing Sgt Gibson's tank and suppressing the crew, as well as Lt Hastings' crew!
Captain Henry immediately dashes forward to rally his understrength tank platoon, but the enemy fire is simply to hot: Sgt Gibson's crew rallies 'up' to pinned...
But Lt Hastings' panics and his tank falls back, suppressed (top left, from bottom right)!!!
Back in the US center, 1st Platoon's MG and mortar teams (bottom left) go to work, targeting the French 75 at The Meatgrinder (top right)...
And they manage to suppress the enemy gun crew.
As 2nd Platoon's heavy weapons, sited in atop Purple Heart Hill (bottom left), fires on the French 75 below Hill 34 (top right), but miss.
On the US right, Lt Woodson pushes his 1st Platoon forward, under enemy fire, rallying Sgt Gibson's tank crew as they go (Lt Woodson's vehicle has made it all the way up to Sgt Foster's burning Scout Car (center right), while Sgt Gibson's immobilized tank is just right of the oasis).
At The Meatgrinder, the French XO moves right to rally the 75mm gun crew...
They only manage to rally 'up' to pinned (bottom left), but they immediately resume firing on the US mechanized column (top center/right).
Immobilizing Lt Woodson's halftrack and pinning Sgt Bienemy's vehicle squad (yellow bead). Lt Woodson and his command team immediately bail out of the stricken halftrack; "it's okay boys, we'll walk from here!"
As Lt Woodson and his command team bail out (far right), Sgt Harrison's MG team (on roof at bottom left, with Sgt Zgnonina's mortar team just below them) spots the French 75mm gun (top center left) and opens fire, pinning the crew and the French XO!
But Lt Woodson's column (far left) is now drawing fire from the other French 75, too (bottom right, below Hill 34, with The Meatgrinder at bottom left and Murderville at center top).
Sgt Gibson's M3 Stuart (immobilized at center bottom) returns fire on the French 75 (to center), as the French HE round impacts atop the bluff at bottom center, pinning Sgt Carrington's 3rd Squad/vehicle.
The French mortar team (bottom right) continues firing on Lt Royals' 2nd Armored Recon Platoon (top left)...
But the shells are off target, actually impacting atop Purple Heart Hill, where Sgt Buckner's MG team is pinned (yellow bead) and Sgt Mims' mortar squad is 'men down,' taking casualties. The grunts of Lt Royals' platoon (bottom right) are just happy the to not be receiving fire...
As the French MG atop Hill 34 (bottom right) zeros in on 1st Armored Recon Platoon's heavy weapons (top left), rattling off a long burst, suppressing Sgt Zgnonina's mortar team and pinning Sgt Harrison's MG team.
With things largely going the French force's way, they get a bit saucy...
The French R35 light tank sallies forth from The Meatgrinder (far right bottom), moving directly up the road to engage Lt Woodson's mechanized infantry (far left/top left), spewing MG and 37mm HE rounds as he goes...
Lt Woodson's halftrack is no longer immobilized, it is now destroyed, and his command team is suppressed (red bead, with Sgt Bienemy's 1st Squad/vehicle pinned behind him)!
Captain Henry tries to rally Sgt Carrington's 3rd Squad/vehicle, but they're happy to stay right where they're at...
So he falls back to the crossroads and tries to get Sgt Zgnonina's mortar team (red bead at right) and Lt Hasting's M3 Stuart (red bead at left, with Sgt Harrison's pinned MG team -yellow bead- on the roof) back in the fight. The MG team is good, but the mortar team and Lt Hastings' tank only get up to pinned.
Meanwhile, Sgt Gibson (in his immobilized tank, left bottom) continues sending 37mm HE rounds at the French 75 at The Meatgrinder (top right), suppressing the crew and the French XO.
And 1st Platoon's heavy weapons (bottom left) fire on French forces east of the river (top right)...
Sending the French 75 below Hill 34 'men down'!
While 2nd Platoon's heavy weapons (atop Purple Heart Hill, bottom left), harmlessly exchanges fire with the French MG atop Hill 34 (top right).
But then 1st Platoon's MG team, under Sgt Harrison (bottom left), opens fire on Hill 34 (top right) as they're trading fire with 2nd Platoon's heavy weapons (atop Purple Heart Hill, far left), and suppressed the French MG team!
On the French left, their R35 light tank (bottom center) begins firing on Purple Heart Hill (top center left), keeping Sgt Buckner's MG team pinned down.
French infantry dug-in on The Meatgrinder (bottom right) return fire on 1st Platoon's heavy weapons at the crossroads (top left), to no effect. On their right (just visible at far right), the French XO and 75mm gun crew attempt to self rally...
But they both fail and fall back (red beads at bottom center, from top right)!!!
The left-hand French rifle squad moves over (from off camera to far left) to help...
The French XO is rallied, but the gun crew is panics and runs!!! The French XO immediately moves to re-man the abandoned 75mm gun.
In the northeast, the French Weapons Platoon leader falls back to help rally the 75mm gun crew below Hill 34 (far right, from far left) as the two MG team (far left and top center) attempt to self rally.
The MG team in the trench (top center) and the 75mm gun crew ar ready, but the MG team atop Hill 34 panics and falls back (far right, from top center right).
Back at the crossroads, Captain Henry keeps working to rally the troops: Sgt Zgnonina's mortar team (yellow bead at center right), but Lt Hastings' tank (yellow bead at left) panics!
Captain Henry then pushes forward, up to the head of the column, where he sets about rallying Lt Woodson's beleaguered platoon. Sgt Bienemy's 1st Squad (yellow bead at center) is good, but Lt Woodson's command team (between them and the command stand) begins to panic and fall back!
They retreat back to Sgt Gibson's immobilized tank (red bead at left, from far right), before Lt Woodson can get them calmed down and back in the fight! But having seen Lt Woodson's command team bolt, now Sgt Carrington's 3rd Squad/vehicle (yellow bead at bottom left) panics!
*The CO tried to rally them and they failed and fell back, but then they were able to self rally.
Meanwhile, Sgt Bienemy is getting aggravated and decides to take things into his own hands: he orders his vehicle forward, where he and his squad dismount (center bottom).
On the left, Sgt Foster moves over to help 2nd Platoon's heavy weapons and Sgt Kidd's tank destroyer rally back into the fight (center, on Purple Heart Hill); the heavy weapons teams are good to go, but Sgt Kidd's tank destroyer crew has had enough and leaves the battlefield (far left)...
Finally, Lt Royals' is able to get his 2nd Platoon (minus 2nd Squad and with Sgt Humphries' Engineer Squad attached) moving towards Murderville, with his lead elements reaching the Engineer Platoon's abandoned trucks (far right).
1st Platoon's heavy weapons (at the crossroads, center bottom) open fire on The Meatgrinder (top center right), suppressing a French rifle squad.
As 2nd Platoon's heavy weapons (atop Purple Heart Hill, bottom left) engage Hill 34 (top right)...
The French 75mm gun crew goes 'men down' again, while the French Wpns Plt leader and MG team are suppressed!!!
But the big development is over on the US right...
As Sgt Bienemy's 1st Squad, 1st Armored Recon Platoon, moved up, they brought Cpl Greene and his bazooka with him!
Cpl Greene and his assistant gunner creep past Sgt Bienemy's squad, up behind a nearby palm, where they calmly set about lining up a shot on the French light tank, then loosed a rocket...
WHAM!!! The French tank goes up in flames!!!
A cheer goes up on the US right...
And then Sgt Bienemy leads his squad and Cpl Greene's bazooka team up to the knocked out French tank!
Further back, Captain Henry rallies Sgt Carrington's 3rd Squad/vehicle, then Lt Woodson and his command team hop in with them...
Lt Woodson orders the 2nd and 3rd Squad halftracks forward, up to Sgt Bienemy's position (bottom right).
The French 81mm mortar team (bottom right) opens fire on Lt Woodson's platoon (top left, with The Meatgrinder at far left)...
But the 81mm HE rounds fall harmlessly in the desert, short of their intended target!
Sgt Gibson, despite his tank being immobilized (bottom left), just keeps hammering away at the French, this time engaging the French mortar team (top center right), suppressing them!
Back at The Meatgrinder, the French XO and his command team manhandle the 75mm gun back into its firing position (top right)...
But Sgt Buckner's MG team, atop Purple Heart Hill (bottom left), spots the movement (top right) and opens fire, suppressing them!
The French rifle squad that rallied their XO now moves up to try and rally a suppressed French squad on The Meatgrinder (far left)...
But Sgt Harrison's MG team (bottom left) spots them (top right) and opens fire...
Causing the previously suppressed rifle squad to panic and fall back (red bead at far right, from far left)!
While over at Hill 34, the French are in a real jam, and it's going to take a while for them to get out of it. The French Weapons Platoon leader (red bead at center bottom) successfully rallies, and now at least is in position to assist the MG team (right of him) and the 75mm gun crew (bottom center) in rallying, but then he'll still need to get back up to the trench (red bead at center left) to rally the 81mm mortar team.
On the other side, back at the crossroads, Captain Henry again tries to rally Lt Hastings' M3 Stuart...
"Sir, we're having problems with our engine and transmission, we need to get back to Maintenance." "Lieutenant, we need that tank up there, in the fight," replied Captain Henry.
"I'm sorry, Sir, my tank needs maintenance, right now, we're combat ineffective," and with that, Lt Hastings and his crew pivoted their tank and departed the battlefield, leaving Captain Henry looking on in disbelief...
Atop Purple Heart Hill (bottom left), 2nd Platoon's heavy weapons engage the French Weapons Platoon in their trench (top right)...
The French MG team there (far right) goes 'men down,' while the 81mm mortar team, already suppressed, panics and falls back (red bead at bottom left)!
As 1st Platoon's heavy weapons (bottom left) fire on Murderville (top right), in support of Lt Royals' 2nd Platoon (center), pinning a rifle squad.
Despite only getting one rifle squad pinned, Lt Royals leads his platoon (and attached engineers) forward, into Murderville, though not yet near enough to move into close combat.
French infantry atop The Meatgrinder (bottom right) spot Lt Royals' platoon (top center left) and open fire...
While on the far right, for the second time in two days, Lt Woodson pushes his halftracks up and behind The Meatgrinder (far right, from bottom left), as Sgt Bienemy pushes his squad forward, crossing the open ground on foot (left).
Lt Woodson and his 2nd and 3rd Squads immediately dismount!
A nearby French squad (bottom left), up on The Meatgrinder, fires down on Lt Woodson's 1st Platoon...
Suppressing Sgt Anderson's 2nd Squad (red bead at bottom center), as Lt Woodson and Sgt Carrington's 3rd Squad (far left) return fire...
Knocking out the French squad, and suppressing the rifle squad further down slope (right top)!
*I actually messed up and did this out of sequence, so you'll actually get to see the rifle squad on the right get to fire in a couple pictures, which is actually before this happened. That is, I let the Americans return fire before I should have, because it made sense as I was doing it, though technically incorrect in the rules (and I agree, the French squad is suppressed, but should gets its opportunity to fire, first, because the French rolled up a 'Firefight,' which means all their units that are able get to fire, then all the US units that are able get to fire).
On the French right, the infantry in Murderville open fire on Lt Royals' 2nd Platoon, pinning Lt Royals' command team and Sgt Ravotti's 3rd Squad.
Before the French rifle squad atop The Meatgrinder (bottom right, the suppressed one we were just talking about, with red bead) opens fire on 2nd Platoon (top left)...
Suppressing Sgt Humphries' Engineer Squad (red bead at far left) and knocking out Sgt Castle's 1st Squad (center)!
And then a French rifle squad in Murderville (bottom right) does the same thing, firing across the battlefield, this time at Sgt Bienemy's 1st Squad, 1st Platoon (top left), nearly on The Meatgrinder...
And Sgt Bienemy's squad is knocked out!
Sgt Gibson, still fighting from his immobilized Stuart (bottom left), spots the French rifle squad (top center) that just knocked out Sgt Bienemy's squad (off camera to far right) and opens fire, suppressing them!
As 1st Platoon's heavy weapons (at the crossroads, bottom left) fire on The Meatgrinder (top right), keeping the French riflemen and 75 pinned down.
And 2nd Platoon's heavy weapons (bottom left, atop Purple Heart Hill) fire on Murderville (right)...
Forcing a French rifle squad to panic and fall back, across the bridge!
And pinning the French CO (yellow bead at center).
**Unlike the last fight in Murderville, where the French CO was key to the defense, he really hasn't had any impact on this fight, hasn't really had an opportunity.
Captain Henry moves up (center, from off camera to bottom left) to support Lt Royals' push on Murderville (top right), but doesn't make it.
**Shades of Lt Richards' failed attempt from the last fight, which ended in his untimely death...
While back on the far right, Lt Woodson rallies Sgt Anderson's 2nd Squad (red bead)...
And then leads Sgt Carrington's 3rd Squad into close combat!
They quickly put the French squad out of action!
Then charge up the back side of The Meatgrinder, again into close combat!
Another enemy squad goes down!
And then the marauding Americans descend on the French XO, manning the 75mm gun...
Knocking them out, as well.
Blood in their eyes, Lt Woodson leads 3rd Squad forward, up to the bridge (center, from bottom left, with Murderville at top center and Hill 34 off camera to far right)!
Lt Woodson's path of destruction across The Meatgrinder. Three French rifle squads and their Executive Officer knocked out, and a 75mm gun captured.
With American infantry closing in from the direction of Purple Heart Hill (off camera to top left) and now behind him (Lt Woodson, off camera to bottom left), short on ammunition, having suffered heavy casualties, the French commander surveys the battlefield, and doesn't take but a moment to make up his mind. Completely spent, the French CO rises to his feet and pats himself off, oblivious to the bullets impacting all around him, the shrapnel whizzing past him, and begins signaling his men to lay down their arms and surrender.
The French-Moroccan soldiers, dejected, begin lining themselves up for surrender, as Lt Woodson (bottom center) signals the other American units to cease fire.
Except the French troops in the northeast; the French Weapons Platoon leader orders his men to spike the gun, and then they, the gun crew, and the MG team from Hill 34 withdraw.
Yes, righteous victory for the Yanks, and sweet revenge! Okay, not sweet revenge as it's the French, but they sure did rough old Task Force Reisman up in that first fight. Hell, they roughed TF Reisman up in this fight, too, but at least the US troops own the battlefield. But man, what a great couple of fights! It was a lot of fun, if maybe a bit too... harsh, or aggressive, for the fighting between the US and French during Operation Torch? That certainly wasn't my intent, but once I put the toys on the tabletop I can't help but get stuck in! Didn't intend on doing this many fights for Operation Torch, either (it's looking like it's going to be seven), but again, once I get started it's hard to stop...
Let's get to some stats:
-the US had 15 men killed, wounded, or missing


Another exciting read, thanks for posting Jack. And well done to Lt. Woodson! As so often in an engagement, it seems to be that one set of actions by one leader seems to somehow tip the balance quite quickly...
ReplyDeleteHi John, and thanks! Yes, Lt Woodson has turned into the quite the small-unit leader, a real dog in the fight. And yes, I really enjoy how things seem to turn on whether someone is able to step up or not (please recall that he was the one that failed in the first attempt to take 'The Meatgrinder'), but it does feel a bit too easy sometime, so I've been giving a lot of thought on how to 'slow' the rules down a bit.
DeleteI'm down to two options:
1) stop allowing units that won a close combat to make a follow-on 'exploitation' move (i.e., only allow one close combat fight per turn), or
2) play on a larger table, making the attacker travel farther/work harder to actually get into close combat, thereby theoretically having more fights decided by the application of overwhelming firepower vice flesh and steel.
I'm leaning towards the latter; my thinking is that it should be difficult to get to grips with the enemy, but when you have 1) the opportunity and 2) the man for the job, it should be quite decisive.
VR,
Jack
Those are two interesting ideas Jack. I suppose the question that occurs to me is how even/random close combat is supposed to be. When reading your AARs, if close combat is entered I am expecting the attacker to win and I am very surprised if they don't. I don't know the odds in the rules so I am inferring that from the posts. If that is true, I wonder if the defender is doing enough to avoid close combats i.e. the decisive outcomes are partly due to defenders choosing to stay strong a bit too long? Just a thought.
DeleteJohn,
DeleteVery interesting. You mention expecting the attacker to win every time; I don't think there is a problem with the mechanics, it's just that I'm typically not close assaulting an enemy position unless/until they are at least pinned and usually suppressed or 'men down,' which puts the odds very much in the attacker's favor.
"...I wonder if the defender is doing enough to avoid close combats..."
Here is where I think the issue lies. Part of this is my concept that if I'm playing it on the table then by definition the defender has decided to make a stand, that the vast majority of fights would be attacker approach objective, run into obstacles, MG, and mortar fire (maybe even some supporting fires), and either the attacker withdraws or he presses home and the defender withdraws, prior to any 'crossing of bayonets.'
So I'm playing these 5Core Company Command games not showing what's come before (mechanical breakdowns, minefields, MG/mortar fire at optimum engagement ranges), just the last 300 yards, and both sides have decided this is a key engagement (or have been caught out, unable to easily withdraw), so we pick up the start of the game and both sides are determined to own the objective (mostly).
But it's still too much close combat, even for my 'Hollywood' style of game. But sides are always steely-eyed killers, as there's no morale test to close and no morale test to stand but, perhaps more importantly, there's no Force Morale (FM) mechanism for a side to decide to throw in the towel prior to simply being overrun...
So you have FM and are having a problem with games going to short, and I don't have FM and am having a problem with games going too bloody ;)
But it is tough for me because, as you mentioned, so many of the games are ultimately decided by that one close combat/series of close combats, and I really do enjoy the drama ;)
V/R,
Jack